PIANOTEQ 8 - User Manual
Welcome
Congratulations on your purchase of Pianoteq.
Pianoteq is the starting point of a new generation of physically modelled virtual instruments, developed from mathematical research made at the Institute of Mathematics of Toulouse at INSA Toulouse, France.
Do not hesitate to contact us if you need any assistance on how to install and use the software. You are also welcome to provide feedback and suggestions - www.modartt.com/support
Table of Contents
- 1. Introduction
- 2. Installing and starting Pianoteq
- 2.1. Installation for
Windows - 2.2. Installation for
macOS - 2.3. Installation of new instrument pack
- 2.4. Using Pianoteq standalone
- 2.5. Using the
VST/VST3/AU/AAXplug-in - 2.6. Hardware requirements
- 2.7. Adapt Pianoteq to your hardware
- 2.8. Quickly loading
fxp,ptqandMIDIfiles - 2.9.
MIDIfile player (standalone version) - 2.10. Interface magnification
- 2.1. Installation for
- 3. Instruments
- 3.1. Acoustic pianos and predecessors
- 3.1.1. Steinway Model D grand pianos
- 3.1.2. Steinway Model B grand piano
- 3.1.3. Shigeru Kawai SK-EX Concert Grand
- 3.1.4. Bösendorfer Concert Grand 280VC
- 3.1.5. C. Bechstein Digital grand piano
- 3.1.6. Ant. Petrof 275 and Petrof 284 Mistral grand pianos
- 3.1.7. Steingraeber E-272 grand piano
- 3.1.8. Grotrian Concert Royal grand piano
- 3.1.9. Blüthner Model 1 grand piano
- 3.1.10. K2 grand piano
- 3.1.11. YC5 Rock grand piano
- 3.1.12. U4 upright piano
- 3.1.13. Karsten Collection
- 3.1.14. Kremsegg Collection
- 3.1.15. Hans Ruckers harpsichord
- 3.2.
KIViRcollection - 3.3. Classical Guitar
- 3.4. Harp
- 3.5. Electric pianos
- 3.6. Hohner Collection
- 3.7. Vibraphones
- 3.8. Xylophone and Marimba
- 3.9. Toy piano, Celesta and Glockenspiel
- 3.10. Steelpans
- 3.11. Other instruments
- 3.1. Acoustic pianos and predecessors
- 4. Managing instruments and presets
- 5. Keyboard Components
- 6. Morphing and Layering
- 7. Tuning panel
- 8. Voicing panel (acoustic)
- 9. Voicing panel (electro-acoustic)
- 10. Voicing panel (clavinet)
- 11. Design panel (acoustic)
- 12. Design panel (electro-acoustic)
- 13. Velocity panel
- 14. Output panel
- 15. From action to effects
- 16. Practice
- 17. Pianoteq PRO
- 18. Appendix: temperaments construction
- 19. Special acknowledgements
- 20. Intellectual property
1. Introduction
1.1. The fourth generation of pianos
The first generation of pianos, starting in 1698 with Cristofori’s pianoforte, came to maturity at the end of the XIX century with the acoustic grand concert piano. It was followed in the XX century by electro-acoustic pianos, and then by digital sampled pianos.
Pianoteq introduces the fourth generation of pianos, based on physical modelling. It offers extraordinary playability and unique physical parameters that model the behaviour of real acoustic pianos.
With Pianoteq, you can adapt the piano sound to your own taste. Unique parameters that model the behaviour of real pianos result in great realism, until now only to be experienced on real acoustic pianos.
Using 32-bit internal computation, the calculated piano sound is free from quantization noise. True dynamic timbre results, from the faintest pianissimo to the strongest fortissimo, for all 127 standard MIDI velocities (and even more with high resolution MIDI).
Everything that characterizes a real piano is there: the mechanical noises, the complex sound of pedals and strings in interaction, the percussive impact on staccato play (short notes), and of course, most importantly, the beauty of the piano sound.
The second generation brought innovative sounds (such as the Fender Rhodes, Wurlitzer, Yamaha CP 80, and others), whereas the third generation only reproduced recorded samples. Based on an effective physical model, Pianoteq allows you to adjust and stretch parameters, resulting in new sounds and performance styles. Pianoteq is both a way to emulate existing pianos and an innovative tool for music creation.
Pianoteq is in fact the first virtual piano factory: it can produce new brands as well as copies of existing instruments, from historical instruments such as harpsichords and pianofortes to contemporary grand pianos or the more recent electro-acoustic pianos.
Other instruments of the idiophones family are regularly added to the Pianoteq collection. Visit our website www.modartt.com and discover our latest creations.
1.2. What makes Pianoteq outstanding
- It is the first of a new generation of pianos, issued from an outstanding breakthrough technology based on physical modelling. Notes are really played (“constructed” in real-time, as on a real piano), not just read from the disk or the memory. This explains why the sound is alive, not static: it is not a simple recording, it is a genuine instrument that responds to the pianist’s finest interpretation.
- It has been developed in the prestigious Institute of Mathematics of Toulouse, at the Institut National des Sciences Appliquées in Toulouse, France. Two specialists from this laboratory have been working hard to create this beautiful instrument. Conception of the physical model is from Philippe GUILLAUME, piano tuner, musician, and mathematician whose “Grail” is finding the equations for the “piano soul.” Implementation is from Julien POMMIER, engineer and mathematician, who implemented the physical model to work in real time.
- It is light: it does not require storing huge data involving a whole collection of DVD’s, since it only needs an up-to-date
CPUfor computing all sounds in realtime. It loads easily into RAM, and installation is instantaneous. No problem using it on a laptop. - It can handle ultra low latencies with good audio drivers on a recent
CPU. - It offers a beautiful collection of stunningly alive instruments: pianos, pianoforte, piano precursors such as harp, cimbalom, clavichord and harpsichord, electro-acoustic and electric pianos, chromatic percussions and other instruments from the idiophones family.
1.3. Pianoteq versions
Pianoteq is available in three versions:
- PIANOTEQ STAGE is for musicians who want to plug it in and play without tweaking the physical model. It includes standard features such as velocity curve, dynamics, action settings, EQ, tremolo, wah-wah, chorus, flanger, phaser, compressor and other effects.
- PIANOTEQ STANDARD offers in addition powerful tools to tweak and adapt the physical model, as well as the positions of the microphones.
- PIANOTEQ PRO goes even further. Its
Note Editfeature allows those who require complete freedom in note shaping to edit the parameters note-by-note.
All versions offer the same sound, instruments and playability but differ in the range of features and settings. The table below summarizes the main differences between the three versions.
| PIANOTEQ STAGE | PIANOTEQ STANDARD | PIANOTEQ PRO | |
|---|---|---|---|
| Included instrument packs1 | 2 | 3 | 4 |
Free KIViR historical instruments |
✓ | ✓ | ✓ |
VST, AU, AAX, NKS, Standalone |
✓ | ✓ | ✓ |
| EQ, velocity curve, reverb unit | ✓ | ✓ | ✓ |
Preset (fxp) loading2 |
✓ | ✓ | ✓ |
| Piano model tweaking | ✓ | ✓ | |
| Advanced tuning | ✓ | ✓ | |
| Microphones setting | ✓ | ✓ | |
| Loads external reverb impulses | ✓ | ✓ | |
Instrument Morphing and layering (Layers) |
✓ | ✓ | |
Note-per-note edit: Volume, Detune, Attack Envelope |
✓ | ✓ | |
| Note-per-note edit: all other physical parameters | ✓ | ||
| Thousands of editable overtones | ✓ | ||
| Supports up to 192 kHz audio3 | ✓ |
[1] These instrument packs are fully working whereas remaining instrument packs are available in demo mode for your evaluation. You can purchase additional instrument packs at any time.
[2] In PIANOTEQ Stage, preset loading is limited to parameters that are present in the interface. Presets built with PIANOTEQ PRO can be loaded in PIANOTEQ Standard without limitation.
[3] PIANOTEQ PRO offers an internal sample rate of up to 192 kHz. Up to 48 kHz in PIANOTEQ Stage and Standard.
This manual describes the general features that can be found in Pianoteq. Depending on your version, some of them may or may not be present.
1.4. Features in short
Pianoteq is equipped with many exciting features:
- Continuous velocity from pianissimo to fortissimo, with progressive variation of the timbre: that makes at least 127 velocities! A sample-based software program would require hundreds of gigabytes for all these velocities
- Complex resonances that only a model can reproduce in all its richness:
- Sympathetic resonances of all strings, both without and with sustain pedal
- Duplex scale (the undamped string parts which come into resonance)
- Damper position effect when key is released (variable overtones damping)
- Other specific effects like staccato and sound continuation when pressing down the sustain pedal a short time after key release (re-pedalling)
- Instrument morphing, which allows you to create hybrid instruments. The morphing is done at the physical modelling level, providing an acoustic authenticity to instruments that never existed
- Instrument layering, which allows you to mix different instruments, e.g. Harp in the low range, Vibraphone in the upper range and mixing both together in the middle range
- Extended key range to 105 keys for some grand pianos (Steinway Model D, K2)
- Timbre modification of repeated notes, due to the hammer striking strings which are already in motion instead of being still
- Polyphonic Aftertouch (particularly interesting for the clavichord)
- Four "physical" pedals with eleven possible assignements (see chapter 14), including in particular:
- Progressive sustain pedal allowing the so-called “partial pedals” 5
- Sostenuto pedal, allowing you to hold some notes after release without pressing down the sustain pedal
- Harmonic pedal, allowing you to play staccato while maintaining the sustain pedal resonance (not available on acoustic pianos)
- Una corda pedal, also called the soft pedal, modifying the sound quality or timbre by shifting the piano action to the right (on grand pianos)
- Variable lid position
- Natural instrument noises (sampled or modelled) including action key release noise, damper noise at key release (bass notes) and sustain pedal noise: pedal velocity dependent “whoosh” produced by the dampers rising together from the strings or falling down
- Microphone positioning and multichannel mixing (up to 5 mics, 5 channels)
- Microtuning and
scalaformat files import - Keyboard, pedal and note-off velocity settings
- Sound control via equalizer and (volume) dynamics
- Built-in convolution reverberation, allowing you to import
.WAVimpulses - Standard effects: delay, chorus, flanger, phaser, fuzz, tremolo, wah-wah, amplifier, compressor, three bands equalizer
EQ3 - Original hammer bouncing feature, interesting for chromatic percussions (marimba, xylophone, cimbalom, ...)
- Instrument condition control, from freshly-tuned to completely worn-out.
[5] If your piano supports a fine enough
MIDIprogression (up to 127 values) for the sustain pedal.
2. Installing and starting Pianoteq
Pianoteq works on computers equipped with Windows, macOS or Linux. You can use Pianoteq in standalone mode or as a plug-in instrument in a VST, VST3, Audio Units or AAX host. Pianoteq runs in 64-bit mode. We recommend visiting www.modartt.com where you will find the latest information, a detailed FAQ page and a tutorial on how to connect your hardware.

2.1. Installation for Windows
Execute the installation program file pianoteq_setup.exe. Activation is required when launching Pianoteq for the first time. Just follow the on-screen instructions. ASIO drivers are necessary for obtaining a low latency. If using a soundcard that is not distributed with its own ASIO drivers, you can download ASIO drivers at www.asio4all.com.
2.1.1. Optimization
If you experience pops and cracks when playing, watch the audio load and CPU frequency in Options ► Perf:
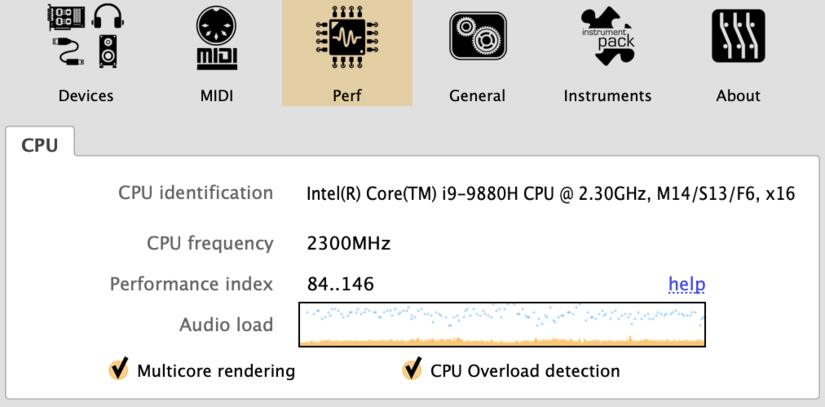
Red bars in the graphic indicate an overload. In that case, look at the displayed CPU frequency. If this frequency varies or stays below the normal frequency of your CPU, it comes from the Power Management setting of your computer which should be set to High Performance.
2.2. Installation for macOS
Click on the Pianoteq package and follow the instructions. Activation is required when launching Pianoteq for the first time. Just follow the on-screen instructions.
2.3. Installation of new instrument pack
To install a new instrument pack that you purchased, make sure you have the latest update installed. Log in to the user area on our website to download. After updating to the latest Pianoteq version, update your licence as follows: click on Options, then on About, then on Update licence. There, leave the serial number as it is and click on Quick Activation. If your computer has no internet connection, you need to click on the Manual Activation button and follow the instructions given.
2.4. Using Pianoteq standalone
Using Pianoteq standalone is very simple. Launch Pianoteq and specify your audio and MIDI settings in the Devices dialogue box: you are ready to play.
2.5. Using the VST/VST3/AU/AAX plug-in
Pianoteq can be loaded by any VST, VST3, Audio Units or AAX host. You will need to specify, inside the host, your MIDI device and the driver you are using.
2.6. Hardware requirements
Pianoteq can be used with any MIDI compatible keyboard. We recommend a touch sensitive keyboard, such as one with full weighted keys simulating the hammer response of a real piano. See tutorial section 16.4 for adapting Pianoteq to your keyboard in the best way. For partial pedalling, a progressive sustain pedal is required.
The requirements for using Pianoteq successfully are:
- Recent
CPU - 512 MB
RAM ASIOcompatible sound card and drivers (concerns Windows users only)- Internet connection (if activating the software using quick online method, otherwise see modartt.com/pianoteq/faq)
Windows7 (64-bit) or later,macOS X10.11 or later,Linux(x86andARM).
2.7. Adapt Pianoteq to your hardware
When you click on the Options button, a window containing the following sections appears:

The Devices section (in standalone mode only) lets you select your keyboard, audio device and related driver (Audio device type), output channels, sample rate and audio buffer size.
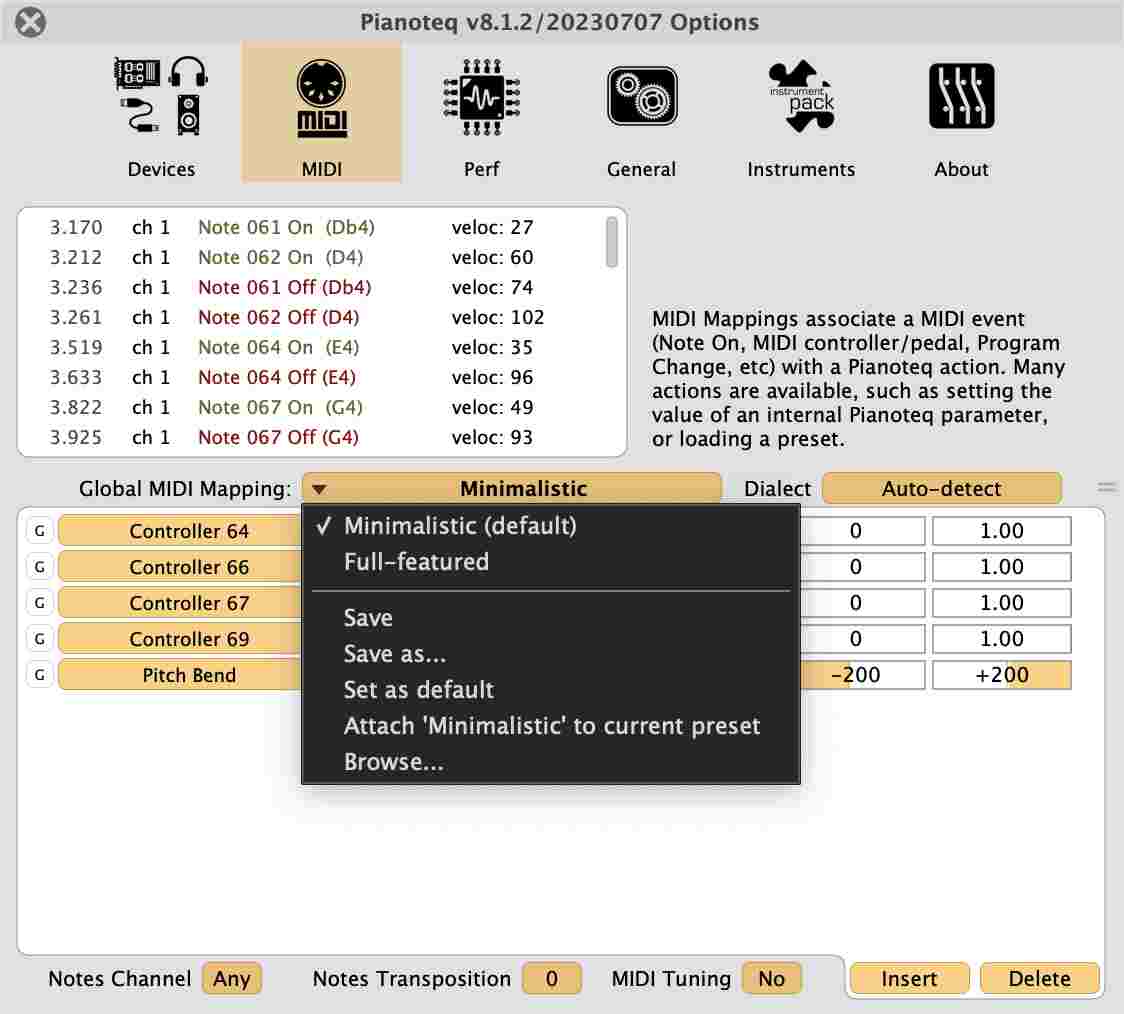
In the MIDI section you can:
- Assign
MIDIcontrollers to Pianoteq parameters (experienced users only ― may produce unexpected sounds withMIDIfiles containing special instructions). - Unassign all controllers except pedals and Pitch Bend by choosing
Current MIDI Mapping: Minimalistic(recommended for starting). - Transpose notes by up to 3 octaves.
- To save your
MIDI mappingsetting, click onSave asand enter a suitable name. If you want Pianoteq to always load yourMIDI mappingpreset, click onSet as default. If you want Pianoteq to always load your savedMIDI mappingpreset when you load a specific instrument preset, click onAttach to current preset, close theMIDI mappingwindow and save your instrument preset by clicking the floppy disk icon.
Pianoteq computes all notes dynamically (that is, in real time). Thus a modern CPU is required. Bass notes contain more overtones and thus require more computations. The Perf section allows you to select from among the following features:
Multicore rendering. You should usually enable this feature.CPU overload detection. Under certain circumstances (a slowCPU, very fast music), theCPUmay be overloaded by the number of required computations.CPU overload detectionmight be useful for real time processing, for example when 10 seconds of sound require 12 seconds ofCPUcomputations. Some computations are then bypassed.Internal Sample Rateaffects the internal sampling rate of Pianoteq. A lower frequency requires less computation. Thus the lower the capacity of yourCPU, the lower you should set this sample rate.- The
Polyphonyis the number of individual sounds (notes, sympathetic resonances…) that are played simultaneously. The lower the capacity of yourCPU, the lower you should set the polyphony. Alternatively, you can chooseAuto (Pessimistic or Optimistic)for an automatic polyphony setup.
2.8. Quickly loading fxp, ptq and MIDI files
You can load fxp and ptq files (and MIDI files with the standalone version) quickly by dragging each file at a time, from the file manager, email client or web browser, onto the Pianoteq interface.
2.9. MIDI file player (standalone version)
The Pianoteq standalone version is equipped with a MIDI player that lets you play and record MIDI files. You can load several MIDI files via File ► Load MIDI file and even create your own MIDI Playlist via File ► Manage MIDI Playlist. A long left-click on the MIDI score let you zoom-in for a better precision.
2.9.1. Playback speed
You can adjust the playback speed by clicking on x1 (“times 1”). A menu will appear where you can choose another value or enter any value between 0.1 and 10. Alternatively, click on x1 and drag the mouse to get the value you want.

2.9.2. Record and Save your performance
Click on the record button to start recording your performance live.
Save your MIDI file by opening the File menu. There you can also export your recording to a WAV, FLAC or MP3 audio file.

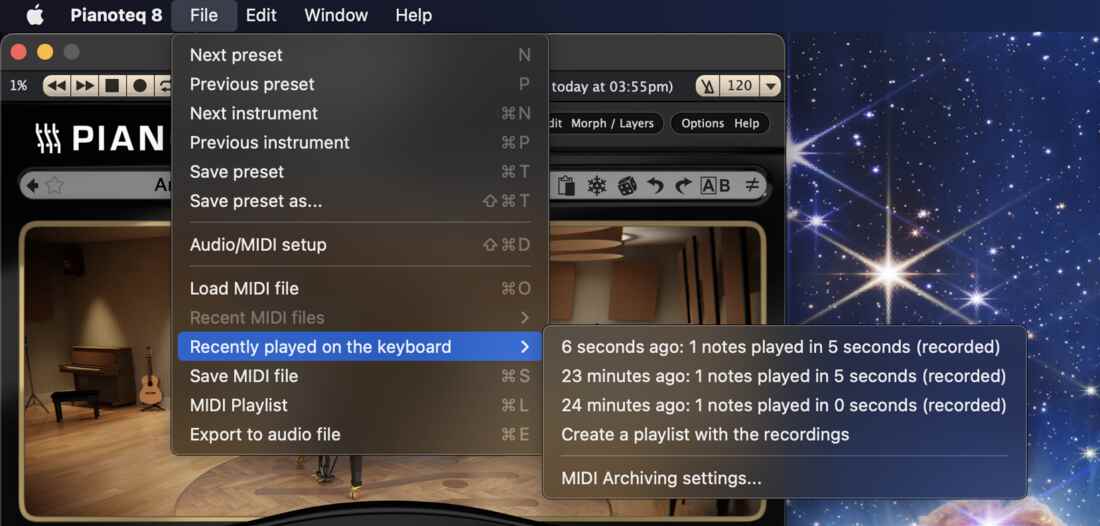
2.9.3. Brilliant performance lost?
At any time, you can retrieve your recent performances via File ► Recently played on the keyboard. Particularly useful when after a brilliant performance you think “too bad I didn’t record this!”. Well, Pianoteq did it for you: just load the latest Recently played on the keyboard and save/export it to a regular MIDI/AUDIO file. It’s as simple as that!
For less recent performances, a MIDI Archiver is available, access to its settings at the bottom of the Recently played on the keyboard menu.
2.9.4. Step by step in your MIDI file and editing
In the standalone version, for exploring your MIDI file step by step, forwards or backwards, use the computer keyboard right or left arrows to play single notes or chords. Using right click in the MIDI player, you can remove events placed before or after the current position.
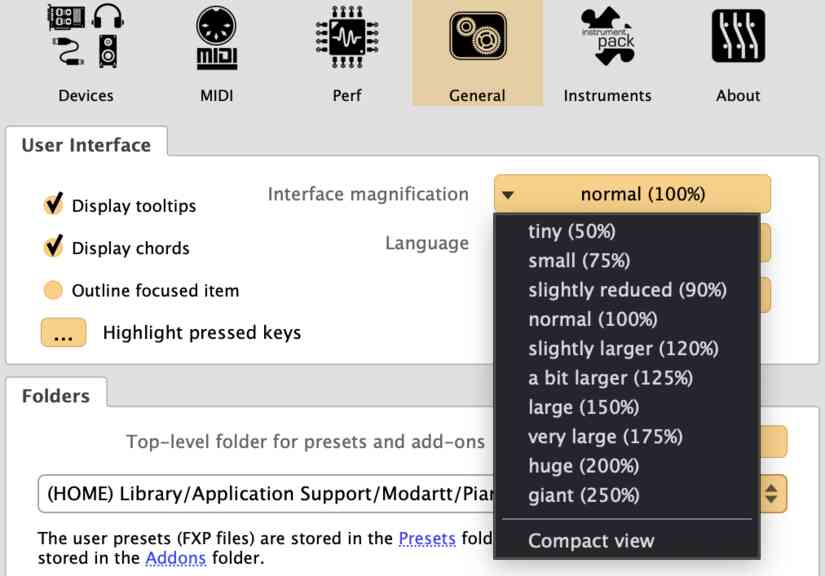
2.10. Interface magnification
The Pianoteq interface is resizable, making it comfortable to work with any display size. Click on Options ► General and select the size in the Interface magnification menu, or simply use the handy keyboard shortcuts +/-:
3. Instruments
Pianoteq instruments are based on physical modelling ― which simulates the way the sound is generated and how it propagates in space ― coupled to a mathematical analysis of original instruments.
The optional instruments are included in demo mode in Pianoteq for your evaluation. You can download additional free instruments from the user area at www.modartt.com.
3.1. Acoustic pianos and predecessors
3.1.1. Steinway Model D grand pianos
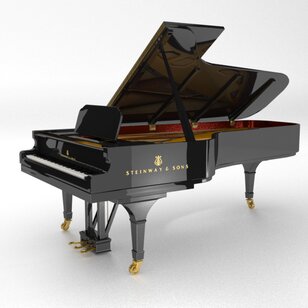
Authorized by Steinway & Sons, the Steinway Model D pack contains two virtual copies of Steinway D grand pianos, well known for their exquisite musical expression: one manufactured in New York (NY Steinway D) — in fact the very first produced of Steinway’s groundbreaking new flagship instrument Model D Spirio|r, which has been used by some of the most famous pianists in the world today — and one manufactured in Hamburg (HB Steinway D). New York and Hamburg Steinway pianos are very much like twin siblings that share strong family traits but exhibit subtle differences in their personalities. These differences can be attributed in part to the variations in hammer construction and voicing techniques utilized in both production facilities. Proprietary procedures in soundboard fabrication and installation unique to each factory also flavor the nuanced tonal distinctions between Hamburg and New York Steinway pianos. Both use soundboards that are constructed from carefully selected premium Sitka spruce wood. Within Pianoteq, each note of each virtual instrument has been carefully adjusted in its finest detail, just like in the real factory. The result is stunningly vivid instruments created with the most demanding musician in mind.
3.1.2. Steinway Model B grand piano
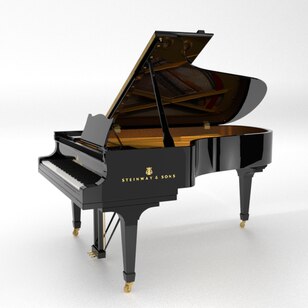
Authorized by Steinway & Sons, the Steinway Model B grand piano was carefully designed to reproduce the finest sound characteristics of a Steinway B instrument which was selected by Modartt for this project. This model is based on the Martha Argerich edition, and is one of the twenty-five Steinway & Sons Model B-211 grand pianos that the prestigious pianist carefully chose in 2014 for their musicality. She signed each.
3.1.3. Shigeru Kawai SK-EX Concert Grand
The Shigeru Kawai SK-EX Concert Grand piano is meticulously handcrafted to perfection in Japan, involving Master Piano Artisans, with less than 20 units made each year to achieve an extraordinary tone and stunning response. Authorized by KAWAI, Modartt’s physical model brings a piano sound with authority and exceptionally broad dynamics, making it ideal for pianists, producers, and composers as it captures the essence of this prestigious instrument, from its hand-wound temaki bass strings to the shimmering brilliance of its highest notes. Different configurations of microphones, room settings, and piano voicing increase flexibility for various musical styles and creative approaches.
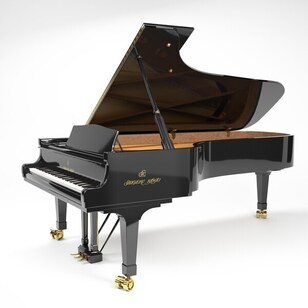
3.1.4. Bösendorfer Concert Grand 280VC
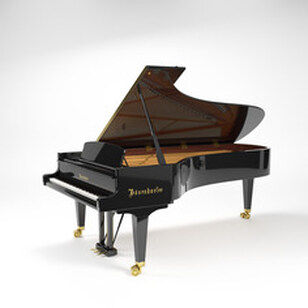
Authorized by Bösendorfer, the Concert Grand 280VC physical model faithfully captures the rich resonance and dynamic spectrum of the instrument, making it a true joy to play and bringing many hours of listening pleasure. It’s easy to understand why: breathtaking dynamics, astounding colours, exhilarating brilliance, a sound as clear as diamonds, yet playfully gleaming like beaming sparkles of light. Franz Liszt, Arthur Rubinstein, Victor Borge, Leonard Bernstein, Oscar Peterson, Vangelis, Tori Amos, Gonzalo Rubalcaba, Daniil Trifonov, and many more, have been using Bösendorfer pianos in their careers, leading to many prominent recordings.
3.1.5. C. Bechstein Digital grand piano
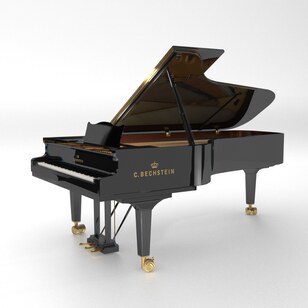
In cooperation with Bechstein, Modartt has developed an accurate physical model of a C. Bechstein 282 grand piano, the Bechstein company flagship. Its sound was captured by the acclaimed Teldex Recording studio in Berlin. The Pianoteq version reproduces the outstandingly brilliant and powerful sound of the C. Bechstein D 282 with its singing, richly coloured voice, suitable for many different music genres.
3.1.6. Ant. Petrof 275 and Petrof 284 Mistral grand pianos
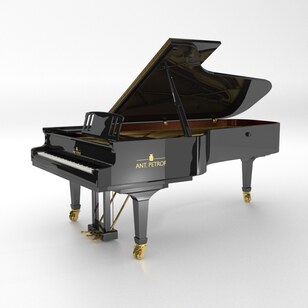
In cooperation with Petrof, Modartt has developed accurate physical models of the two Petrof masterpieces: Ant. Petrof 275 and Petrof 284 Mistral grand pianos. It maintains the colourful, romantic and rounded tone which the Petrof instruments are praised for, thanks to first class materials. These physically modelled pianos capture the characteristic Petrof sound with a range of presets offering a beautiful palette of timbres suitable for all kinds of music.
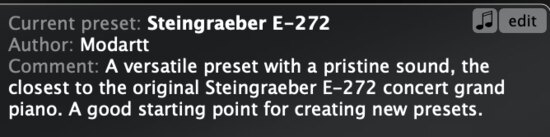
3.1.7. Steingraeber E-272 grand piano
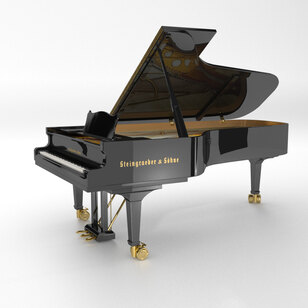
In cooperation with Steingraeber, Modartt has developed an accurate physical model of a Steingraeber E-272 grand piano. Steingraeber has reduced the surface of the treble soundboard; hence strings have 27% less wood weight to set in motion, and even when softer intonation is called for, the player is rewarded with an immediate, singing resonance. For more delicate playing, Steingraeber E-272 is also equipped with the Sordino (Celeste pedal) and the Mozart Rail (Mozart Rail pedal).
3.1.8. Grotrian Concert Royal grand piano
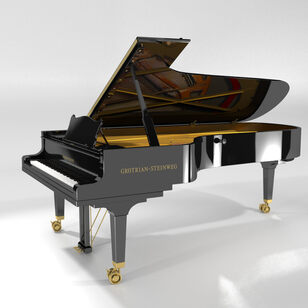
In cooperation with Grotrian, Modartt has developed an accurate physical model of a Grotrian Concert Royal grand piano, rightly considered to be one of the best grand pianos in the world. In order to reproduce the characteristic clarity and warmth of the original instrument, every detail of the Pianoteq model has been fine-tuned, resulting in an authentic and joyful instrument. Timbre and complex resonances are breathtaking.
3.1.9. Blüthner Model 1 grand piano
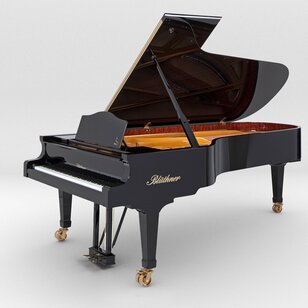
In cooperation with Blüthner, Modartt has developed an accurate physical model of Blüthner Model 1 grand piano for Pianoteq. A unique feature in Blüthner’s grand pianos is the fourth string for each key in the treble, called the Aliquot system. Its purpose is to create a sympathetic vibrating string that enhances the tone. This feature is included in the Pianoteq Blüthner model.
3.1.10. K2 grand piano

The grand piano K2, which was created for Pianoteq 5, has evolved by combining the best elements of several models. Its 211 cm (6' 11") cabinet offers the magnificent sound that comes from a perfect balance between warmth and brilliance.
3.1.11. YC5 Rock grand piano
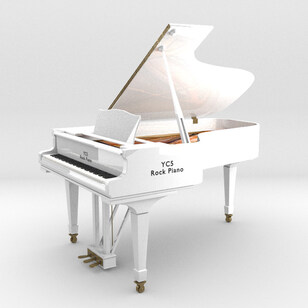
The YC5 Rock piano adds a lot of bite to your pop/rock recording, and fits beautifully in a mix with drums and electric instruments. Its characteristic bright timbre is also adapted for expressive playing and suitable for jazz recording sessions. YC5 is modelled from a well known Japanese grand piano, frequently seen on stages and widely appreciated by touring artists for its musical qualities and reliability. It is also a popular instrument at conservatories and other music schools.
3.1.12. U4 upright piano
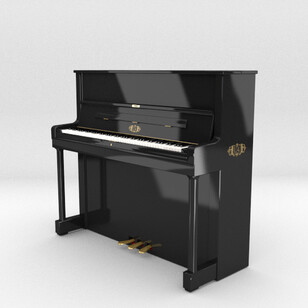
The U4 upright piano offers many presets emphasizing the characteristics of upright pianos. Besides the beautiful timbre of well-built acoustic pianos, there is higher inharmonicity and increased imperfections in presets such as Blues, Honky Tonk, Vintage, Detuned, Ruined, Bierkeller, Tacky, Wavy, Weathered, Club...
3.1.13. Karsten Collection
Peter Karsten is an instrument collector from Braunschweig, Germany. This collection includes virtual copies of: J. Salodiensis virginal (1600), G. Giusti harpsichord (1680), Ph. Schmidt square piano (1780), J. Weimes pianoforte (1808), NY Steinway square piano (1858). The virtual copy of the NY Steinway square piano was evaluated and authorized by Steinway & Sons in New York. Peter Karsten himself participated in many steps of the development of all the instruments ― from the initial recordings for the audio analysis until the final stages of the beta tests ― together with a dedicated team of experienced musicians, ensuring the authenticity of the instruments.
3.1.14. Kremsegg Collection
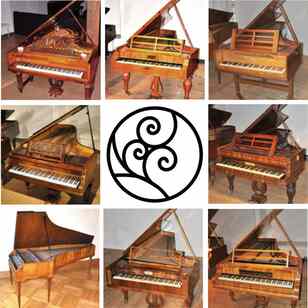
This collection of beautiful historical pianos, ranging from the 18th Century to the late 19th Century, has been created in collaboration with Kremsegg Schloss Museum (Austria). It includes virtual copies of pianofortes J. Dohnal (1795), J. Broadwood (1796), and grand pianos I. Besendorfer (1829), I. Pleyel (1835), J. Frenzel (1841), S. Erard (1849), J.B. Streicher (1852), C. Bechstein (1899). Incomparable for rendering the music of the Classical period, these instruments can also be used for more recent compositions. The late-19th Century pianos, particularly, with a design approaching that of a modern piano, illuminate jazz and other modern music.
3.1.15. Hans Ruckers harpsichord
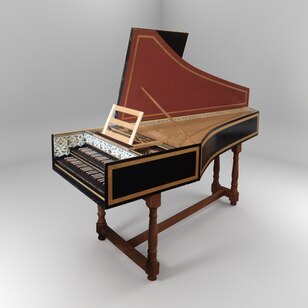
The physical model is based on a copy by Matthias Griewisch of a Hans Ruckers II le Jeune harpsichord (1624). This virtual instrument offers an extension of the original instrument, from 4½ to 6½ octaves, and is equipped with three registers — lower 8', upper 8', and 4', which can be combined in ways not even possible in the real world (see the L8', U8' and 4' buttons above the interface keyboard). A local MIDI mapping allows you to change the registration directly via the 3 lower notes of your keyboard. Besides sustain and soft pedals, this harpsichord is equipped with a Buff stop pedal and a Rattle pedal (cf. Section 14.1).
3.2. KIViR collection
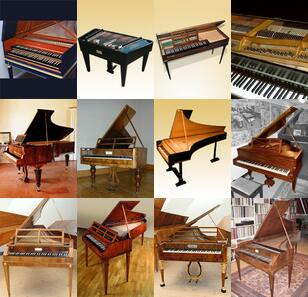
This collection is the result of the Keyboard Instrument Virtual Restoration project. It can be downloaded from our website at www.modartt.com. It includes the free instruments clavichord, cimbalom, harpsichords, pianofortes and acoustic and electro-acoustic pianos. Some of them are presented in their current state. Their age has caused imperfections, such as some voicing irregularities, which we have kept intact. We regularly enrich this collection with new instruments.
3.3. Classical Guitar
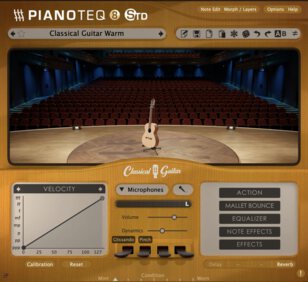
This instrument is modelled after nylon Classical guitars. Three reference instruments, among these a concert guitar C9 by Luthier Jean-Marie Fouilleul, was used as basis for the model. For the attack part, a finger pick style has been chosen, which is natural given that this instrument is mainly used to play classical, flamenco and Latin music. The idea was to find a sweet spot regarding the amount of nail used during the attack. If it differs from your taste, it is easy to take advantage of the parameters of the model, in order to adjust the sound to the target style. A guitar mode has been designed to help keyboard players mimic the guitar player without limiting their playing, see section 5.3. Many of the most common guitar player techniques are available: legato, vibrato, glissando, pinch harmonics, palm mute and rasgueado. The model has been augmented by natural noises resulting from the interaction between the player and the instrument, including squeaking, rubbing and sliding sounds. Additionnal features, such as supplementary tunings, automatic or manual fingering, fast repetitions, hollow or solid body, reserved midi channels for midi guitar are offered. The instrument lets you explore a range of presets including some experimental ones, such as 12-string guitars and electric guitars. If the Amp effect from Pianoteq does not suit your needs, the bare preset is a great starting point for third-party Amp plug-ins.
3.4. Harp
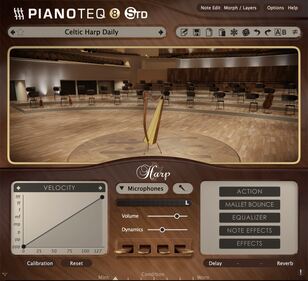
The Harp pack includes a concert harp physically modelled after a Salvi concert grand harp, and a celtic harp equipped with nylon strings. Both include the ability to play pinch harmonics (flageolets) and glissandos. A diatonic mode offers a closer experience to the reality of the instrument where seven pedals allow to change the pitch of the strings and play in all keys, see section 5.2.
3.5. Electric pianos
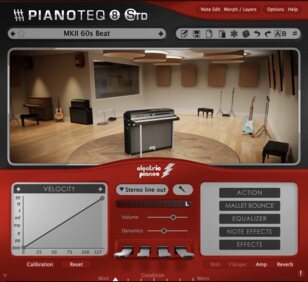
The Electric pianos pack offers three amazing electro-acoustic pianos from the seventies. Each Electric Piano (Vintage Tines MKI, Vintage Tines MKII and Vintage Reeds W1) is provided with several variants. Using the rich interface features, you can customize them to your own taste.
3.6. Hohner Collection
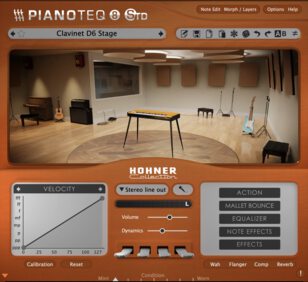
The Hohner6 Collection, authorized by Hohner, includes four famous instruments manufactured from the early sixties until the early eighties: Electra-piano, Pianet N, Pianet T and Clavinet D6. The virtual copies for Pianoteq benefit from its physical modelling: addition of a sustain pedal, range extended to seven octaves and possibility to adjust physical properties.
3.7. Vibraphones
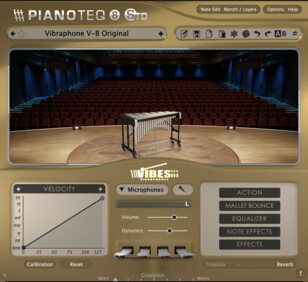
The Vibes pack offers two beautiful vibraphones. V-M is a virtual copy of a Musser vibraphone that belongs to the famous French vibraphonist Dany Doriz. V-B is a virtual copy of a Bergerault vibraphone that belongs to the Condorcet studio in Toulouse (France). The bars are made of metal.
3.8. Xylophone and Marimba
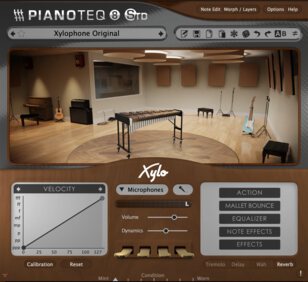
The Xylo pack includes a xylophone and a marimba. The xylophone virtual copy is modelled after a modern 3½-octave French brand and the marimba virtual copy is modelled after a modern five-octave French brand. In contrast with the vibraphone, the bars are made of wood instead of metal.
3.9. Toy piano, Celesta and Glockenspiel
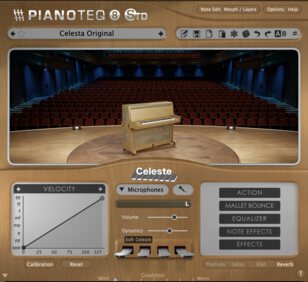
The Celeste pack includes a toy piano, a celesta and a glockenspiel. The sound of the toy piano is produced by small hammers striking metal rods. The virtual toy piano is modelled after a two octaves Michelsonne instrument and is extened to 4 octaves. The celesta resembles an acoustic upright piano but houses metal plates struck by felt hammers resembling piano hammers. The virtual celesta is modelled after a modern five-octave German brand. The glockenspiel also has metal plates but they are struck by hard metal mallets held by the musician. The virtual glockenspiel, modelled after a modern French brand, has been extended to cover four octaves.
3.10. Steelpans

The Pianoteq physical model has been enriched to produce the characteristic timbre of steelpans, with their "blooming" overtones that are due to the mechanical properties of thin steel sheets. Steel drums were originally built from empty oil barrels as the popular drums were forbidden by the Trinidad government.
The Steelpans pack includes 4 instruments: Steel Drum, Spacedrum, Hand Pan and Tank Drum. Each instrument is provided with one preset faithful to the original instrument modelled and several variants.
The Steel Drum instrument is a combination of the known types, the "double second", the "tenor", the "double guitar", the "triple cello", and covers 4 octaves.
The Spacedrum is a recent variant of the Hand Pan. Both instruments offer presets for hand playing and mallet playing, and are extended to 4 octaves. The blooming effect is a bit less pronounced than in the Steel Drum.
The Tank drum is made of thicker metal from a gas tank. Several tongues are cut into the bottom of the tank for producing the notes. Due to its shape and thickness, there is almost no blooming effect. The instrument is extended to 3½ octaves.
3.11. Other instruments
Other instruments such as church bells and tubular bells, are available for download on our website at www.modartt.com. Subscribe to our newsletter for the latest information.
4. Managing instruments and presets
The Pianoteq interface is divided into two sections:
- An Instrument section containing innovative features presented in three panels called
Tuning,Voicing, andDesign. The three unified panels open with a single click on the instrument picture.
The three Instrument section panels
- An Audio Engineering section, which offers you a unique feature available through the
Outputmenu: microphones positioning and mixing. The section also offers features likevelocitycurve,volume,dynamics,equalizer,actionandmalletsettings. Finally, various types of effects are also available: the ones directly modifying the models, callednote effects, and the others more conventionnal audioeffects:reverberation,chorus,flanger,phaser,compressorand others.
The Audio Engineering section
Adjusting any of the parameters is easy. But you can also simply choose your instrument from the instrument menu on the top left.
4.1. Difference between "instrument" and "preset"
You can load and save instruments from the instruments menu:

This menu lets you choose from a list of built-in instruments and presets, extra instruments (files with extension ptq) or presets (extension fxp) that you have saved in your Pianoteq folders. More details are provided in section 4.4.
The physical model contains a great number of parameters, but only a small proportion of them are available through the user interface. When only the user interface parameters are changed, then we say that it is still the same instrument but a different preset. Hence presets are understood as variations of a given instrument.
For example, Steinway Model D Prelude and Steinway Model D Classical are the same instrument, as the difference lies in the microphone position which can be defined by the user himself. On the contrary, Steinway Model D Prelude and K2 Prelude are two different instruments because it is impossible to obtain one of them by modifying the user interface parameters of the other.
4.2. Instrument modifications
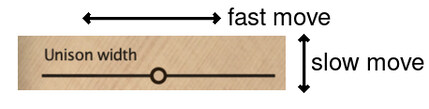
You can change any parameter of the current instrument or preset by moving the corresponding slider with the mouse. Moving the mouse cursor perpendicularly to the slider will make the slider move slowly.
Each time you modify parameters in Pianoteq, a few computations are needed to update the instrument (physical model).
Once you are done, the edit and save buttons to the right of the instruments menu allow you to edit and save your new preset.
Also have fun trying the Random button, which changes all settings randomly!
4.3. Playing with the parameters
In Pianoteq you can modify and create your own presets, save them and share them with other users. The following commands are located at the top of the interface.

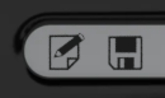
- The
edit(pen) andsavebuttons allow you to edit and save your new preset. - The
copyandpastebuttons allow you to select and copy/paste a subset of the current parameters from one preset to another. Right click on thecopybuttow allows to copy without changing the previous selection. - The
freezeallows you to select the parameters that you want to keep unchanged when changing instrument or preset. This is a convenient feature for “transporting” settings from one instrument to another. - The
random(dice) button allows you to randomly changetuning,voicing, anddesignparameters. Parameters located in the Audio Engineering section are not affected by the random command. - Using the
undo/redocommands, you can at any time undo and redo the changes you have made: up to 100 undos are possible. A right click on the button shows you the last modification. - The
ABbutton allows you to switch between two presets A and B, one being in the foreground while the other is in the background. Theledbeside them is lit as soon as A and B are different. Clicking on theledcopies the foreground preset into the background preset. A right click on theABbutton lists the differences between A and B. A and B presets have their ownundo/redostack.
4.4. Handling presets
When you click on the edit button, the following presets manager appears:
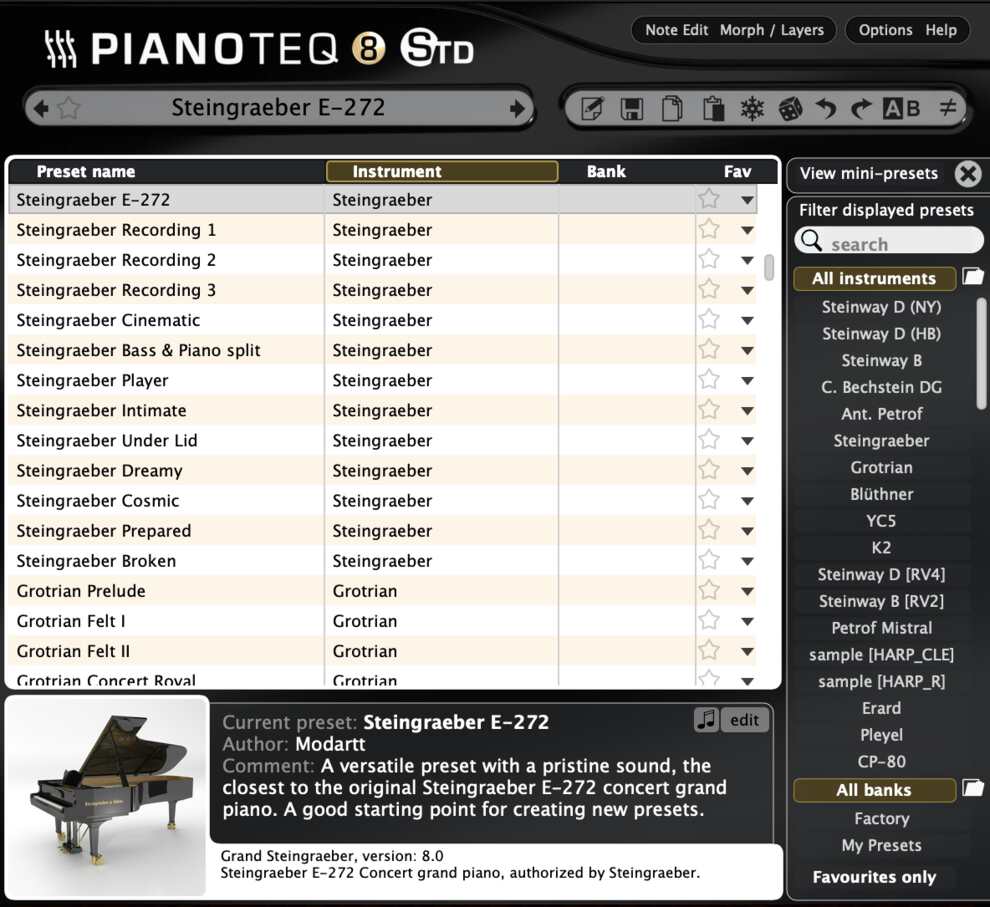
It lets you manage the instruments and presets from the instruments menu. You can edit the presets information, sort or filter them (see some part of them), rename them, etc.
4.4.1. Edit
Information on each preset is displayed at the bottom of the presets manager, as well as a small demo excerpt (mini-player to the left of the edit button). There you can edit the information related to your own presets, and record yourself your own demo excerpt (left and right clicks on the mini-player).
4.4.2. Sorting
The way presets are sorted can be chosen by clicking in the appropriate column: Preset name, Instrument or Bank.

A bank is a set of presets that are located in a given folder, except the factory bank which contains all built-in instruments and extra instruments provided as ptq files and located in the Addons folder.
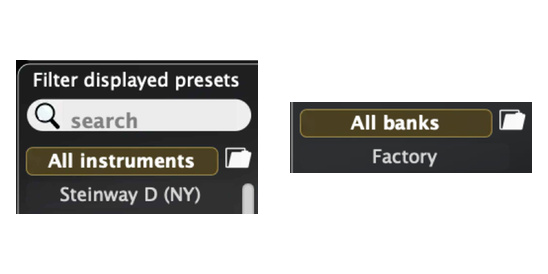
4.4.3. Filtering
You can select the instruments and presets that are visible in the instruments menu through three different filters located on the right side of managing window: search, All instruments, All banks. You can also click on individual instruments or banks.
4.4.4. Renaming presets
A double click on a user preset name allows you to rename it. You can also open the contextual menu by clicking on the small arrows in the Fav column.
![]()
4.4.5. The Pianoteq folders
The easiest way to find the Pianoteq folders is to click on the little folder images to the right of All instruments and All banks. The Pianoteq folder contains two sub-folders:
Addons: this is where to store the extra instruments provided asptqfiles,Presets: this is where to store the user defined banks. Each bank is itself a folder that contains presets withfxpfile format.
4.4.6. Importing fxp files
There are two ways of importing fxp files:
- Drag and drop the file into the interface,
- Copy the file into the appropriate folder.
4.4.7. Saving presets
After you have created your new preset, you can save it by simply clicking on the save button; a popup window will ask you for a preset name and a bank name (default bank is My Presets). Each time you click again on the save button, you will save the new values with the same preset name. You can access backup copies with a right click on the preset name (if there are some).
4.5. Hints
4.5.1. Creating your own instrument
Generally speaking, you will find it more interesting to make adjustments, large and small, in several parameters instead of making a single large adjustment. Moving a single slider to the left may throw the weight of the sound onto other parameters that you may want to adjust. Moving a slider to the far right may obscure the contribution other parameters make to the sound, or make their small contribution seem too strong. Moreover, the parameters that interact may be in separate panels, since each panel has controls that modify the way in which a single physical component of a piano contributes to the sound, instead of controlling the sound in general. This manual often touches on these adjustments. Further experimentation will let you experience the ways in which the parameters interact. Make a small adjustment in one parameter and a large one in another. Make large and small adjustments everywhere. You can create almost any sound that a piano can create, and more.
4.5.2. Brilliance
Brilliance is an important sound quality for achieving good realism. You may want to adjust it whether you are staying close to the loudspeakers, or listening at low volume levels, or using headphones. You can for example change the hammer hardness from the Voicing panel, or use the EQ from the lower panel.
The keyboard velocity itself plays a crucial role in the sense of brilliance. Visit the Pianoteq user forum www.forum-pianoteq.com where users provide velocity curves for many types of keyboards. See also the tutorial in section 16.4.
4.5.3. Using reverberation
Listening through loudspeakers usually requires significantly less reverberation than through headphones. The reason is simple: when using loudspeakers, the sound is naturally reverberated by the room in which they sit. We thus recommend that you reduce the reverberation mix when using loudspeakers.
Moreover, it is worth mentioning that bypassing reverberation in Pianoteq does not have the same effect as bypassing reverberation in a sample-based instrument. In the latter case, unless recording was made in an anechoic chamber, there is a natural reverberation present in the recorded samples which may not be perceived as reverberation because the note release cuts the reverb tail itself, whereas in Pianoteq, there is no reverberation whatsoever when you switch it off. In that case, the sound loses an important part of its natural quality and may sound strange or synthetic, particularly with headphones, because in the real world we never hear sounds without some reverberation. Hence, we recommend bypassing reverberation only when using an external — or natural — reverberation.
4.5.4. Instrument controls
The following table summarizes Pianoteq main controls that are associated with instrument features and will be discussed in the next sections.
| Feature | Controls | Action |
|---|---|---|
| Pitch | Diapason |
Changes A (above middle C) frequency |
| Tuning | Temperament |
Chooses among standard temperaments |
| " | Unison width |
Frequency variation within each unison (group of three strings) |
| " | Octave stretching |
Stretches octaves |
| Sound length | Direct sound duration |
Modifies the direct sound duration |
| " | Soundboard mechanical impedance |
Modifies the global sound duration: raising impedance yields longer sounds |
| Timbre | Spectrum profile |
Modifies individual intensity of the first eight overtones |
| " | Hammer noise |
Modifies the hammer noise level |
| " | Strike point |
Changes the overtones level |
| " | Soundboard cut-off frequency |
Raising cut-off frequency enriches high frequencies of each tone |
| " | Soundboard Q factor |
Raising Q factor shortens high frequencies duration |
| " | String length |
Controls sound “acidity” (inharmonicity) |
| " | Attack Envelope |
Controls the attack envelope |
| Brilliance | Hammer hardness |
Enriches the high frequencies: the harder the hammer, the brighter the sound |
| Resonance | Sympathetic resonance |
Controls the amount of sympathetic resonances (strings, soundboard, cabinet) |
| " | Duplex scale resonance |
Controls the amount of Duplex scale resonances (undamped string parts) |
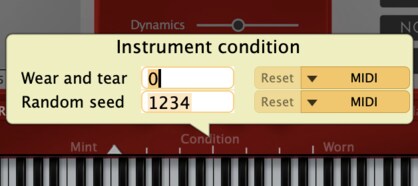
Finally, the Condition slider lets you modify the state of the instrument, from freshly-tuned to completely worn-out. Right-clicking on this slider and changing the Random seed parameter allows you to enjoy thousands of broken instrument variations.
4.5.5. Hidden shortcuts
Ctrl+Click(Windows, Linux),Command+Click(MacOS) or LongClickon anyslidertriggersMIDI learn(e.g.Next preset), long touch on iOS,Clickingon anysliderwhile holdingShiftor perpendicular movement with respect to it allow fine adjustment,- Holding the
Shiftkey while moving a control point on a curve allows fine adjustment, not available on touch devices, - Drag 'n drop
FXP,MIDIandPTQfiles onto the main interface in order to use them, - Long
Left-Click,Right-Click(Windows) orShift+ClickonNext/Previous presetchanges toNext/Previous instrument, long touch on iOS, - Long
Left-Click,Right-Click(Windows) orShift+ClickonRandombutton triggers a slight randomization, long touch on iOS, - Long
Left-Click,Right-Click(Windows) orShift+ClickonA/Bbutton shows a list of differences between presetA/Bin a pop-up window, long touch on iOS, Alt+EnterorAlt+Clickresets asliderto its default value,Shift+Alt+EnterorShift+Alt+Clickto swap the values, on iOS, use double-touch to show a popup dialog,- Long
Left-Click, orRight-Clickon the parameterfreezecheckbox toggles the feature, long touch on iOS.
4.5.6. Assigning a parameter to a MIDI controller
You can assign Pianoteq parameters to MIDI controllers such as those that may be on your keyboard. Select the parameter slider that you want to assign (right click on the slider and click on MIDI ► Assign MIDI Control) and move the knob of the MIDI controller (or the pedal) that you have chosen for this parameter. Pianoteq will automatically assign the parameter to the controller. More sophisticated possibilities are provided in the Options ► MIDI section.
Any MIDI control may be assigned except the following ones: MIDI controls 6, 38, 96-101 which are used for RPN and NRPN MIDI parameters; controls 120 to 127 are reserved for various reset operations ("all notes off" etc.); controls 32 to 63 are reserved for 14-bit precision controllers.
5. Keyboard Components
5.1. Keyboard range
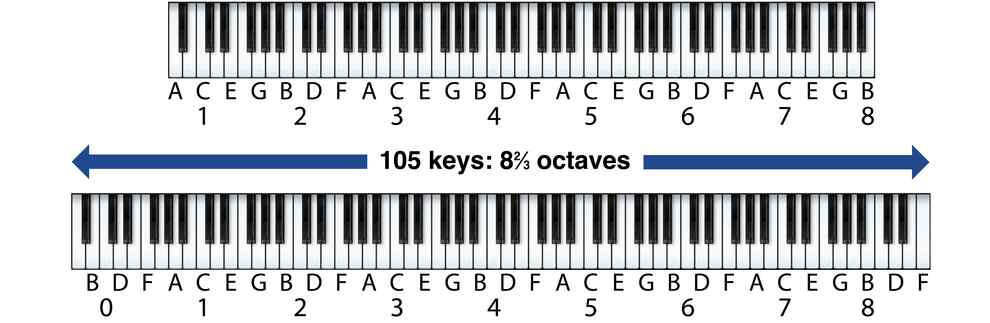
5.1.1. Keyboard range extension
The grand pianos Steinway Model D and K2 benefit from an unprecedented keyboard range extension from 88 to 105 notes (8⅔ octaves):
5.1.2. Original/extended range
Most historical instruments (cf. KIViR, Kremsegg and Karsten collections) have a reduced range. For some of them, it was possible to extend it slightly. The extended range has been set to the default range for all presets except the reference preset, usually the first one. If you want to use the original range (e.g. in order to obtain the original sympathetic resonances range), click on the minus sign to the left of the virtual keyboard. Clicking on the plus sign will bring you back to the extended range.
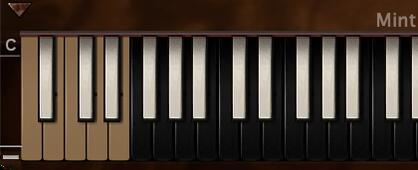
5.2. Chromatic versus diatonic mode (Harp)
By default, the keyboard is set to chromatic mode (except for the diatonic harp preset):

If you click on the little D to the left of the keyboard, you enter the diatonic mode where only white keys produce a sound. As in a real concert harp, the key signature is specified by seven pedals, from left to right D, C, B, E, F, G, A, each pedal being controlled by a group of three black keys:

For example, clicking on left black key below E will produce an E♭ alteration whereas clicking on the right black key will produce an E# alteration.
Clicking on the little C to the left of the keyboard brings you back to chromatic mode.
5.3. Guitar mode
By default, the guitar instrument pack sets the keyboard to guitar mode. To go back to chromatic or diatonic mode, click on the little G on the left of the keyboard. If you click on the guitar neck, it will play the corresponding note, showing a white disk. This mode sets many different features. As can be seen in the following image, several guitar player techniques are available through the yellowish key switches on the left of the keyboard:
legato: note played using the left hand only, pressing the string with a new finger (hammer-on), or pulling the string with the finger already playing (pull-off), activated via the buttonLeg. Onto the right of the keyboard. When on, if you try to play up to a minor third, keeping the first note pressed, the new note will be played legato and a small triangle appears on the guitar neck instead of a disk.glissando: note heard because of the sliding movement of the left fingers on a string. The glissando technique is triggered when the starting note is interrupted by the ending note. If the starting note is stopped before the end of the glissando, the ending note is played glissando, showed by a white horizontal ellipse on the guitar neck. Otherwise, it is plucked normally. The velocity of the ending note sets the speed of the glissando. You can make glissando with chords, where the ending chord is calculated playing only one ending note. The length of the glissando is then calculated relatively to the bass note of the chord. There is a key switch and a pedal to activateglissando.pinch harmonics: note played while stopping the vibration at half of the string resonating length. There is a key switch and a pedal to activatepinch harmonicsand it is shown as a white equal sign on the guitar neck. The pedal moves continuously, providing interesting variation of tone.- palm mute: note played with some amount of right hand palm muffling the sound. There is a key switch and a pedal to activate palm mute, which is represented by a vertical ellipse on the guitar neck. The pedal (named
Buff Stops) moves continuously, providing interesting variation of tone. rasgueado: used primarily in flamenco to play chords as the guitar player plucks most of the strings, releasing each finger very quickly.

The key switches for the playing techniques are by default in gate mode (ON when pressed). You can set them to toggle mode by clicking on the little triangle on the right of the keyboard, which accesses advanced menus and the Keyswitches sub-menu.
The vibrato is central for guitar players. It has been implemented for every instrument in the Note Effects panel, see section 15.4. A button ~ has also been added to access it from the guitar mode.
the thumb key switch on the left of the keyboard is another important feature regarding the variation of timbre, which simulates the tone modification provoked while playing guitar with the right thumb. A similar effect can be achieved by reducing the Piano, Mezzo and Forte Plucking brightness.
The guitar mode lets you experience, in a very convenient way, the six strings of the guitar. On the guitar, the same note can be played on different strings over the neck, changing its timbre. It is constantly used by guitar players to soften or harden the tone. In guitar mode, you can set the keyboard to easy or advanced Adv. playing style. The easy mode sets the general position of the guitar player left-hand on the guitar neck, according to the played notes. The advanced mode Adv. adds key switches on the right of the keyboard to move the left-hand manually. There is a third way to choose the string: key switches on the left of the keyboard can force to play on a specific string. An extra key switch has also been added to force use of Open strings when played. Finally, a hidden feature improves chord playability. Indeed, once the guitar player left-hand is placed on a specific part of the neck, some intervals cannot be played at the same time (usually the seconds and minor third) as the string is already in use. An automatic string selector has been implemented when such a case appears, relieving keyboard players from any potential frustration while playing in guitar mode.
In order to mimic guitar player chords plucking, two repetition key switches have been added, on the left of the keyboard, that can strum previously played chords up and down. It can also repeat single notes to play faster.
Special care has been dedicated to incorporate the additional noises which the guitar player produces as the body touches the instrument. Among the various sounds, squeaks when sliding on the strings and noises related to finger movements on the neck, have been added. In order to control the amount of noise added, a Casual to Pro slider is available. When set to Pro, no additional noises can be heard.
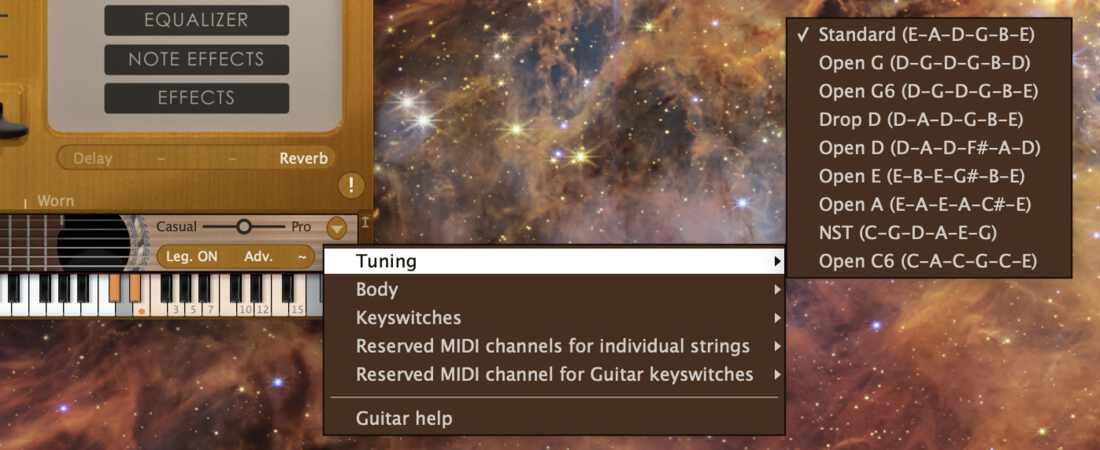
The advanced settings are available by clicking on the triangle on the right of the keyboard. In this menu, you can:
- choose between various well-known guitar
tunings, - change the guitar body between
hollowandsolid, - manage the key switch behaviour between
gateandtogglemode, - route each string on a different
midi channel(very practical with midi guitars), - route the key switches to another
midi channel.
This guitar mode is available for every instrument in Pianoteq by clicking on the little C to the left of the keyboard until it shows the guitar neck.
6. Morphing and Layering
Instruments VibraDrum, CimbaHarp or GlockenTines for sure do not exist. However these are three of the many instruments you can create with the acoustic Morphing introduced in Pianoteq 7 (Standard and PRO). This new technology handles the morphing at the physical modelling level, providing a stunning acoustic authenticity to instruments that never existed. The timbre of the hybrid instrument you can create is the one of an imaginary acoustic instrument whose physical parameters lie somewhere in between those of the instruments from which you started building the morphing.
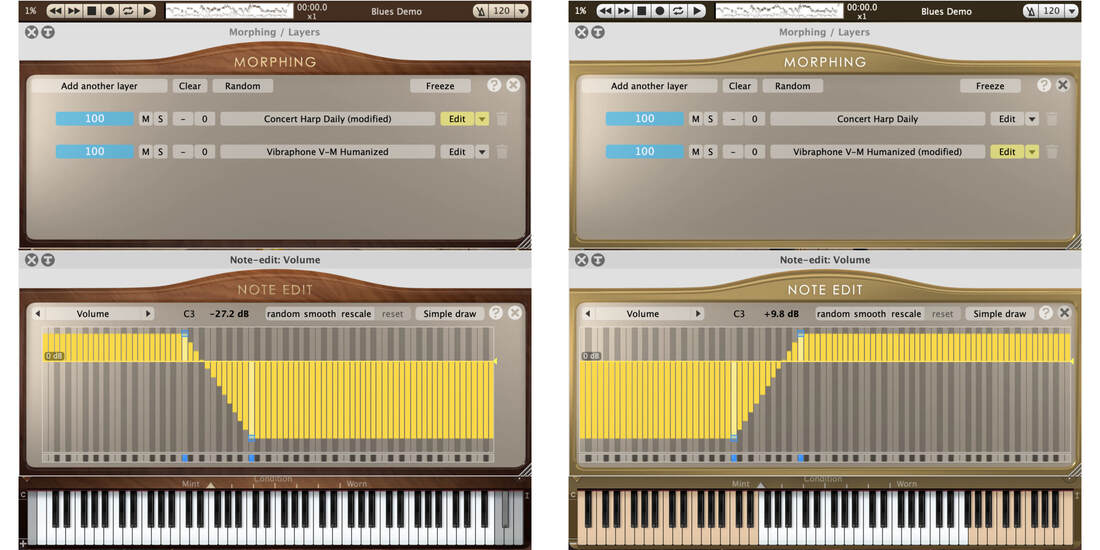
The Layering feature allows you to mix several instruments, e.g. playing Harp in the low range, Vibraphone in the upper range and mixing both together in the middle range. When layering instruments together, there are two parameters you may find of particular interest: Volume and Attack Envelope. Both can be edited note per note in Pianoteq Standard and PRO. The Volume can be used for splitting the instruments to different keyboard ranges, and the Attack Envelope can be used to mix an instrument with a particular attack that you want to emphasize, with another one whose attack has been weakened via the Attack Envelope parameter.
The difference between Morphing and Layering is that in the latter the two sounds are mixed together with a given ratio (as if you were running several instances of Pianoteq), whereas in Morphing the instrument Physics itself is being morphed at a given ratio, providing a single instrument with intermediate physical parameters.

A click on the Morph / Layers button gives you access to the Morphing/Layers panel. Once you have clicked on Morphing, you will be able to select the instruments you want to morph in your “recipe”, the values of each “ingredient” being displayed in the left column; or you can let the Random button choose for you.
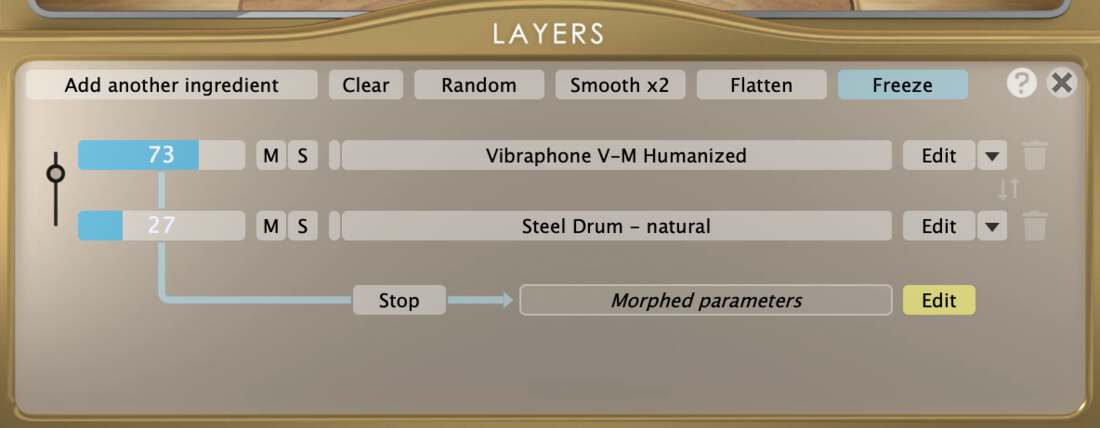
- The
Morphingslider on the left controls the morphing amount for each ingredient of the recipe. If you assign it to aMIDIcontroller (right click), for example included in aMIDIfile via the so-called automation, the instruments morphing amount will follow the automation. Clicking on theStopbutton will stop the automatic application of the morphing recipe, - The
Flattenbutton merges all instruments from the recipe into one single independent instrument, - The
Freezebutton allows you to select the parameters that should not be morphed: they are “frozen”. Some of them are frozen by default: for exampleEffects,LimiterorPedal assignments(which are not proper physical parameters) andOutput settings(it makes no sense morphing a two mics configuration with a three mics configuration), - The
Smooth x2button avoids all glitches that may occur during a morphing operation, but increases theCPUusage, - The Mute and Solo buttons
MandSlet you individually mute or listen to each ingredient of the recipe, - The
Editbutton lets you individually edit each ingredient of the recipe, which you can alsoRename,SaveorSave asvia the drop-down menu.
Clicking on Layers instead of Morphing gives you access to the Layers panel, which is very similar to the Morphing panel. The above mentioned example is easily obtained by setting both the volume of the Vibraphone in the low range and the volume of the Harp in the upper range to zero (via Note Edit), and cross-fading them together in the middle range.
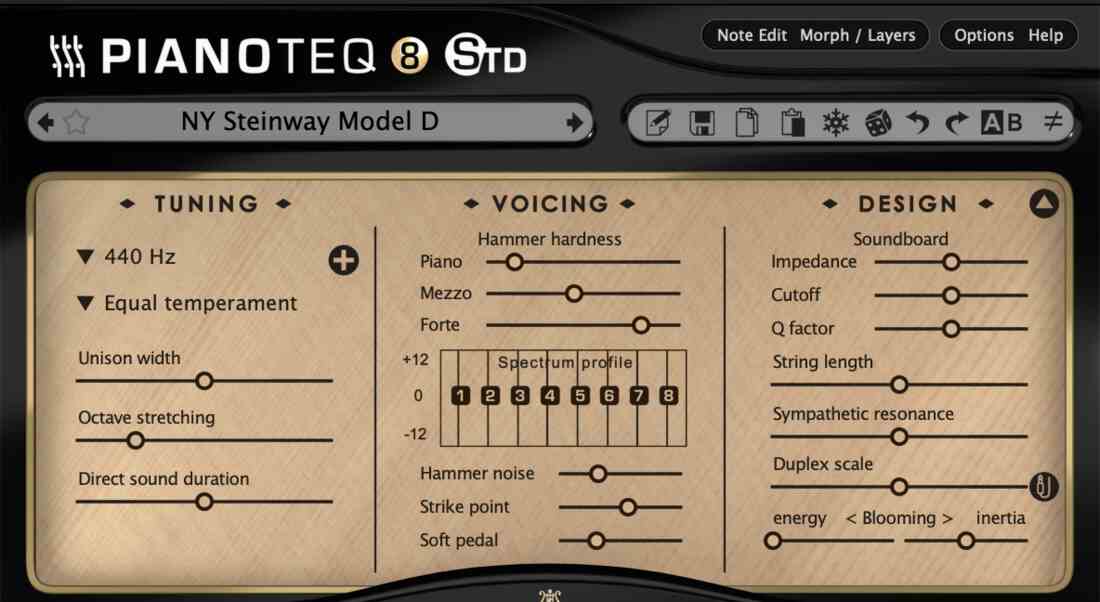
7. Tuning panel
Pianoteq allows you to perform all of the tuning operations usually made by a piano tuner. The Tuning panel contains the following controls:

7.1. Diapason
The standard diapason (A above middle C) frequency7 is 440 Hz, but you can change it to other values by clicking in the Diapason menu.
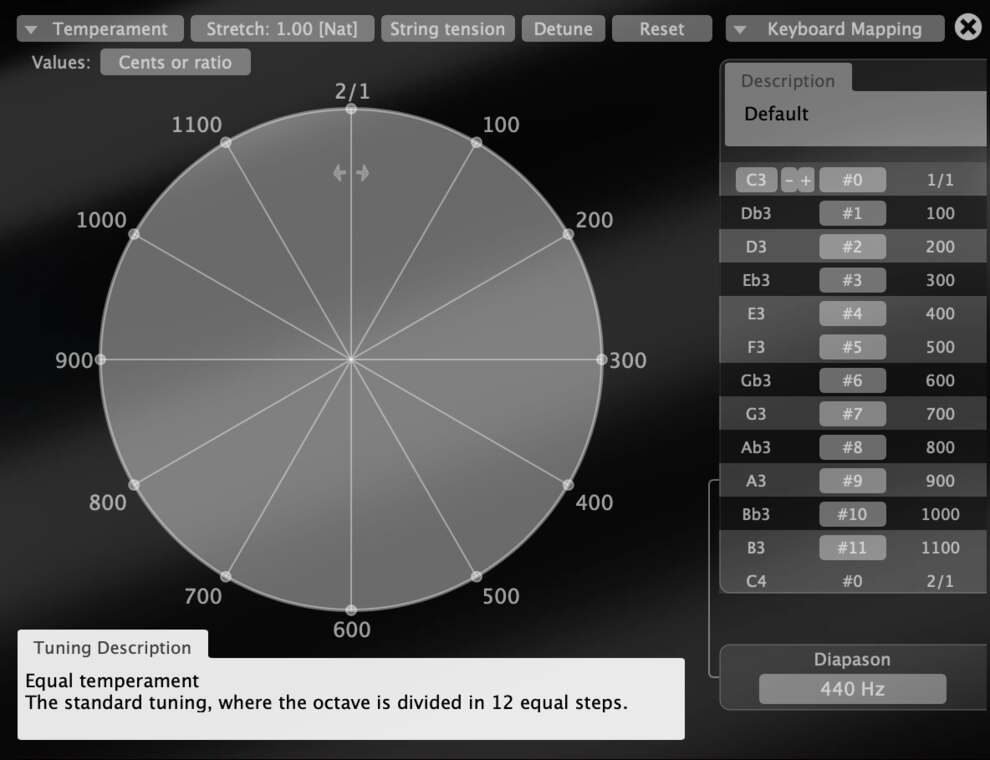
7.2. Temperament
The temperament defines the way the scale is tuned. By clicking in the Equal temperament menu, you can choose from the following temperaments (see appendix):
Equal temperament: the standard tuningPythagore(VIth A.C.): based on harmonic (pure) fifths except for one (the so-called “diabolus in musica”). Can you hear which one it is?Zarlino(circa 1558): sometimes called the “physicist scale”, based on harmonic thirds (ratio 5/4) and fifths (ratio 3/2)Meantone,Well temperamentandWerckmeister III(XVIIth): unequal temperaments used in baroque musicFlat: octaves ratio is strictly 2, for use in certain circumstances, for example with synthesizers.
The Detune notes entry in both Diapason (440 Hz item by default) and Temperament menus gives you access to the Note Edit - Detune panel where you can detune your instrument note per note.
A unique feature of Pianoteq is that tuning does not follow a pre-computed frequency table (except for the flat temperament), but takes into account the inharmonicity of the strings, in the same way a piano tuner does with acoustic pianos. Hence, the consonance of the notes is improved and the chords have a fuller and richer sound.
For other temperaments, you can enter the Advanced Tuning panel by clicking on the + button  . There you can import your own
 scala8 files and keyboard mappings via the Temperament and Keyboard Mapping menus.
When retuning an instrument, you can choose among two options: String tension or Full rebuild. Changing the string tension affects the timbre of the instrument because inharmonicty increases when tension decreases, whereas full rebuild recalibrates all strings in order to provide the same timbre for a given pitch.
In the Stretch menu (left to the String tension/Full rebuild checkbox), one can adapt the stretching of the piano tessitura. When Stretch is set to 1, if Harmonic stretching is unchecked, then inharmonicity is taken into account, in a similar way as piano tuners do when tuning by ear, that is, listening to the beats between partials (Natural stretching). If on the contrary Harmonic stretching is checked, then inharmonicity is ignored, in which case the partials are considered to be harmonics, that is, integer multiples of the fundamental, hence the name. Whether the stretching is harmonic or natural, when increasing the stretch value above 1, the tessitura is broadened according to the chosen value, and conversely, when it is reduced below 1, the tessitura is contracted. If you wish to observe what it simply means in terms of cents, you can click on Transfer the stretching into Detune note-edit and check the values by clicking on the Detune checkbox.
[8] For more information, see www.huygens-fokker.org
7.3. Temperaments requiring more than 128 notes
The MIDI standard allows only 128 notes (per MIDI channel). Hence it is a bit delicate to map temperaments that have lots of notes per octave, such as 31-EDO or 53-EDO: the 7 and 1/3 octaves of piano tessitura would require almost 400 notes with the 53-EDO temperament! Fortunately, it is possible to use the 16 available MIDI channels to increase the number of notes available to 16x128 = 2048. In the Advanced Tuning panel, select the Keyboard Mapping menu, and check the extended layout for up to 16*128 notes submenu. When this option is checked, a Main MIDI channel is defined. MIDI notes that arrive on this channel are played as usual, but notes arriving in the next MIDI channel will play one octave higher, the following channel will play 2 octaves higher etc., and previous MIDI channels play the lower octaves (if the main MIDI channel is channel 1, then its “previous” channel is defined as channel 16).
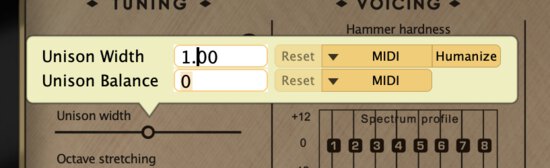
7.4. Unison tuning
As very few people know, the three strings of each piano unison (the strings hit by each hammer) are not tuned at exactly the same frequency. To change the timbre or colour of the sound, a skilled piano tuner introduces small tuning differences between these three strings.
Experiment yourself by gently changing
- The
Unison width, that is, the difference between the lowest and the highest frequency produced by the three strings of a single note, - The
Unison balance, which allows you to adjust the intermediate frequency of a 3 strings choir from the lowest (balance = -1) to the upper frequency (balance = +1) of the choir, balance = 0 being the factory setting value.
7.5. Octave stretching
It is quite usual to stretch octaves9 in a piano, but how much should they be stretched? Well… this might be a matter of taste! Adjust it to your own taste by modifying the octave stretching parameter. The main effect will be observed in the treble notes.
When the octave stretching parameter is set to 1, the stretching follows the natural inharmonicity of the strings (depending on the string length), so there still is a slight stretching. If you want no stretching at all, then use the flat temperament.
in the Advanced Tuning panel Stretch menu, you can transfer the stretching (the amount of detuning) induced by inharmonicity to the Detune parameter, which allows you to observe directly that detuning in the Note Edit - Detune panel.
[9] The musical interval between the two closest notes with the same name (e.g. A3 and A4) is called an octave. The theoretical frequency ratio between two such notes is 2, but in practice it is slightly stretched because of the inharmonicity of the strings and the property of the human ear (cf. also Design Panel).
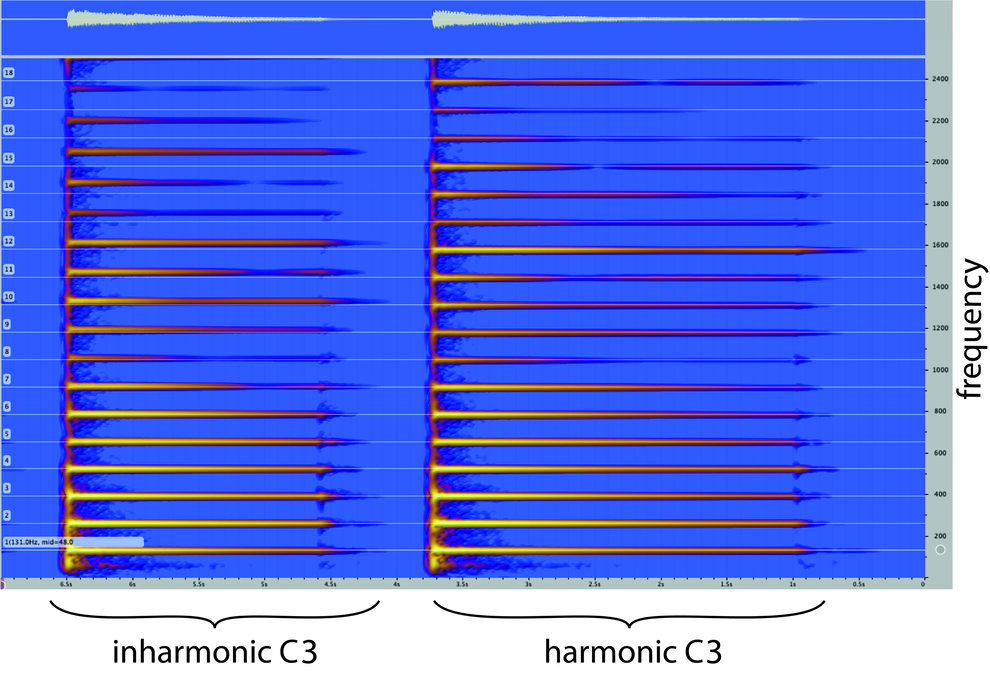
7.5.1. Octave stretching Note Edit
When tuning a piano, a "natural" way would be, like for most instruments in modern western music, to adjust the pitch of each note to equal temperament, using in particular a frequency ratio of octaves exactly equal to two. Unfortunately, pianos are inharmonic, meaning that strings do not produce harmonics which by definition are integer multiples of the fundamental frequency of the note; instead, each overtone sounds slightly higher than the corresponding harmonic, and is then called a partial. The following spectrograms show the difference between harmonic and inharmonic sounds:
Consequently, when tuning e.g. the octave C3-C4 in the natural way described above, C4 fundamental frequency would be slightly lower than the corresponding second partial of C3. This pair of partials would slowly beat and C4 would probably sound flat relatively to C3.
When inharmonicity is considered, the simplest way of tuning this octave is to match C4 first partial (the fundamental) with C3 second partial. However, the other pairs of partials will not match. For example, C3 fourth partial will in that case be slightly higher than C4 second partial.
The following figure shows the result when matching the fourth partial of a note with the second partial of its octave:
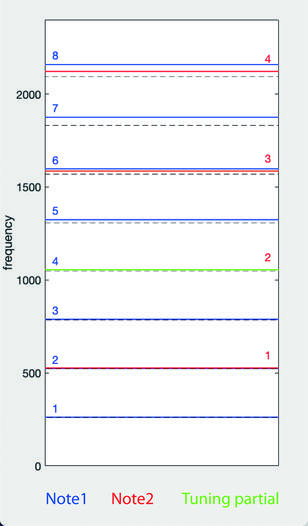
Ultimately: which pair should match? All things considered, this is a matter of aesthetic choice. Besides, instead of tuning octave intervals, you can decide to tune double octaves, or even other intervals, which itself leads to choosing specific pairs of partials to be matched. The Stretch Points Note-Edit panel, shown below, lets you select the Tuned interval, and the matching pair for each base note (the lowest note of the interval):
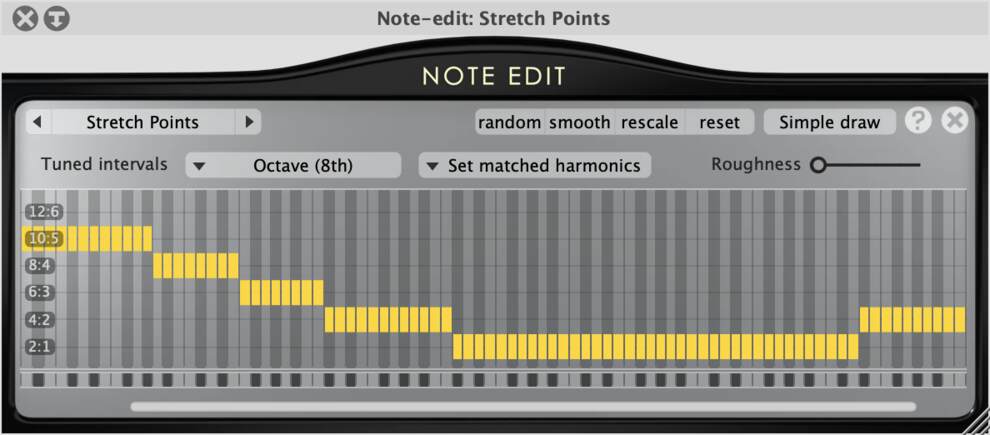
Let us see what each ratio means on two examples of Tuned interval options: Octave and Fifth.
7.5.1.1. Ratios involving partials of Octaves: 2:1, 4:2, 8:4, 10:5 and 12:6
Speaking of ratio 2:1 for note C3 (middle C) means that the SECOND partial (C4) of C3 (the 2 in 2:1) will match the FIRST partial of its octave C4 (the 1 in 2:1). There will be no beating on the matched pair 2:1, which is here in the region of 520 Hz.
Keeping the same example C3 and its octave C4, 4:2 means that the FOURTH partial of C3 (namely, C5) will match the SECOND partial of C4 (also C5). There will be no beating on the matched pair 4:2, which is here in the region of 1050 Hz. The tuning with ratio 4:2 is shown in the figure above.
Ratios 8:4, 10:5 and 12:6 follow the same reasoning, each one having its particular region of matched frequency.
It is worth noting that the String Length parameter in the Pianoteq Design panel has an important incidence when modifying the Stretch Points values, since it directly drives the string inharmonicity.
7.5.1.2. Ratios involving tuned Fifths: 3:2, 6:4, 9:6, 12:8 and 15:10
In this example, the two reference notes are Middle C3 and G3, but the same ratios hold for all fifth intervals throughout the entire chromatic piano keyboard.
Speaking of ratio 3:2 means that the THIRD partial of C3 (namely G4) will match the SECOND partial of G3 (also G4).
Speaking of ratio 6:4 means that the SIXTH partial of Middle C3 (namely G5) will match the FOURTH partial of G3 (also G5).
It goes in a similar way for the other ratios 9:6, 12:8 and 15:10, each one having its particular region of matched frequency.
Other traditional tuning intervals are considered by piano tuners: octave plus fifth (12th), double octave (15th), double octave plus fifth (19th) and triple octave (22th), all included in Pianoteq. For fun, we also included a non-traditional way of tuning a piano based on Major Third.
Another feature in this Note Edit panel is the Roughness slider that can smooth transitions when different Stretch Points values are used throughout the keyboard (slider on the left means "as smooth as possible").
7.6. Direct sound duration
A remarkable physical consequence of changing the unison width is that the direct sound duration itself is modified. This can also occur when reshaping hammers. You can modify that duration independently via the Direct sound duration parameter.
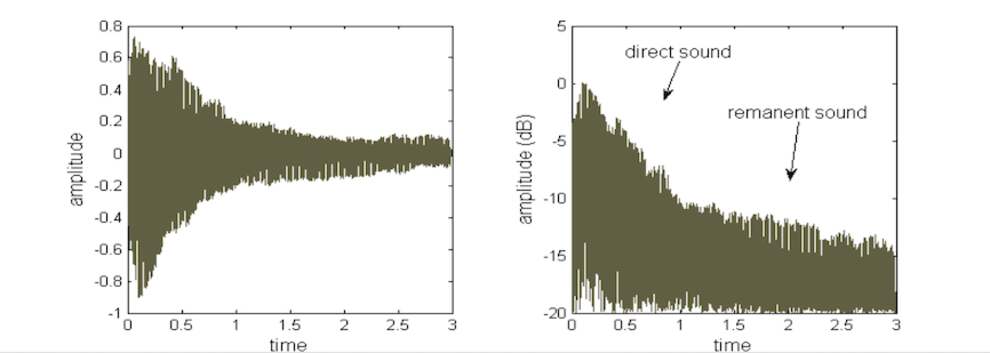
Time representation of a piano sound decay, natural scale (left) and log scale (right). Fast decay at the beginning (direct sound), slow decay after (remanent sound).
8. Voicing panel (acoustic)
The strings of a piano are struck by the hammers, small wooden pieces covered with hard felt. For a piano tuner, voicing consists in “shaping” the sound according to the pianist’s taste. This is made by working on the hammer felt, giving it the desired shape, hardness and elasticity.
Pianoteq allows you to perform this same voicing operation. The voicing panel offers you the following controls:
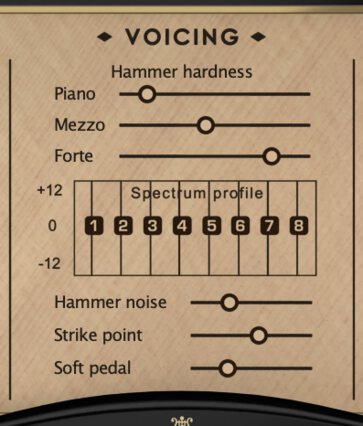
8.1. Hammer hardness
Here you can choose the Hammer hardness at three different velocities:
- Piano, corresponding to
MIDIvelocity 32 - Mezzo forte, corresponding to
MIDIvelocity 64 - Forte, corresponding to
MIDIvelocity 96.
The harder the felt, the more brilliant the sound becomes. Of course, the louder you play, the harder the felt should be, unless you wish to try some original playing effects!
8.2. Spectrum profile
Here you will find small sliders that allow you to adjust the individual intensity of the first eight overtones (cf. section 11.2). Experiment with it by increasing the weights of all fundamentals (the first overtone is called the fundamental) by raising the first bar. Depending on the piano brand, the seventh, eighth or ninth overtone is usually weaker than the other overtones: the strength of the overtones is related to the hammer strike point defined by the piano manufacturer.
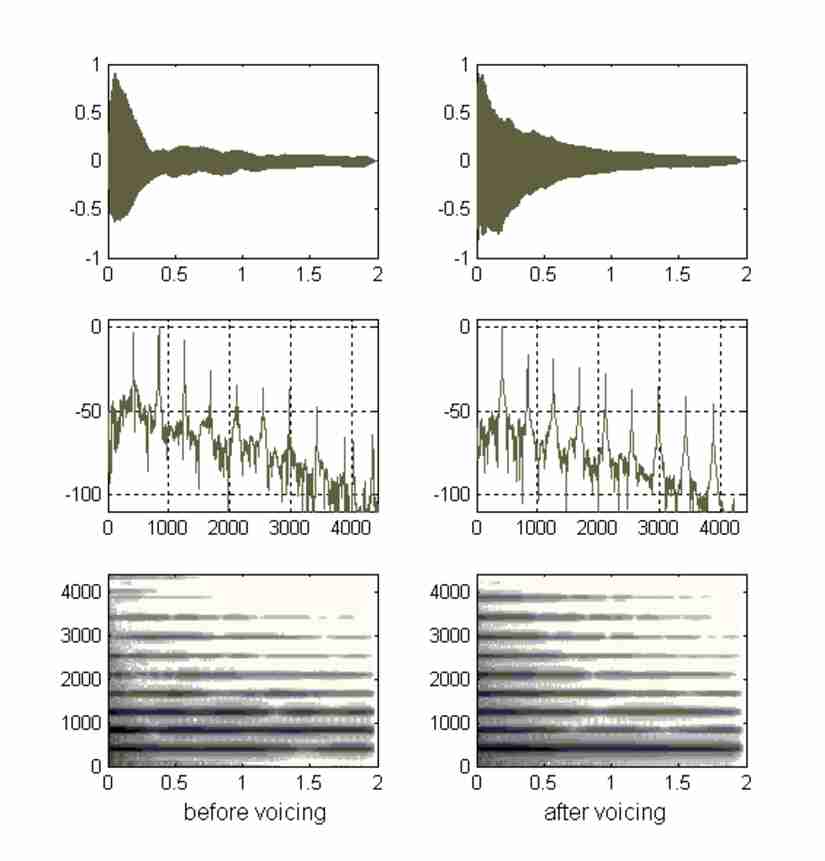
Time, frequency and time-frequency representation of a note, before and after voicing. Here, among other things, the first overtone intensity has been increased.
8.3. Hammer noise
You can adjust the Hammer noise, that is, the weight of the hammer percussion sound. With a loud hammer noise, you will feel as though you are standing close to the piano.
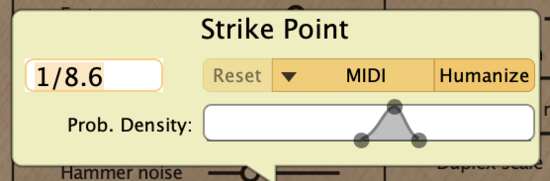
8.4. Strike point
The Strike point slider allows you to choose the position where the string — or the bar for percussion instruments — is struck by the hammer or the mallet.
A special humanization feature allows the strike point to vary as if it was played by a human musician. This feature is particularly suitable for the chromatic percussion instruments. Right click on the Strike point slider and select Humanize. You can adjust the range of the random variation on both sides of the mean strike point.
8.5. Soft pedal
Here you can control the smoothing degree of the una corda pedal, also called the soft pedal. Despite its name, the una corda pedal usually lets the hammer strike the three strings, but with a softer part of the hammer felt.
9. Voicing panel (electro-acoustic)
The tone sources (reed, tine, bar) of an electro-acoustic piano are struck by hammers or mallets whose hardness can vary, depending on the material that is used. Here again, as for acoustic pianos, Pianoteq provides a voicing panel that offers the following parameters:
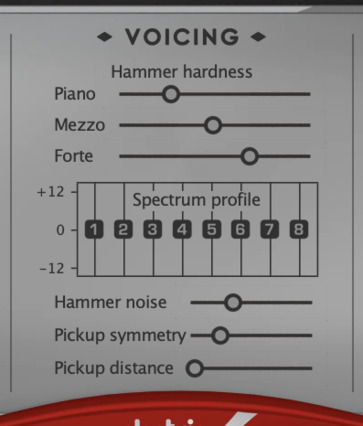
Hammer hardness, spectrum profile and hammer noise work in the same way as with acoustic instruments.
9.1. Pickup symmetry
In an electro-acoustic piano, the pickup is not exactly in front of the tone source at rest. When it is exactly in front, due to the symmetry of the device, the note jumps one octave higher than the normal tone. Moving the Pickup symmetry slider from left to right makes the pickup move from an unsymmetrical position to a symmetric position, providing thus a wide range of timbres.
9.2. Pickup distance
The Pickup distance slider sets the distance between the tone source and the pickup. When the pickup is moved closer to the tone source, the sound becomes more distorted and the timbre variation between soft and loud sounds increases.
10. Voicing panel (clavinet)
The clavinet works much like a clavichord. When a key is depressed, a small rubber tip strikes the string and presses it on to an anvil. It contains two sets of pickups, positioned above and below the strings, and is usually electronically amplified.
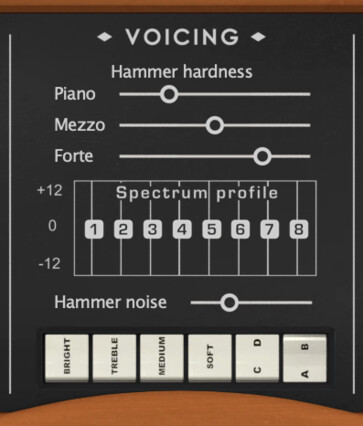
The voicing panel of the clavinet lets you choose among the four standard pickups settings:
- A-C: Lower pickup
- B-C: Upper pickup
- A-D: both pickups
- B-D: both pickups but out of phase.
Even more, it lets you make any continuous change between these four settings by right-clicking on the two CD/AB buttons.
The original register switches for tone colours Brilliant (shortened to Bright), Treble, Medium, Soft are also available.
Hammer hardness, spectrum profile and hammer noise work in the same way as they do with acoustic instruments.
11. Design panel (acoustic)
This panel offers controls over piano design parameters such as string length or soundboard characteristics (the soundboard is the wooden plate which transmits the string vibrations to the air.)
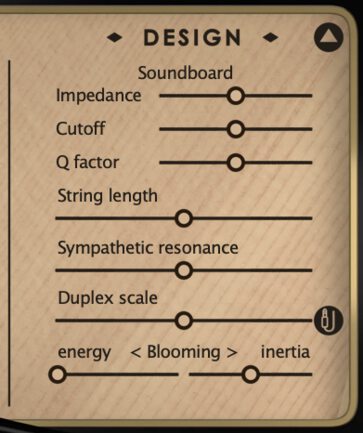
11.1. Soundboard
On a real piano, you cannot change the soundboard mechanical impedance10. With Pianoteq, it becomes very easy: it is just one of the design parameters. You can control:
- The soundboard mechanical
Impedance: the greater the impedance, the longer the sound becomes. - The soundboard
Cutoff: the higher you set this frequency, the more high overtones will be present. - The soundboard
Q factor: the greater this factor, the faster the high overtones will decrease.
[10] That is, how the soundboard resists the string vibrations, and thus amplifies the sound.
11.2. String length
Each piano note produces a complex sound, mainly composed of overtones with approximate frequencies f, 2f, 3f... where f denotes the fundamental frequency.
A parameter which greatly affects the timbre (and the tuning) is the so-called inharmonicity: the more inharmonic the strings, the more the overtone frequencies of each string are driven away from their theoretical values f, 2f, 3f... and the more the piano sound will resemble a bell.
Inharmonicity decreases very rapidly with string length. Experiment by changing the String length. The difference will be most evident in the bass range. You can choose up to a 10 meter long piano! At such a size, there is almost no inharmonicity. People say that piano manufacturers dreamed of producing pianos without inharmonicity...
11.3. Sympathetic resonance
The Sympathetic resonance parameter controls the weight of the strings’ sympathetic resonances. It is used, for example, in the famous piece Mikrokosmos by Béla Bartók. The sympathetic resonances depend on the position of each individual damper, and consequently on the position of the sustain pedal: it is longer when the sustain pedal is down, for dampers do not then touch the strings.
Experiment by pressing down a few keys very slowly so that they do not produce any sound, and then, without pressing down the sustain pedal, play a few notes staccato. You will hear the resonance introduced into the first depressed notes. If you release these notes, the sound will stop.
You can also do the “opposite” experiment. Play a note loudly and hold it, press silently another note, and release the first note: it continues resonating in the second note.
11.4. Duplex scale
The Duplex scale parameter controls the weight of the duplex scale resonance, issued from the undamped string parts located between tuning pins and frame (front scale) and between bridge and frame (rear scale). This invention was patented by Steinway (who consulted with the physicist Hermann von Helmholtz) in 1872 and enriches the harmonic content of the notes.
11.5. Blooming
The Blooming parameters, first designed for steel drums, can also be used for the other instruments, allowing to create new sounds. The blooming effect that characterizes the timbre of the steel drums arises from the non linearity of the mechanical response of thin steel sheets. During the attack, some energy is transferred from lower to the higher overtones, producing a “boiinng” sound. Two parameters control this effect:
- The
Blooming energyparameter controls the amount of mechanical energy which is transferred from lower to higher overtones, - The
Blooming inertiaparameter controls how fast this energy is transferred: the higher the inertia, the longer it takes to be transferred.

12. Design panel (electro-acoustic)
The tines that serve as resonator in certain electro-acoustic pianos produce a typical noise when hit by the hammer during the attack, or by the damper during the release. In the Pianoteq Electric Pianos Vintage Tines MKI and Vintage Tines MKII, these two noises can be controlled separately by the Tine noise hammer and the Tine noise damper parameters.
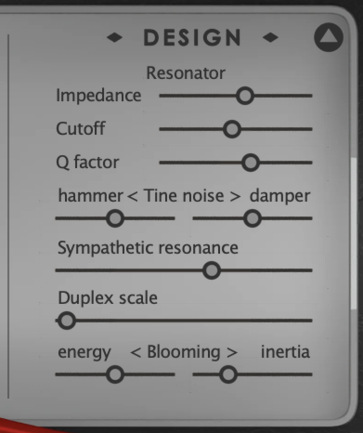
Impedance and Sympathetic resonance work in the same way as with acoustic instruments.
Here again, the Blooming parameters, first designed for steel drums, can be used for the electro-acoustic instruments, allowing to create new sounds. See in particular the MKI Blooming Grit preset.
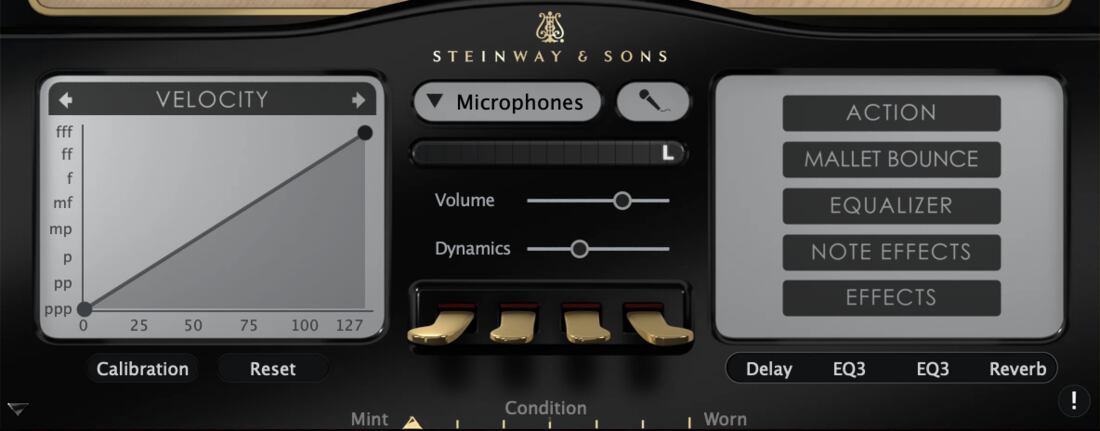
13. Velocity panel
On the left side of the Audio Engineering section, you can find a velocity control curve, allowing you to adjust Pianoteq to your keyboard. You can add or remove control points (double click to remove) and modify the curve by moving them with the mouse. The upper menu lets you separately adjust Velocity, Note-off, Pedal and Aftertouch velocities.
A right click on the velocity graphic opens a menu where you can select and manage velocity presets.
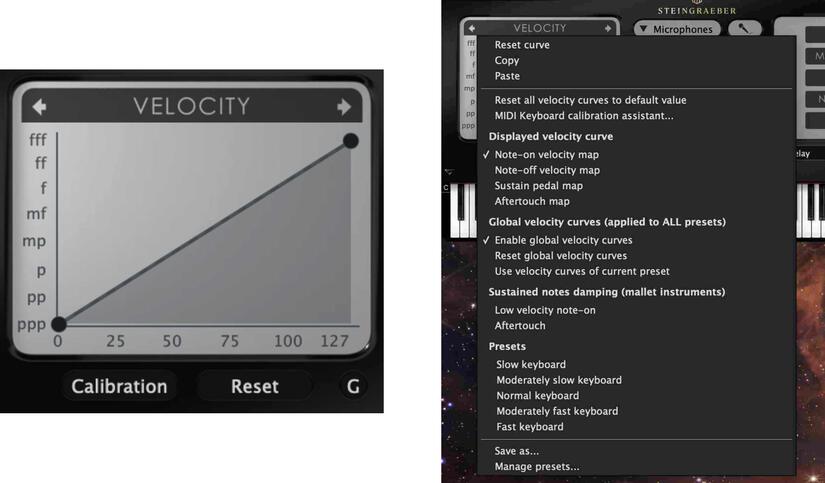
The calibration button opens the Keyboard calibration assistant which will help you adjust Pianoteq to your keyboard and pedal and to your own playing style. We strongly recommend that you follow that procedure at least once. See also tutorial 16.4.
The reset button resets the displayed velocity curve to the default curve.
When ON, the G button lets you define a global velocity curve which overrides the default velocity curve of any preset.
If your digital keyboard is not equipped with Aftertouch, you still can test Pianoteq's Aftertouch by clicking with the mouse on its graphical keyboard and dragging the cursor vertically above the keys.
Mallet players often use mallets as dampers while using the sustain pedal. The purpose is to exclude certain notes in a group of ringing notes. Pianoteq offers this feature in the velocity panel. Click on one of the two following options in the Sustained notes damping (mallet instruments) section:
Low-velocity note-on: piano notes are dampened when using the sustain pedal,Aftertouch: notes are dampened according to theirAftertouchvalue when using the sustain pedal (adjustable with theAftertouch curve).
This extra control is accessible not only for Chromatic percussions, e.g. Vibraphone, but for any instrument.
14. Output panel
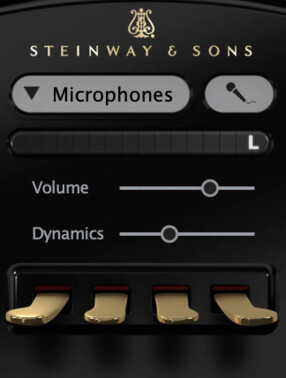
In the middle of the Audio Engineering section you will find:
- A menu that allows you to choose from among four recording modes:
Stereophonic,Monophonic,MicrophonesandBinaural. TheMicrophonesmode lets you set microphone positions for acoustic instruments. TheBinauralmode includes a head model and is mostly intended for use with headphones. TheStereophonicandMonophonicmodes are used with electro-acoustic instruments and also allow compatibility with previous Pianoteq versions. Click onsave asfor saving your microphone settings. - A volume VU meter, equipped with a
limiterthan can be turned on/off by a simple click. By reducing high amplitudes, the limiter is intended to avoid cracks that may appear when the amplitude is too high (in such a case, the clipping led to the right of the vu-meter shows up). - The sound
Volume. You can adjust it note by note via a double click on the slider. - The sound
Dynamics, which controls the loudness level between pianissimo and fortissimo. Since it is applied to each note, it can be seen as the ideal compressor for it allows you to adjust the dynamics without any distortion. In particular, the attack and decay of individual notes are not modified. - Eleven types of pedals that can be assigned to the four user interface pedals (you can change the default assignment for each pedal by right-clicking on the pedal).
14.1. Pedals
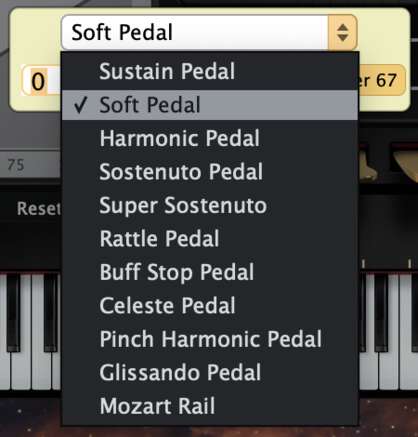
The eleven pedals that can be used are the following:
Una corda Pedal, also called soft pedal. It moves the piano action to the right (on grand pianos), so that the hammers strike the strings differently, changing the timbre of the notes,Celeste Pedal, also called moderator, where a felt strip is interposed between hammers and strings, creating a softer sound. This pedal is usually found in upright pianos, in some early pianofortes as well as in some grand pianos, as for example by Steingraeber. Once this pedal is selected in the interface, a right click on the pedal will allow you to adjust the felt thickness. Checking theReverse the celeste pedaltriggers the pedal without the need of pressing down the pedal,
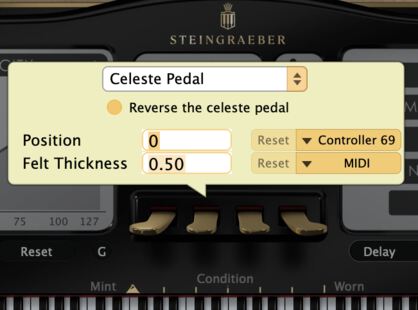
Mozart Rail Pedal, reduces the key depth and the hammer to string distance to play more softly,Harmonic Pedal, allows you to play staccato while maintaining the sustain pedal resonance effect,Sostenuto Pedal, allows you to hold some notes after release without pressing down the sustain pedal. Depress some keys, depress theSostenuto Pedal, release the keys, and the sound of the notes will continue as long as theSostenuto Pedalis down. CheckIgnore the sustain pedalif you do not want theSostenuto Pedalto capture the dampers lifted by the sustain pedal,
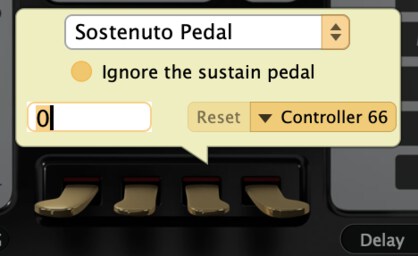
Super Sostenuto Pedal, where the notes held by the sostenuto can be replayed staccato, which is not possible on a "real" piano,Sustain Pedal, which lifts the dampers, letting the strings ring after the keys are released. Being progressive, it allows the so-called “partial pedals”11,Rattle Pedal, also called bassoon pedal, which equipped certain historical pianos, as for example the Besendorfer from the Kremsegg collection. A piece of parchment comes into contact with the strings to create a buzzing noise resembling the sound of the bassoon,Buff Stop Pedal, where a wooden bar covered with leather or felt is pressed against the strings, softening and shortening the tone. It can be found in some harpsichords and historical pianos. On a real harpsichord, the buff stop generally acts only on one register, leaving the other registers untouched. In Pianoteq, you can select which registers are affected by the buff stop pedal. This can be done via a right click on the register buttons (L8', U8', 4'), which gives you also access to the level and detune of each register:

Glissando Pedal, which produces smoother note attacks, as when a harpist or guitarist plays glissandos on his harp,Pinch Harmonic Pedal, which produces harmonics by shortly touching the string at a specific point on new notes, producing harmonics. Also known by harpists as flageolet.
[11] If your piano supports a fine enough
MIDIprogression when using the sustain pedal.
14.2. A sound radiation physical model
The Pianoteq instruments are based on a physical model of the soundboard and its radiation. It simulates the sound field generated by the instrument, and thus allows you to place microphones anywhere around the piano, or just above the soundboard, or even below the piano if you want. The acoustic pressure and pressure gradient are measured where you place the microphone, which allows to simulate omnidirectional microphones as well as directional microphones.
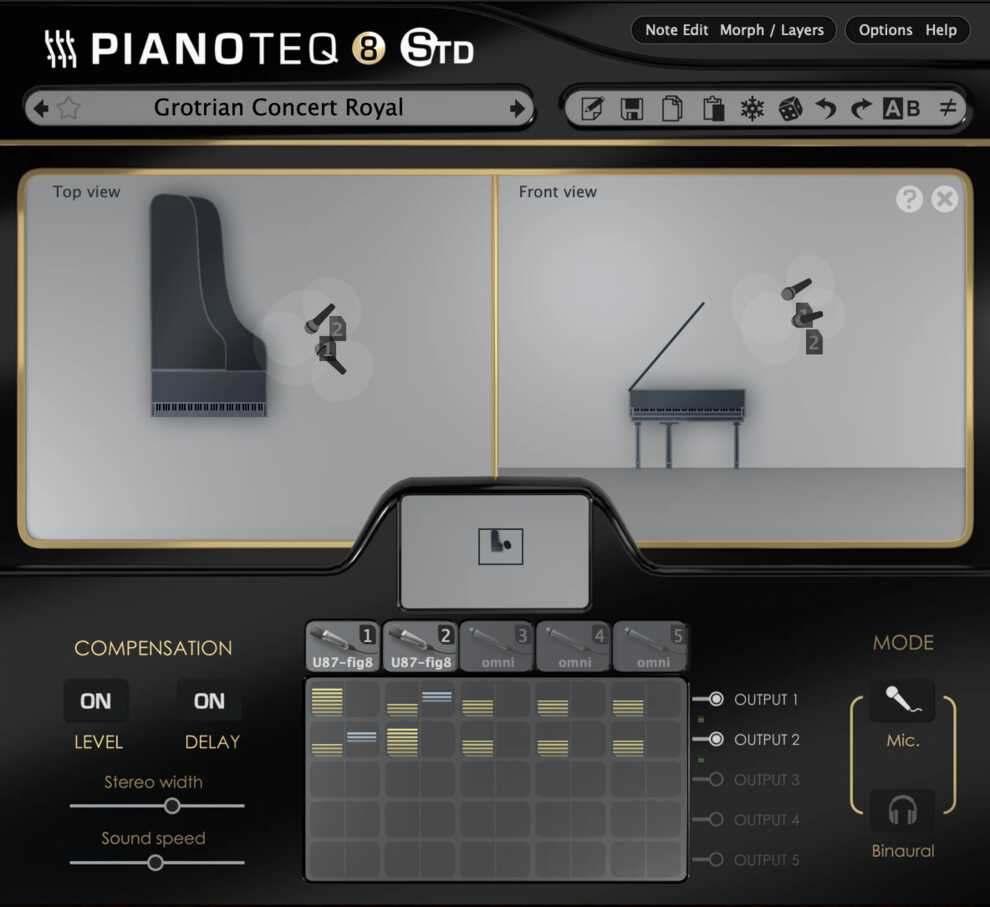
A head model is also provided: here, an additional treatment is applied to the sound pressure registered by the ears of the listener. It can provide an increased realism when listening with headphones.
14.3. Microphones mode
Once you have selected the recording mode, the microphone window opens (you can detach the microphone window by hovering the mouse cursor above the microphone area and dragging it with the mouse). You can then drag a microphone to any location around the instrument and choose its direction.
14.3.1. Microphones and microphones techniques
Several types of virtual microphones are available, such as omnidirectional, cardioid and figure 8, to choose from a range of well-known microphone brands: U87 (omni, cardio and fig8), DPA-4006-4007-4011-4041, C414 (omni, cardio and fig8), CMC6-MK2-MK4, SF-12-24, R84, as well as two "perfect" microphones (they capture the acoustic field generated by the model without any distortion): perfect-omni and perfect-fig8.

When Proximity effect compensation is checked, an automatic compensation algorithm is involved which avoids the increase in bass response when the microphone is close to the soundboard.
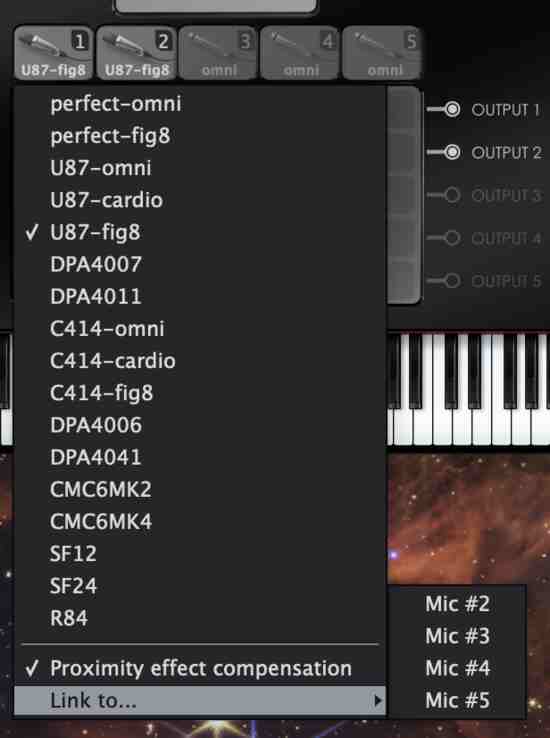
To make it easier moving several microphones, you can link them together, either by the Link to command from the microphones menu, or by double-clicking in between the microphones you want to link. Then you can move them, rotate them and adjust their distance to each other.
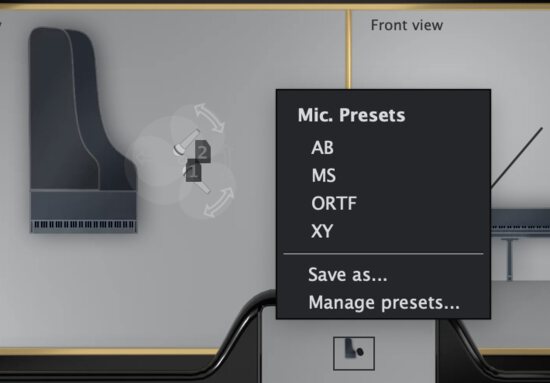
By right-clicking in the mic area, you can save your mic settings as a Mic. Preset and load those you have created.
Here are a few classic microphones techniques.
- AB Technique. Two omnidirectional microphones are placed approximately 50 cm (19") of each other. The technique is denoted BA in Pianoteq when the left/right channels are reversed.
- XY Technique. Two cardioid microphones are placed as close as possible and facing each other at an angle taken between 90º and 135º.
- ORTF Technique. Two cardioid microphones are placed approximately 17 cm (7") of each other (distance between our ears) and facing each other at an angle of 110º.
- MS Technique. An omnidirectional microphone (M) and a figure 8 microphone (S) are placed as close as possible and facing each other at an angle of 90º. The output used in the left and right channels are then M+S and M-S.
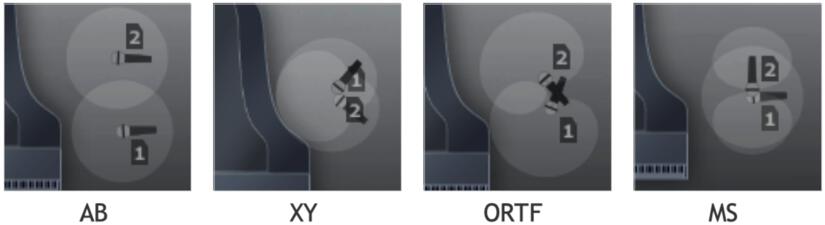
14.3.2. Mix table
The mix table allows you to mix the microphones into the different output channels. For each active microphone and each active channel, you can adjust the volume, the delay and the polarity that you want to be applied by clicking in the corresponding cell (right click opens the popup). Polarity is reversed when Reversed polarity = 1. Which channels are active depend on your audio configuration.
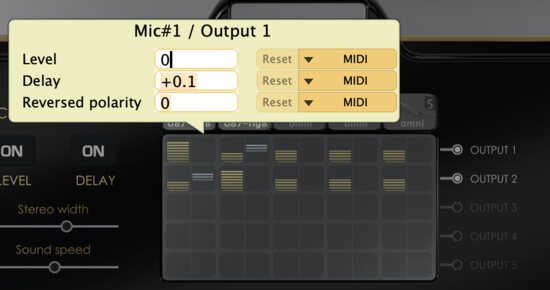
14.3.3. Compensation
When switched on, Level compensation and Delay compensation compensate respectively for the level and delay on each line connecting a microphone to a channel. When switched off, the raw sound from the microphones is heard: the volume decreases with the distance from the piano while the delay increases. In both cases, level and delay that you adjust in the mix table are relative to the chosen configuration.
14.3.4. Stereo width and sound speed
Two other parameters can be adjusted in the Microphones mode:
Stereo width. This parameter allows you to narrow or broaden the stereo image of the instrument,Sound speed. Since this parameter was present while we developed the model, we chose to make it available for you. Its effect is equivalent to changing the time unit. It modifies the travel time of the sound waves in the air.
14.3.5. Lid position
The lid can be raised or lowered. Hover the mouse over the top edge of the lid and drag the lid to raise or lower it. This feature appears in the same panel as the microphone position because it is part of the acoustic radiation model and thus directly influences the sound waves captured by the microphones.
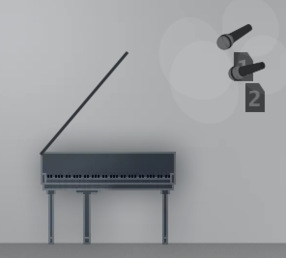
14.3.6. Binaural mode
If you have selected the Binaural mode, you can choose the position of the listener around the piano. The Binaural mode involves physical modelling of a dummy head. You can rotate the head in any direction, and you can even increase its size (for big headed people only).

14.3.7. About the microphones position
As is well-known among sound engineers, the microphone position has a dramatic effect on the resulting sound of the piano: for some positions, the sound is nicely balanced from low to high frequencies while other positions lead to a strongly coloured sound. There might be places where some frequencies are almost completely missing (wave nodes), and even the best position is far from rendering a purely flat response: recording always brings some additional colour, which makes sound recording a real art.
The next graphic gives an idea of how “flatness” can vary with the position: the lower a point of the surface, the flatter the response becomes.
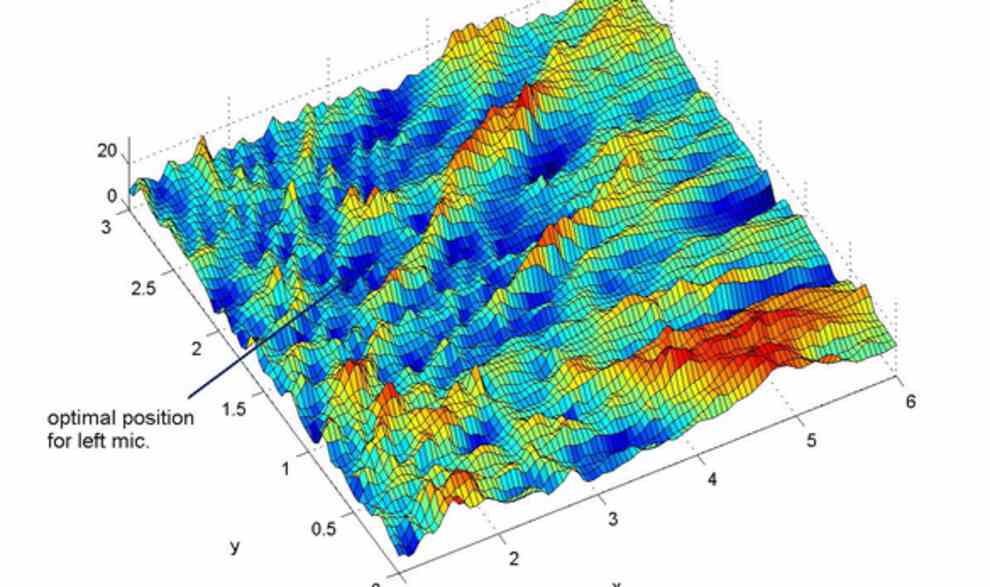
15. From action to effects
The lower right panel gives access to the Action, Mallet Bounce, Equalizer and Effects settings. The buttons below it provide a shortcut for enabling/disabling the selected effects and the reverb.
15.1. Action
Here you can adjust several parts of the piano action:
Damper position: when a note is released, the damper falls back on the strings and each overtone decays more or less rapidly depending on the damper position. It is particularly noticeable in the bass notes when using partial pedals (and also with keyboards sending variable key release velocity),Damping duration(efficiency of the dampers),Last damper: all keys withMIDInote number greater than this value have no damper,Mute: makes the dampers more or less press onto the strings,Key release noise, noise made by the release of the key,Sustain pedal noise: “whoosh” when all dampers rise together, as well as when they fall.

15.2. Mallet bounce
This feature is particularly interesting for the chromatic percussion instruments, including the cimbalom.
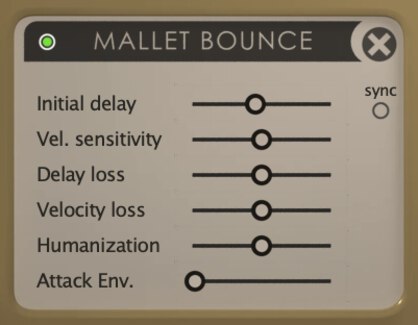
You can adjust the way the mallet bounces on the bar (or on the cimbalom strings):
Initial delay: adjust the delay for the initial bounce,Velocity sensitivity: the higher the sensitivity, the longer the first bounces at high velocity (the “drop height” has increased),Delay loss: adjust the amount of delay loss from one bounce to the next one,Velocity loss: adjust the amount of velocity loss from one bounce to the next one,Humanization: adjust the random variation of all these parameters.
15.3. Equalizer
In its default state (Main is selected), contrarily to the EQ3 effect (cf. Section 15.5), this EQUALIZER works in pre-processing (modifying the model before computing sound). The fact that it works in pre-processing allows automatic volume compensation: for example, when increasing the medium spectrum, it will increase the medium frequencies in each note while keeping the natural balance across the keyboard. In other words, the middle notes will not get suddenly louder than the other ones. Another advantage of pre-processing is that it allows very fine variation in the EQ curve, unlike on a standard 3 band EQ. You can add (click) or remove (double click) control points and modify the curve by dragging them with the mouse.
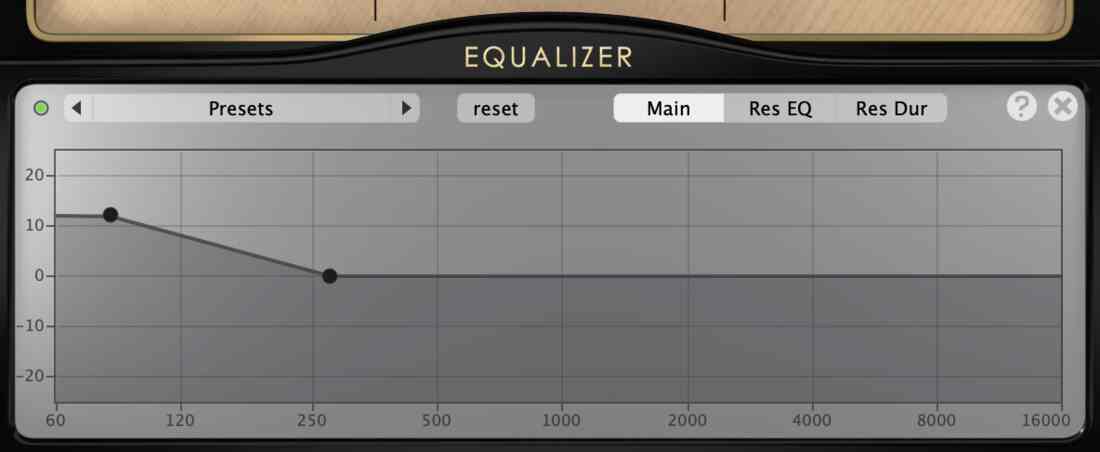
Two other features, Res Eq and Res Dur, allow respectively to equalize the sympathetic resonances and to modify their duration.
15.4. Note Effects
This panel adjusts the effects acting directly on the model, for each individual note. Three effects are available, the Vibrato, modulating the frequency, the Tremolo, modulating the volume, and the Attack Envelope.
The Depth of the Vibrato defines the importance of the effect in cents. The Offset controls whether the change in frequency will be more positive or negative. The Depth, in dB, of the Tremolo controls the importance of the effect, and the Relative Phase determines how synchronous the Vibrato and Tremolo are when used together.
The left part of the panel sets the speed of the variations, Rate, the time before it appears, Onset Duration, its Shape and its Phase.
When using the Attack Envelope in addition to the Mallet Bounce feature, Bounce Envelope determines how the bounced attack will be.
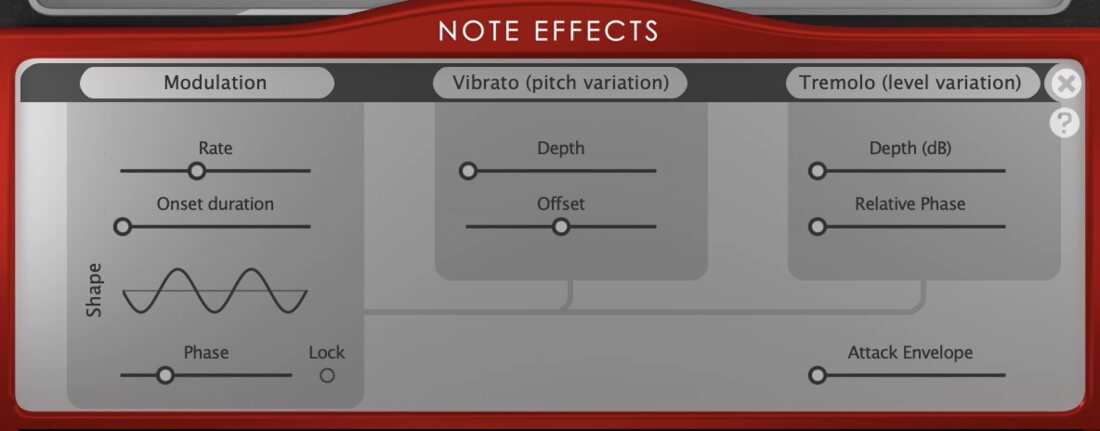
15.5. Effects
The effects panel lets you chain three effects that can be switched if wanted.
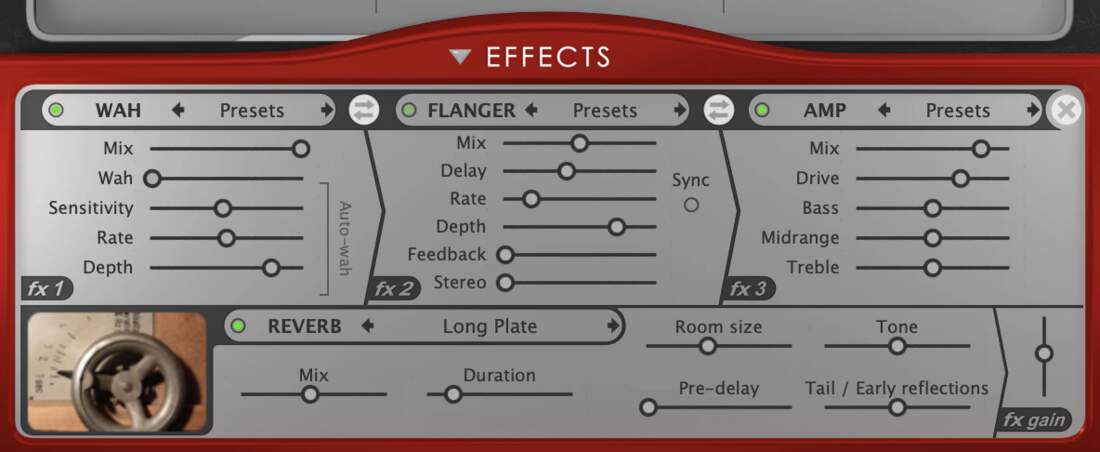
The effect menus allow you to select among the following effects: Tremolo, Wah, Chorus, Flanger, Phaser, Fuzz, Delay, Amp, Comp, EQ3. The Gain is applied after all effects. Placed here for convenience, it does the same as the Volume in the main interface.
The following controllers are shared by several effects:
Delay: the length of the delay line in milliseconds,Depth: the loudness variation in dB in the effect,Feedback: the percentage of signal feedback in the effect delay line,Mix: the ratio of the effect and the unprocessed sound,Mono switch: changes the effect from mono to stereo,Rate: frequency of the oscillator that modulates the effect,Stereo: phase offset between the stereo oscillators,Sync switch: its menu allows synchronizing the effect to the tempo,Tone: simple tone control for the delayed signal.
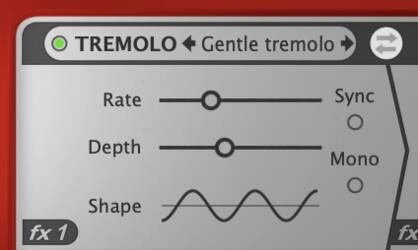
In the Tremolo effect, you can control the shape of its LFO by draging the mouse horizontally and vertically over the Shape curve.
In the Wah effect, the Wah slider itself is the direct controller of the wah-wah effect (right click on it and click on MIDI to assign it to a MIDI controller). In Auto-Wah mode, the Wah is modulated by the amplitude of the sound. Specific Wah controllers:
Sensitivity: Auto-Wah is disabled when the slider is at the extreme left. The more you push it to the right, the lower the amplitude which starts triggering the Wah effect.Depth: controls the upper limit of the frequency shift for the wah-wah filter.
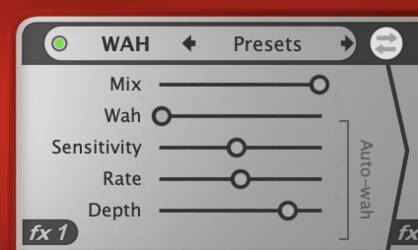
Similarly, in the Phaser effect, the Phasing slider is the direct controller of the phaser effect. Specific Phaser controller: Intensity: the width of the frequency sweep, ranges from 0% to 100%.
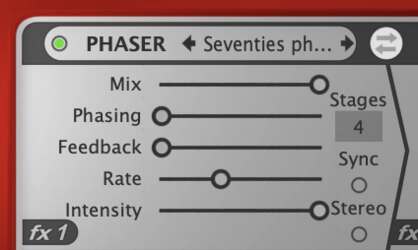
The Amp effect simulates an amplifier equipped with the following controllers:
Mix: the ratio of the effect and the unprocessed sound,Drive: amount of distortion introduced in the signal,Bass: amplifier low frequencies boost,Midrange: amplifier mid-range boost,Treble: amplifier high frequencies boost.
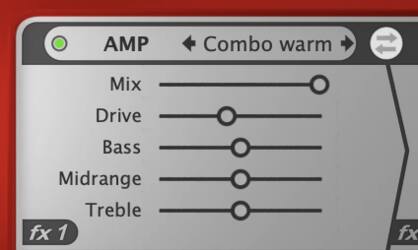
The Comp effect is a standard compressor with the following controllers:
Ratio: gain ratio input/output above the threshold,Attack: the time it takes for the compressor to reduce the gain once the signal reaches the assigned threshold level,Release: the time it takes for the gain reduction to end once the signal drops below the assigned threshold level,Threshold: the level at which the compressor gain reduction starts,Gain: the gain in the overall level after the compression.
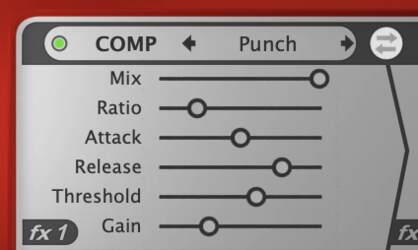
The EQ3 effect is a simple 3-band parametric equaliser. Dragging control points on the interface will change the cutoff-frequency and the gain of each band. Pressing the ’shift’ key while dragging will change the Q factor of each band.
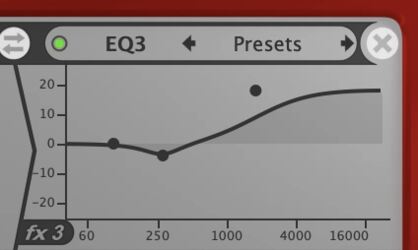
15.6. Reverberation
A new convolution reverberation unit simulates acoustic surroundings ranging from Studio up to very long reverbs like Cathedral or Taj Mahal. It includes other types of reverbs such as Plate, Spring, Speakers, Broceliande... In PIANOTEQ STANDARD or PIANOTEQ PRO, you can even load your own reverb impulses via Load WAV impulse... in the reverb menu.
The reverberation is controlled by the following parameters:
Mix: the relative level in dB between reverberant sound and direct sound,Duration: the length of the reverberant sound,Room size: from 5 to 50m,Pre-delay: the time between the direct sound and the reverberant sound,Tone: a tilt equalizer that only affects the reflected sound, darker to the left, brighter to the right,Tail / Early reflections: the relative level in dB between early reflections and reverberation tail.

16. Practice
And now, a few tutorials to help you understand how Pianoteq works. We will learn how parameters influence the sound. It is important to notice that Pianoteq also lets you produce new sounds which could never be obtained from a real instrument.
16.1. Tutorial 1: tuning
What is the difference between a “normal” piano and a “honky tonk” piano? Most of the difference can be found in the unisons tuning. Each note has three strings, except in the bass range. The honky tonk sound comes from the fact that these three strings are not in tune: they do not produce the same frequencies. You can obtain this effect by moving the Unison width slider to the right in the Tuning panel:

However, having the three strings perfectly in tune is not necessarily best. If you push the slider completely to the left, the three frequencies of each unison will match almost perfectly, but you will find that the sound becomes uninteresting. It sounds too “clean”; it lacks life. So, how should it be tuned? There is no universal truth in such an aesthetic matter. That is why Pianoteq, for the first time in a digital piano, lets you adjust the unison tuning to your own taste!
When changing Unison width, you may also find it interesting to change the Direct sound duration, reducing it if you have reduced Unison width and vice versa. Observe that the closer the strings are to being in exact unison, the faster the direct sound will decay and the slower the remanent sound will decay.
Unison tuning is not the only feature that affects tuning: another question is how intervals, that is, the frequency ratio between two different notes, are tuned. The tuning of all the intervals within an octave is called a temperament.
Over the years, many different temperaments have evolved. The most commonly used today is the equal temperament, in which all semitones are equal. However, a few hundred years ago, people used many other temperaments, some of which you can choose in the Temperament menu. Try playing them. You may find the difference not so evident when playing single notes, but much more prominent when playing chords, some of them having a nice consonant sound, whereas others having a quite harsh sound.
16.2. Tutorial 2: voicing
The main objective of piano voicing is setting the brightness of the sound by adjusting the hammer hardness. Different music may require different voicing. The Voicing panel contains three hammer hardness sliders. Try first moving the Mezzo slider, which acts on the hammer hardness around MIDI velocity 64. Moving it to the left, you will obtain a softer sound, whereas moving it to the right yields a brighter sound:
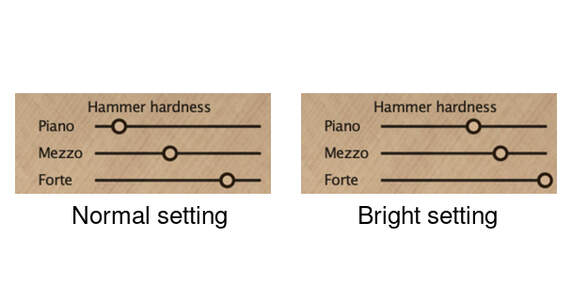
Once you are familiar with these sound changes, you can try the other two sliders acting at Piano level and Forte level respectively. You may also want to experiment with using the Hammer noise parameter in conjunction with this Hammer hardness setting. You can, for example, set the Hammer hardness to very soft, but increase the volume of the hammer hitting the string using the Hammer noise setting. In other words, reducing the hardness of the hammer doesn’t mean that you have to lose the percussive sound of the hammer as you reduce the brightness of the sound. On the other hand, you may want to have hard hammers to make the timbre bright, but at the same time reduce the volume of the percussive knock of the hammer hitting the strings.
Another feature is timbre adjustment through the intensity of the individual overtones, which can be partially performed on a real piano by shaping or needling the hammers.
- Try moving the overtone sliders one by one in the
Spectrum profile, starting with the first overtone, also called the fundamental. - Experiment by increasing the eighth overtone by 15 dB. A funny sound, isn’t it?
- Next, try some more global shaping, raising or lowering, for example, the first three overtones:
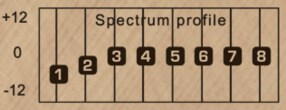
Voicing is not independent from tuning, for shaping the sound during tuning can be considered as voicing. Do you want to obtain longer decay? Then you can:
- Act directly on tuning by reducing the
Unison widthin theTuningpanel, - Act indirectly on tuning by increasing the
Direct sound duration, - Act on design parameter by increasing the
Soundboard Impedancein theDesignpanel.
16.3. Tutorial 3: soundboard design
Soundboard impedance plays a crucial role in piano design. What is the soundboard mechanical impedance? When a periodic force is applied to the soundboard, the wood oscillates with a certain velocity at the same frequency as the applied force. The soundboard impedes (resists) with its inertia, elasticity and resistance: this is the mechanical impedance, which has a ratio of force / velocity.
Typically, a high impedance results in a long sound because the energy is only slowly transmitted from the strings to the soundboard, and vice versa. High impedance yields long but weak sounds whereas low impedance yields strong but short sounds. Hence piano manufacturers have to find a compromise between sound level and sound duration.
With Pianoteq’s solution, you are free to amplify the sound as much as you want. There is no more compromise. You can set the impedance, adapting it to the sound duration that you want:
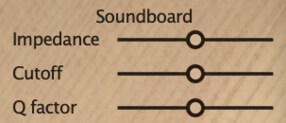
- The first slider,
Impedance, acts globally on the impedance at all frequencies. Moving it to the right will result in longer sounds and vice versa.
The mechanical impedance depends on the frequency. The impedance is usually quite high below a certain frequency called the cut-off frequency, above which it drops down with a slope called the Q factor: the rate at which impedance is reduced and thus the rate at which the sound decreases in length. Higher frequencies decay more rapidly than lower frequencies. Hence:
- Moving the second slider,
Cutoff, to the right will increase the cut-off frequency, and thus increase the number of high overtones that are long. - Moving the third slider,
Q factor, to the right will increase the impedance slope, and thus decrease the duration of the overtones above the cut-off frequency. Moving it to the left will instead allow these overtones to decay more slowly, prolonging the initial bright sound just after the attack.
Example: if you like emphasizing the sound of the strings, you can reduce the Q factor. Alternatively, you can increase the Impedance or the Cutoff.
16.4. Tutorial 4: adapting Pianoteq to your keyboard
For demanding pianists, it is of utmost importance to adapt Pianoteq to the keyboard in the best possible way.
- Step 1. If your keyboard has its own velocity settings, choose the one you like the best in general.
- Step 2. Use the Keyboard calibration assistant by clicking on the
Calibrationbutton below the velocity window and follow the instructions step by step.
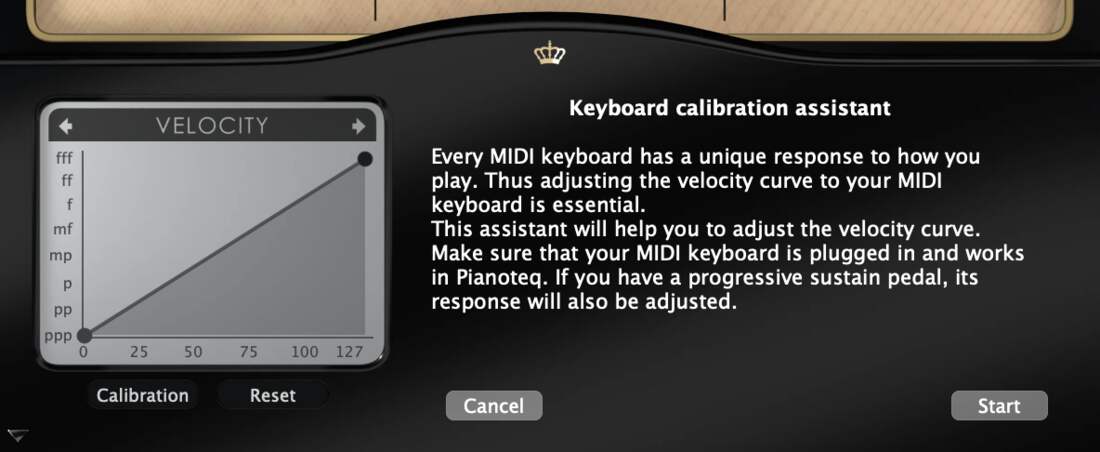
- Step 3. If necessary, make further adjustments of the velocity curve by moving the control nodes of the curve or adding new ones.
16.4.1. Further adjustments
Some further adjustments can be made that depend on the instrument you are playing:
- Step 4. Select the
Dynamicsthat you want to use, typically between 20 dB and 60 dB. Measurements made on acoustic pianos show a dynamic range of approximately 50 dB. In piano recordings, due to compression, the dynamic range is often much narrower. In Pianoteq, when changing dynamics, the forte volume remains constant while the lower amplitudes are raised or lowered.

- Step 5. Choose the appropriate timbre when playing piano, mezzo forte and forte by moving the corresponding sliders in the
Voicingpanel.
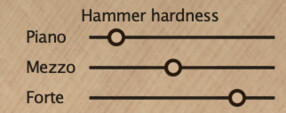
You are now ready to play. Note that steps 3 to 5 can also be used to adapt Pianoteq to a given MIDI file in the best possible way.
16.5. Tutorial 5: difference between spectrum profile and equalizer
What is the difference between the spectrum profile (see tutorial 2) and the equalizer? Let’s look at an example. Open the Voicing panel and set the first two spectrum bars respectively to +6 dB and +3 dB:
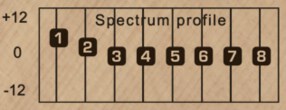
What happens to the sound? All notes are modified: for each note, the fundamental has been increased by 6 dB and the second overtone by 3 dB. The piano sound has become globally softer because the higher overtones now have a lower amplitude relative to the fundamental and the second overtone.
Using several undo’s, put the spectrum bars back to their original values, and now adjust the equalizer curve, increasing it from 0 dB to 10 dB when going down from 200 Hz to 62 Hz:
What happens to the sound now?
- For all notes with a fundamental above 200 Hz, that is, above G2 (the G just below middle C), nothing happens, because their overtones are all above 200 Hz, where the equalizer is a straight horizontal line.
- For notes below G2, the first overtones are modified according to the equalizer curve. For example, G1 whose fundamental is 98 Hz will have its fundamental frequency increased by 6 dB, whereas the other overtones remain almost unchanged (because they are above 196 Hz).
The resulting piano sound will have more bass, with an unchanged middle register and treble notes.
17. Pianoteq PRO
PIANOTEQ PRO is the advanced version of Pianoteq. It includes the following additional features:
- Note per note adjustment for physical parameters: tuning, unison width, hammer hardness, strike point, string length, spectrum profile, soundboard impedance, damper position... This note per note adjustment is available in the Standard version only for tuning and volume.
- Sample rates available up to 192 kHz (limited to 48 kHz in the Standard version). Be aware that a high sample rate will generate a massive increase of
CPUload.
17.1. Note Edit
The Note Edit (note per note adjustment) of parameters is a very powerful tool that lets you adjust the chosen parameter for each note.
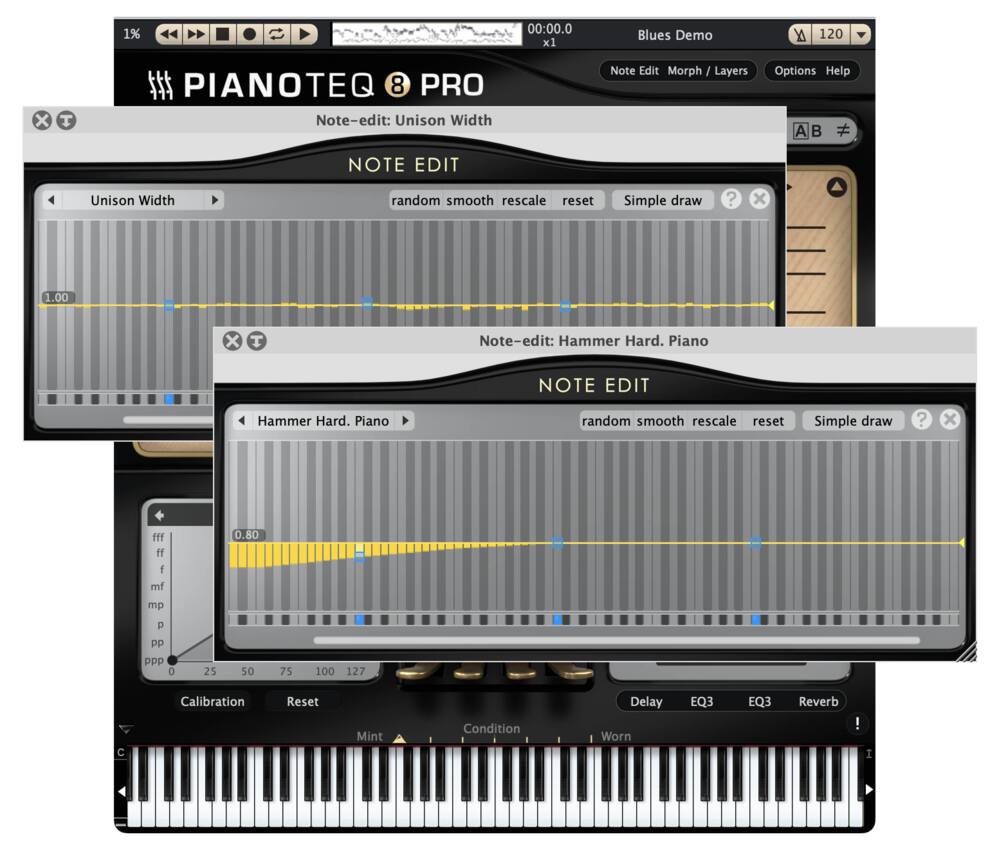
You access the Note Edit window by clicking on the Note Edit button or by double clicking on an “editable” slider. You can drag the Note Edit window anywhere on your screen and open several new windows, allowing you to work on several parameters at the same time as you can see in the picture above, where Unison width and Direct sound duration are being adjusted.
Observe the handles that let you perform some more global changes on the curve. These handles are located on specific control notes that you can select/unselect by a double click on the control rail below the graphic. These control notes are shared by all parameters except the special case of the spectrum profile which is described in the next section. For fine tuning, press the Shift key while moving a point of the curve.
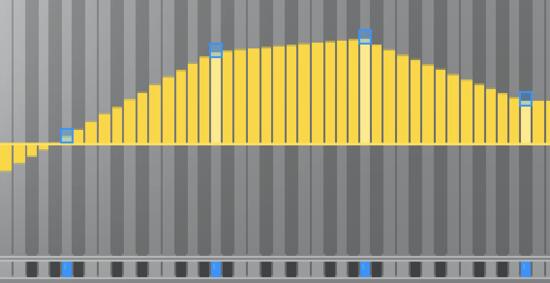
Clicking outside a control note lets you modify any other note individually.
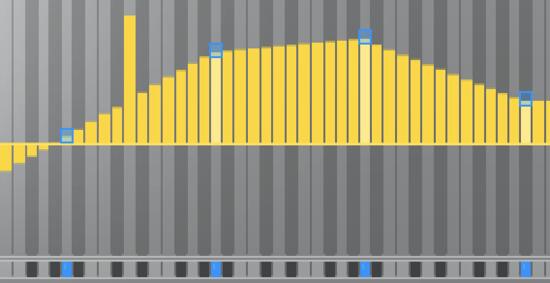
Convenient tools are provided that allow you to modify a given shape: random, smooth and rescale. Click and drag the mouse around the button to vary the degree of the effect (see also the tips that are provided on the interface). The reset button resets all parameters to the saved settings of the preset (contained in the fxp file on the hard drive).
17.2. Spectrum profile examples
The Note Edit of the Spectrum Profile works a bit differently from the other parameters, for you can adjust each overtone for each note! You can access it by a double click on any of the spectrum profile sliders.
Overtones can be modified individually, but also in different combinations called Harmonic, Comb, Major, Octave... Various draw modes named Simple draw, Haircut and Fill only are also provided. All these features are grouped in the same menu on the right, labelled Simple draw at first access.
The spectrum profile has its own set of control notes that you can select/unselect by a double click on the control rail below the graphic. They are independent of the control notes used by the other parameters.

Outside the control notes, the spectrum profile is linearly interpolated, and you can observe the intermediate values by clicking on the corresponding note on the control rail.
17.2.1. Example 1
If you set a single control note and increase its third overtone by 6 dB, all of the notes will have their third overtone increased by 6 dB:
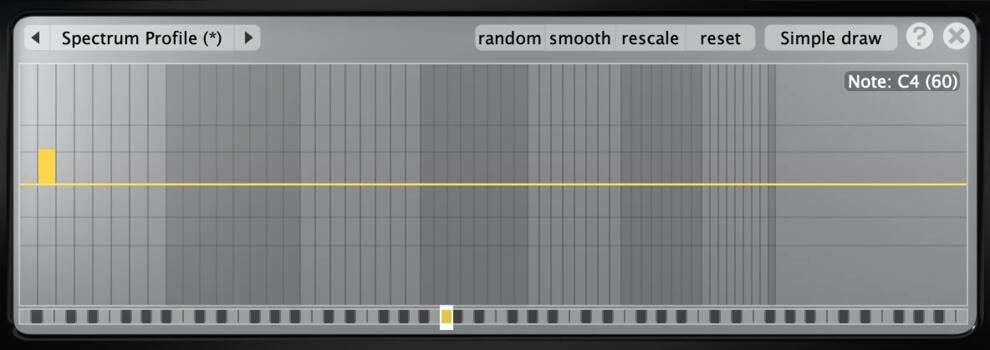
With a single control note...
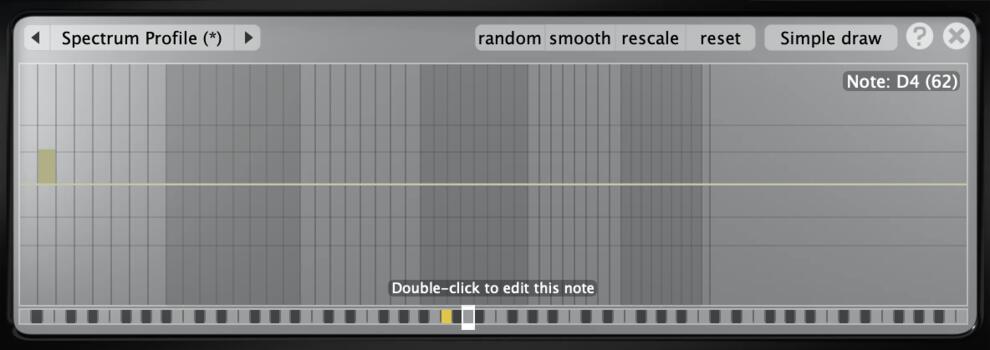
... all other notes are modified in the same way.
17.2.2. Example 2
Here — starting with a reset to clear everything — since we wanted only the middle C to be modified, we added 2 control notes on each side to prevent the interpolation from "propagating" to the other notes:
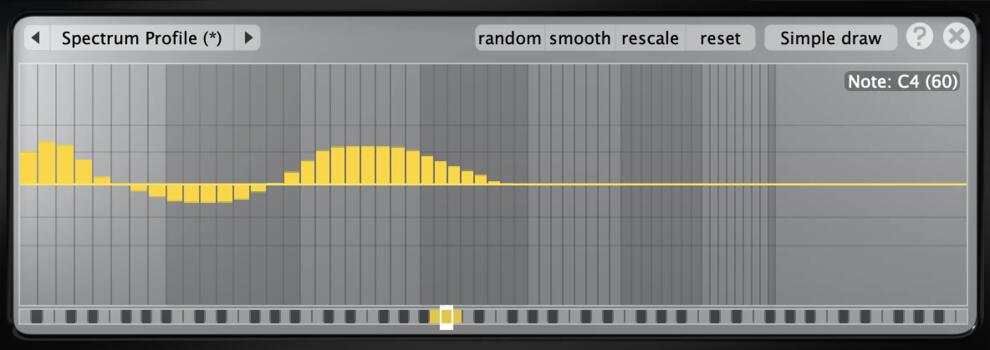
With three consecutive control notes...
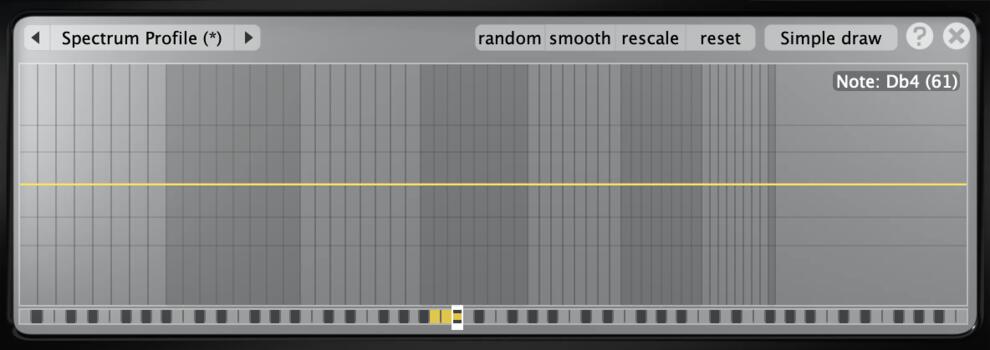
... you can alter only the middle note if you want to prevent your edit from spreading to the notes above or below it.
17.2.3. Example 3
In this last example, we modified the middle C and the C below, and we observe how the intermediate notes are interpolated:
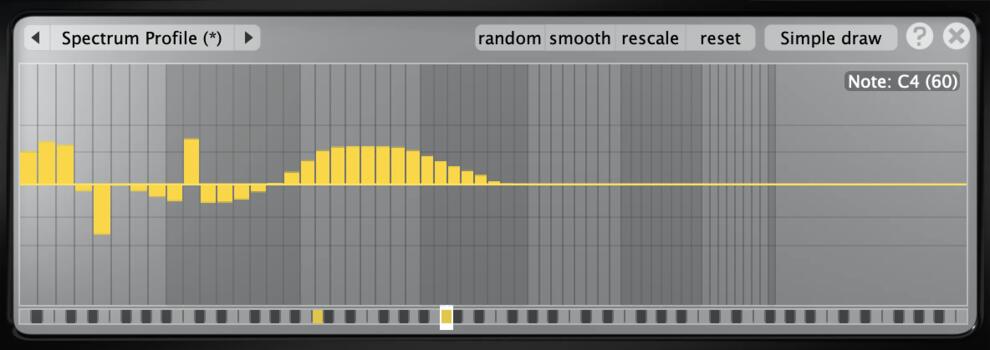
Profiling the middle C...
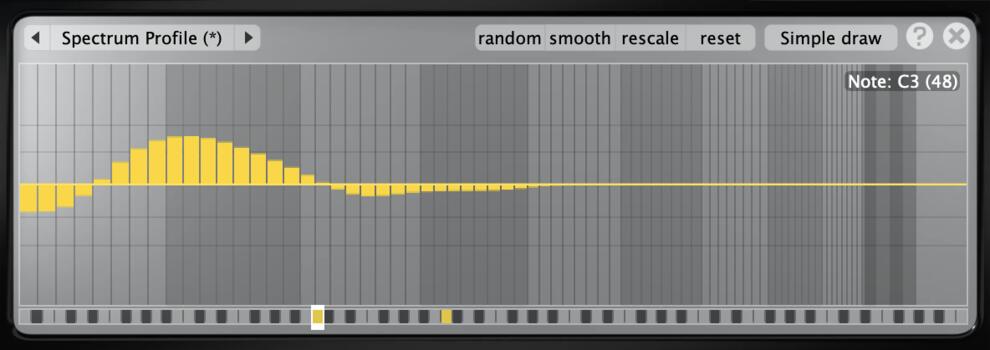
... and the C below ...
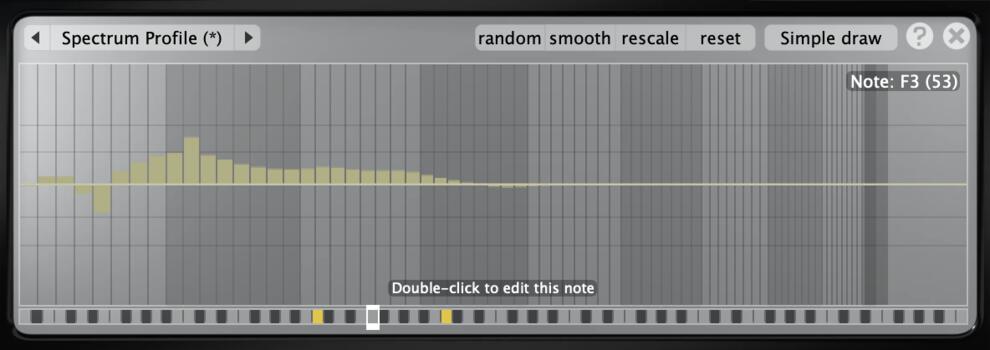
... results in interpolated values for the F between.
18. Appendix: temperaments construction
MATLAB programs for some Pianoteq built-in temperaments12. Inputs are equal tempered frequencies f (which may be stretched) and corresponding MIDI numbers.
%-------------------------------------------------------------------
function f = pythagore(f,MIDI)
%-------------------------------------------------------------------
delta = 3/2/2^(7/12);
ratio = delta.^[-3 -8 -1 -6 1 -4 3 -2 -7 0 -5 2];
f = f.*ratio(rem(MIDI,12)+1);
%-------------------------------------------------------------------
function f = zarlino(f,MIDI)
%-------------------------------------------------------------------
ratio2C = [1 25/24 9/8 32/27 5/4 4/3 45/32 3/2 25/16 5/3 16/9 15/8];
ratio = ratio2C./2.^((0:11)/12);
ratio = ratio/ratio(10); % leaving A unchanged
f = f.*ratio(rem(MIDI,12)+1);
%-------------------------------------------------------------------
function f = mesotonic(f,MIDI)
%-------------------------------------------------------------------
q = 5^(1/4);
ratio2C = [1 5*q^3/16 q^2/2 4*q/5 5/4 2/q 5*q^2/8 q ...
           25/16 q^3/2 4*q^2/5 5*q/4];
ratio = ratio2C./2.^((0:11)/12);
ratio = ratio/ratio(10); % leaving A unchanged
f = f.*ratio(rem(MIDI,12)+1);
%-------------------------------------------------------------------
function f = welltempered(f,MIDI)
%-------------------------------------------------------------------
q = max(real(roots([1 0 0 2 -8]))); a = (128/q^5)^(1/7);
ratio2C = [1 a^2*q^5/16 q^2/2 a^4*q^5/32 q^4/4 2/a a*q^5/8 q ...
           a^3*q^5/16 q^3/2 4/a^2 a*q^4/4];
ratio = ratio2C./2.^((0:11)/12);
ratio = ratio/ratio(10); % leaving A unchanged
f = f.*ratio(rem(MIDI,12)+1);
%-------------------------------------------------------------------
function f = werck(f,MIDI)
%-------------------------------------------------------------------
ratio2C = [1 256/243 1.1174 32/27 1.2528 4/3 1024/729 1.4949 ...
           128/81 1.6704 16/9 1.8792];
ratio = ratio2C./2.^((0:11)/12);
ratio = ratio/ratio(10); % leaving A unchanged
f = f.*ratio(rem(MIDI,12)+1);
[12] Some of these temperament definitions derive from “Der Piano und Flügelbau, Herbert Junghanns, Verlag Das Musikinstrument Frankfurt/Main, 1979”
19. Special acknowledgements
19.1. Instrument providers
- Michel Armengot, France (electric piano CP-80)
- Paul Badura-Skoda, Austria (pianoforte Walter)
- C. Bechstein Pianoforte GmbH, Germany (Bechstein DG)
- Robin Bigwood, Great Britain (harpsichords Grimaldi, Blanchet)
- J. Blüthner Pianofortefabrik GmbH, Germany (Blüthner Model One)
- L. Bösendorfer Klavierfabrik GmbH, Austria (Bösendorfer 280VC)
- Olivier Cussac, France (Rhodes MK1, Wurlitzer 200A, Clavinet Hohner D6, Toy Piano Michelsonne)
- Pascal Gaillard, France (Steel Drum)
- Luigi Gaggero, Italy (Cimbalom Balázs Kovács)
- Marc Guilliou, France (Spacedrum, Hand Pand, Tank Drum)
- Grotrian Piano Company GmbH, Germany (Grotrian Concert Royal)
- Haendelhaus, Germany (pianoforte Schmidt)
- Kawai Musical Instruments Manufacturing Co., Ltd., Japan (Shigeru Kawai SK-EX)
- Peter Karsten, Germany (Karsten collection)
- Modartt SAS, France (Steinway B)
- Monique Niebisch, France (piano Erard)
- Orchestre du Capitole de Toulouse, France (celesta, glockenspiel, marimba, xylophone)
- Gilbert O'Sullivan, Great Britain (piano Bechstein)
- Daniel Parisot, France (Hamburg Steinway D)
- PETROF, spol. s r.o., Czech Republic (Ant. Petrof, Petrof Mistral)
- Heinz Preiss, Kremsegg Schloss Museum, Austria (clavichord Neupert, Pianofortes Schöffstoss, Schantz and Graf, Kremsegg collection)
- Klaus P. Rausch, Germany (Electra-piano, Pianet T)
- Klaviermanufaktur Steingraeber & Söhne, Germany (Steingraeber E-272)
- Steinway & Sons, USA (New York Steinway D)
19.2. Recording engineers
- Luc Filaretos (Studio le Graal, France)
- FWL studios (Blüthner, Germany)
- Gerhard Kanzian (Bösendorfer, Austria)
- Andreas Kaul (Steingraeber, Germany)
- Matthias Kontny (Karsten collection, Germany)
- Laurent Minh (France)
- Herwig Preiss (Kremsegg Schloss, Austria)
- Lauren Sclafani and Melody Hwang (Steinway New York, USA)
- Teldex Recording studio (Bechstein DG, Germany)
- Vaclav Vlachy (Petrof, Czech Republic)
- Matthias Wegener (Grotrian, Germany)
Warm thanks to our beta testers, who helped us greatly in improving our instruments. Without their intensive participation, their constructive criticism and enlightening advice, Pianoteq wouldn’t have become the enjoyable instrument which you are playing.
Many thanks also to our customers and distributors for their support and all others who supply us with valuable opinions and ideas.
19.3. Company
MODARTT is a company that develops and provides software, hardware and consulting services for artistic and technological applications. MODARTT also supports the KIViR project (Keyboard Instruments Virtual Restoration), offering digital restoration of historical keyboard music instruments in museums. Please visit our website www.modartt.com for further details.
19.4. Authors
- Pianoteq: Philippe Guillaume and Julien Pommier
- Artwork: Richard Baracetti and Guillaume Joly
- User Interface: Guillaume Joly
- Manual: Niclas Fogwall and Philippe Guillaume
- Editing and proofreading: Gregg Johnson and Robin Tournemenne
20. Intellectual property
- Pianoteq is a trademark of MODARTT S.A.S., 9, avenue de l’Europe, 31520 Ramonville Saint Agne, France.
- Patent: US 7,915,515 B2, Europe 07.823284.0/2047455, Japan 5261385, China ZL200780022703.2.
- Cubase, ASIO, and VST are trademark of Steinberg Media Technologies GmbH
- The Audio Units logo is a trademark of Apple Computer, Inc.
- FFTPACK v4. Copyright (c) 2004 the University Corporation for Atmospheric Research ("UCAR"). All rights reserved. Developed by NCAR's Computational and Information Systems Laboratory, UCAR, www.cisl.ucar.edu.
- Redistribution and use of the Software in source and binary forms, with or without modification, is permitted provided that the following conditions are met:
- Neither the names of NCAR's Computational and Information Systems Laboratory, the University Corporation for Atmospheric Research, nor the names of its sponsors or contributors may be used to endorse or promote products derived from this Software without specific prior written permission.
- Redistributions of source code must retain the above copyright notices, this list of conditions, and the disclaimer below.
- Redistributions in binary form must reproduce the above copyright notice, this list of conditions, and the disclaimer below in the documentation and/or other materials provided with the distribution.
- THIS SOFTWARE IS PROVIDED "AS IS", WITHOUT WARRANTY OF ANY KIND, EXPRESS OR IMPLIED, INCLUDING, BUT NOT LIMITED TO THE WARRANTIES OF MERCHANTABILITY, FITNESS FOR A PARTICULAR PURPOSE AND NONINFRINGEMENT. IN NO EVENT SHALL THE CONTRIBUTORS OR COPYRIGHT HOLDERS BE LIABLE FOR ANY CLAIM, INDIRECT, INCIDENTAL, SPECIAL, EXEMPLARY, OR CONSEQUENTIAL DAMAGES OR OTHER LIABILITY, WHETHER IN AN ACTION OF CONTRACT, TORT OR OTHERWISE, ARISING FROM, OUT OF OR IN CONNECTION WITH THE SOFTWARE OR THE USE OR OTHER DEALINGS WITH THE SOFTWARE.
- WEBP. Copyright (c) 2010, Google Inc. All rights reserved.
- Redistribution and use in source and binary forms, with or without modification, are permitted provided that the following conditions are met:
- Redistributions of source code must retain the above copyright notice, this list of conditions and the following disclaimer.
- Redistributions in binary form must reproduce the above copyright notice, this list of conditions and the following disclaimer in the documentation and/or other materials provided with the distribution.
- Neither the name of Google nor the names of its contributors may be used to endorse or promote products derived from this software without specific prior written permission.
- THIS SOFTWARE IS PROVIDED BY THE COPYRIGHT HOLDERS AND CONTRIBUTORS "AS IS" AND ANY EXPRESS OR IMPLIED WARRANTIES, INCLUDING, BUT NOT LIMITED TO, THE IMPLIED WARRANTIES OF MERCHANTABILITY AND FITNESS FOR A PARTICULAR PURPOSE ARE DISCLAIMED. IN NO EVENT SHALL THE COPYRIGHT HOLDER OR CONTRIBUTORS BE LIABLE FOR ANY DIRECT, INDIRECT, INCIDENTAL, SPECIAL, EXEMPLARY, OR CONSEQUENTIAL DAMAGES (INCLUDING, BUT NOT LIMITED TO, PROCUREMENT OF SUBSTITUTE GOODS OR SERVICES; LOSS OF USE, DATA, OR PROFITS; OR BUSINESS INTERRUPTION) HOWEVER CAUSED AND ON ANY THEORY OF LIABILITY, WHETHER IN CONTRACT, STRICT LIABILITY, OR TORT (INCLUDING NEGLIGENCE OR OTHERWISE) ARISING IN ANY WAY OUT OF THE USE OF THIS SOFTWARE, EVEN IF ADVISED OF THE POSSIBILITY OF SUCH DAMAGE.
- LIBJPEG. This software is based in part on the work of the Independent JPEG Group.
- LAME 32bits version 3.99.5
- Copyright (c) 1999-2011 by The LAME Project
- Copyright (c) 1999, 2000, 2001 by Mark Taylor
- Copyright (c) 1998 by Michael Cheng
- Copyright (c) 1995, 1996, 1997 by Michael Hipp: mpglib
All products names and any trademarks mentioned are used for identification purposes only and are copyrighted by their respective holders.