MODARTT ORGANTEQ - User Manual
Welcome
Congratulations on your purchase of Organteq - the starting point of a new generation of pipe organs, created by the MODARTT team.
Do not hesitate contacting us if you need any assistance on how to install and use the software. You are also welcome to provide feedback and suggestions - www.modartt.com/support
Table of contents
- 1. Introduction
- 2. Installing and starting Organteq
- 2.1. Installer package download
- 2.2. Installation for
Windows - 2.3. Installation for
macOS - 2.4. Using Organteq standalone
- 2.5. Using the VST/VST3/AU/AAX plug-in
- 2.6. Hardware requirements
- 2.7. Adapt Organteq to your hardware (standalone version)
- 2.8. Adapt Organteq to your
MIDIsetup - 2.9. Quickly loading
fxp(settings) andMIDIfiles - 2.10.
MIDIfile player (standalone version) - 2.11. Interface magnification
- 3. Console overview
- 4. Preset
- 5. Parameters edition
- 6. All settings
- 7. List of built-in presets
- 8. List of stops
- 9. Special acknowledgements
- 10. Intellectual property
1. Introduction
1.1. Physically modelled Virtual Pipe Organ (VPO)
Organteq is the first physically modelled organ reproducing the heart of the complex flue and reed pipes physics. The sound is generated in real time from scratch, reproducing the typical and variable pipe attack transients chiff as well as the 3D configuration, where pipes are located in space according to their keyboards. Even the action noises from keys, stops and couplers are modelled.
1.2. What makes Organteq outstanding
By being physically modelled, Organteq offers several advantages over sample based variants:
- Superior playability.
- Unique sound adjustments via physical parameters.
- Fast installation and loading.
- Storage just 30 MB (Megabytes).
1.3. Features in short
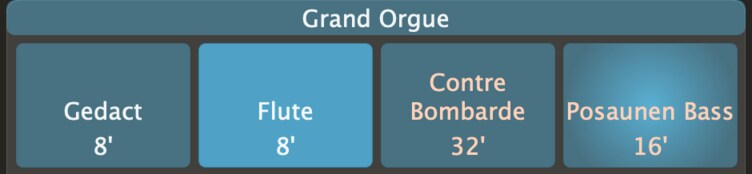
Organteq offers 74 unique stops and more than 4,000 pipes, inspired by the works of famous French builders from the Romantic period, such as A. Cavaillé-Coll, and by great German baroque builders, such as A. Schnitger, G. Silbermann, and T. Tröst. These stops can be assigned on a 50-stop slots console of 3 manual keyboards with a 5-octave range and a pedal keyboard with 32 notes. Each keyboard can be assigned to a selection of stops with adjustable parameters.
With the MIDI learn feature and the convenient MIDI mapping, Organteq provides quick and easy connection with your MIDI compatible keyboard and other devices.
The reverb module offers parameters to vary the ambience, from a pure anechoic dry sound to a giant spacious wet sound.
2. Installing and starting Organteq
Organteq works on computers equipped with Windows, macOS or Linux. You can use Organteq in standalone mode or as a plug-in instrument in a VST, VST3, Audio Units or AAX host. Organteq runs in 64-bit mode only. We recommend visiting www.modartt.com/organteq where you will find the latest information, a detailed FAQ page and a tutorial on how to connect your hardware.
2.1. Installer package download
Once registered as a user on the modartt.com/user_area, you will be able to log in and download the binary archive located in the Download section.
2.2. Installation for Windows
Execute the installation program file organteq_setup.exe. Activation is required when launching Organteq for the first time. Just follow the on-screen instructions. ASIO drivers are necessary for obtaining a low latency. If using a soundcard that is not distributed with its own ASIO drivers, you can download free third-party ASIO drivers at www.asio4all.com.
2.2.1. Optimization
If you experience pops and cracks when playing, watch the audio load and CPU frequency in Options ► Perf:
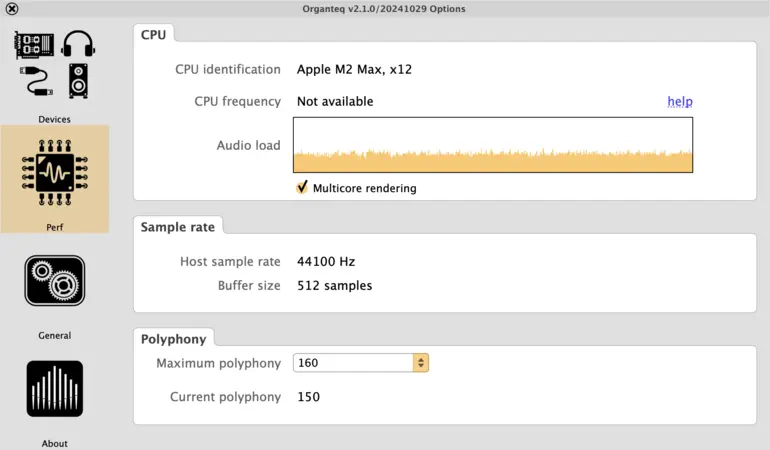
Red bars in the graphic indicate an overload. In that case, look at the displayed CPU frequency. If this frequency varies or stays below the normal frequency of your CPU, it comes from the Power Management setting of your computer, which should be set to High Performance.
2.3. Installation for macOS
Click on the Organteq package and follow the instructions. Activation is required when launching Organteq for the first time. Ensure to follow the on-screen instructions.
2.4. Using Organteq standalone
Using Organteq standalone is simple. Launch Organteq and specify your audio and MIDI devices settings in the Options ► Devices dialogue box. You are then ready to play.
2.5. Using the VST/VST3/AU/AAX plug-in
Organteq can be loaded by any VST, VST3, Audio Units or AAX host. You will need to specify, inside the host, your MIDI device and the driver you are using.
2.6. Hardware requirements
Organteq can be used with any MIDI compatible keyboard. To simulate a real organ closer, you can use multiple MIDI compatible keyboards and an organ pedal board.
The requirements for using Organteq successfully are:
- Recent
CPU(Intel i7, i9, Xeon, AMD Ryzen or equivalent is recommended) - 512 MB
RAM ASIOcompatible sound card and drivers (concerns Windows users only)- Internet connection (if activating the software using quick online method, otherwise see modartt.com/pianoteq/faq)
Windows7 (64-bit) or later,macOS X10.11 or later,Linux(x86).
2.7. Adapt Organteq to your hardware (standalone version)
When running the standalone version, click on the Options button. A window, containing the following sections, appears: Devices, Perf, General and About.
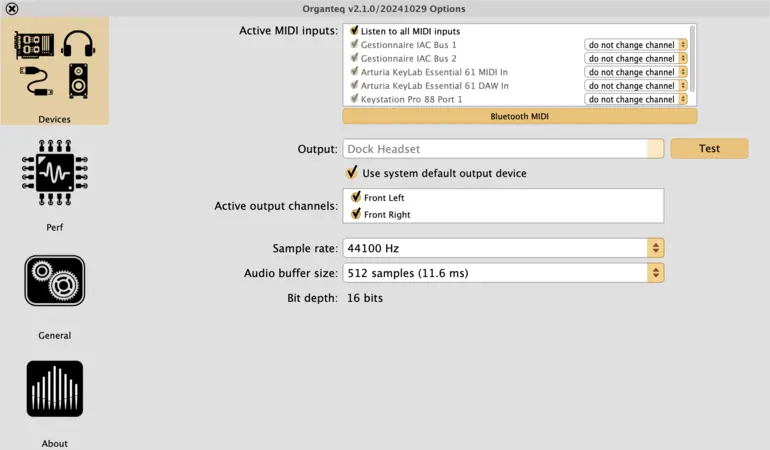
The Devices section lets you select your hardware keyboards, audio device and related driver (Audio device type), output channels, sample rate and audio buffer size.
MIDI channels. Each keyboard brand usually offers a way to set the emitting channel. Alternatively Organteq proposes a send to channel option for each device. If selected, all the incoming messages of the particular MIDI device will have the specified channel.
If running Windows, you should select an ASIO driver in order to minimize latency. If intending to play on a MIDI compatible keyboard, you should select an audio buffer size which generates a latency of less than 8ms to simulate the response of real organ keyboards.
The audio load graph lets you check how your computer performs. If you encounter performance issues, you will need to lower the sample rate.
2.8. Adapt Organteq to your MIDI setup
In Organteq, the MIDI mapping is made of two parts:
- the
MIDI Action mapping: internal actions triggered byMIDIevents - the
MIDI Keyboard mapping: routing betweenMIDIchannels and virtual keyboards
Click on the left part of the MIDI mapping button to open the MIDI mapping window. From there you can either set a MIDI Action mapping or a MIDI Keyboard mapping.

Clicking on the upper right button opens a menu where you can:
- select another
MIDI mapping SaveorSave as...yourMIDI mappingconfiguration (bothActionandKeyboard)PinorUnpinaMIDI mapping(in Standalone mode only).Browsethe list ofMIDI mapping
MIDI mapping it is advised to Pin it.
Pin a MIDI mapping by clicking on the pin icon from the main interface (Standalone only).
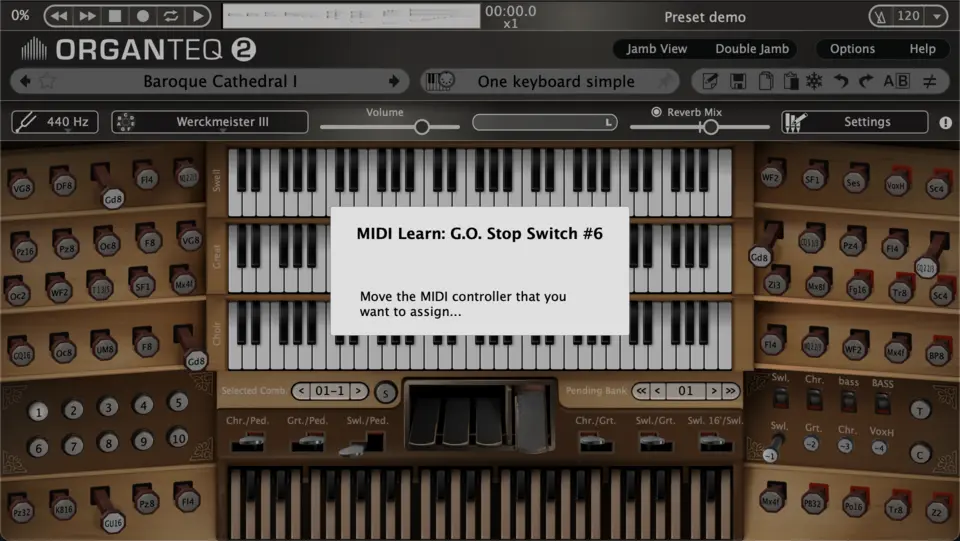
2.8.1. MIDI Action mapping
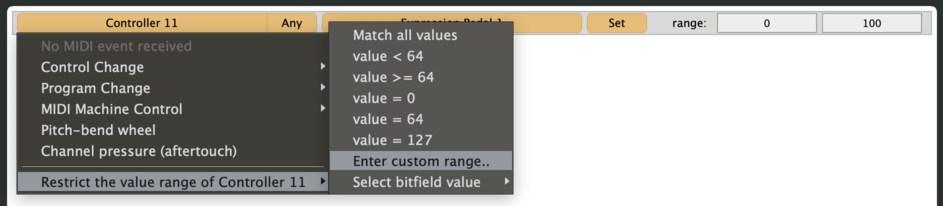
The MIDI Action mapping is made of several Action mapping items. Each item assign a MIDI event (Note On, Note Off, CC, Program Change, etc...) to an Organteq internal action, with MIDI channel filtering and bounds restrictions options.

MIDI controller by clicking on the element while holding the OS specific modifier key (Windows: ctrl + click, macOS: ⌘ + click). See the MIDI Learn section.
Action mapping items by three options : MIDI channel first, MIDI message first or Param first.
You can restrict the input bounds of the Controle Change MIDI message as illustrated below. It is usefull for defectuous MIDI hardware that do not send value within the full range [0, 127].
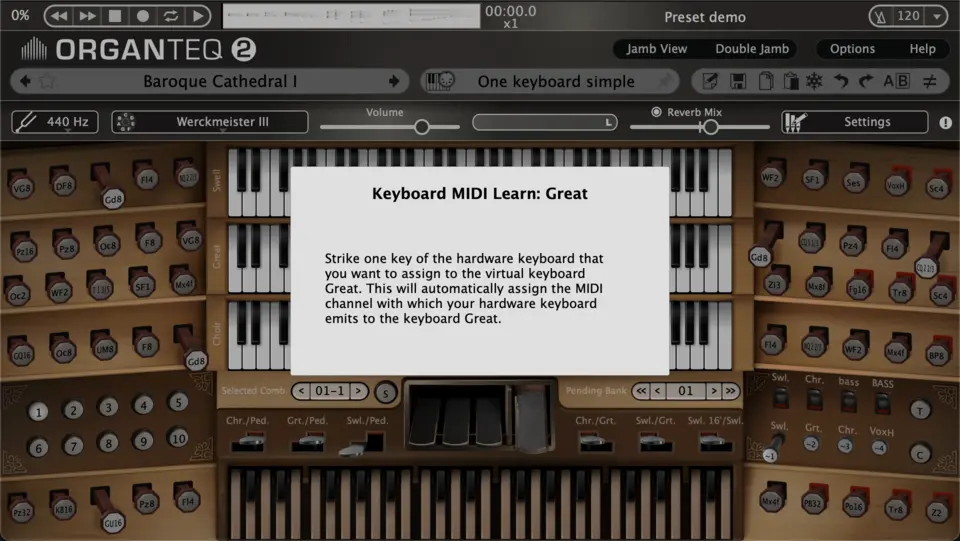
2.8.2. MIDI Keyboard mapping
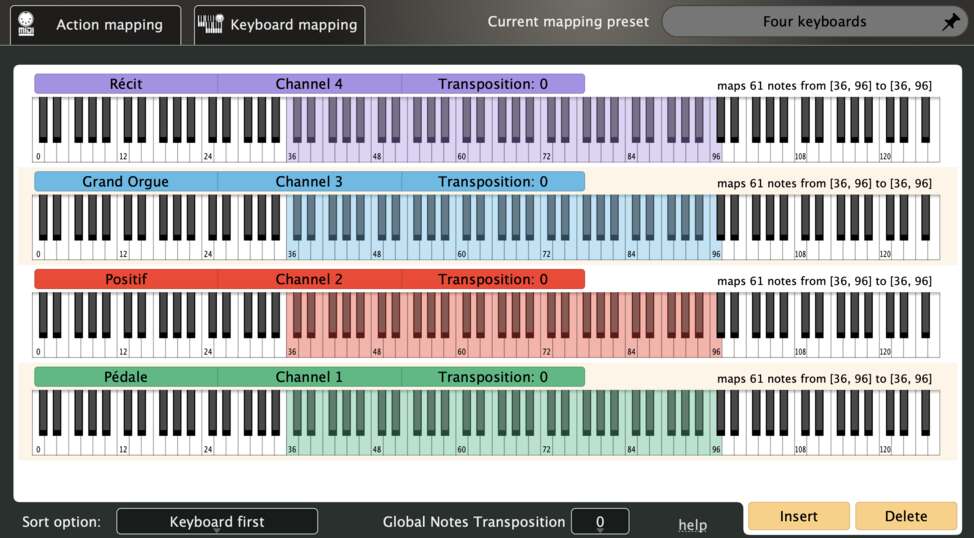
Organteq comes with four virtual keyboards: Pédale, Positif, Grand Orgue and Récit. A Keyboard mapping item allows one to route a MIDI channel to a given virtual keyboard with input range and transposition options.

Keyboard mapping items by two options : MIDI channel first or Keyboard first.
MIDI keyboards, make sure that each of them emits on different MIDI channels. In the plug-in version this is set from the host. For the standalone version, please refer to the section Adapt Organteq to your hardware (standalone version)
MIDI Keyboard mapping up.
Example 1: a basic Keyboard mapping
A basic Keyboard mapping is made of four Keyboard mapping items, one per virtual keyboard, routing the 1 to 4 MIDI channels as follow:
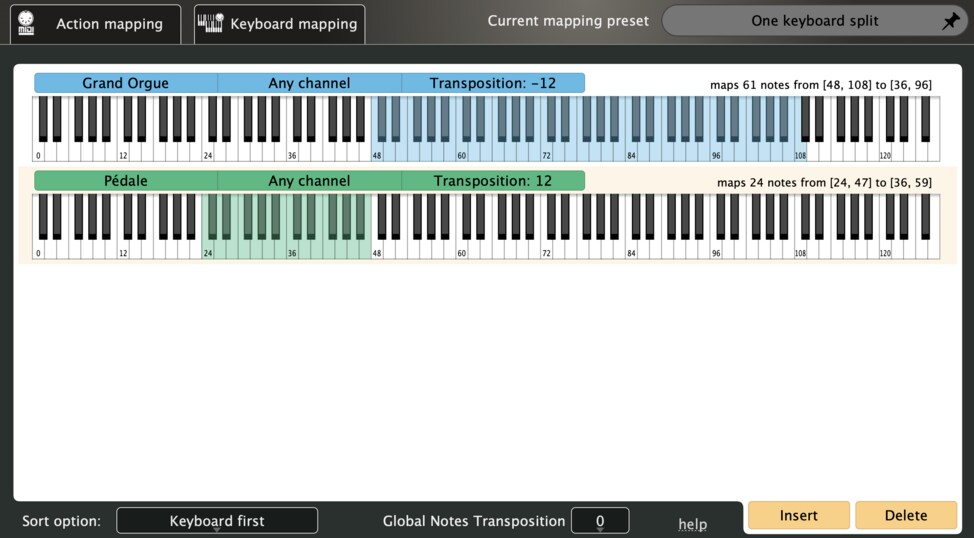
Example 2: a "keyboard split" for pianist
If you have only one hardware keyboard and you still want to use several virtual keyboards, here is an example of a "keyboard split" setup:
2.8.3. MIDI learn
The easiest way to set your MIDI setup is to use the MIDI learn mode.
2.8.3.1. MIDI Action mapping setup
ctrl + click(Windows) or⌘ + click(macOS) on the on-screen UI item:MIDI learnmode is triggered- touch any controller you want to link with
All conflicts will be removed: all other Action mapping items involving the UI action or the MIDI event, will be removed.
MIDI messages for switching on and off. For these specific actions it is asked during the MIDI learn to switch the associated controller on, then to switch it off.
MIDI learn mode can also be triggered by right-click on the on-screen UI item then selecting the option MIDI : Assign MIDI event.
2.8.3.2. MIDI Keyboard mapping setup
- ensure that each keyboard emits on a unique
MIDIchannel - right-click on the on-screen keyboard:
MIDI learnmode is triggered - press any key on the
MIDIkeyboard you want to link with
All conflicts will be removed: all other Keyboard mapping items involving the on-screen keyboard, or the MIDI channel, will be removed.
2.9. Quickly loading fxp (settings) and MIDI files
You can load fxp (and MIDI files with the standalone version) quickly by dragging each file at a time, from the file manager, email client or web browser, onto the Organteq interface.
2.10. MIDI file player (standalone version)
The Organteq standalone version is equipped with a MIDI player that lets you play and record MIDI files. You can load several MIDI files via File ► Load MIDI file and even create your own MIDI Playlist via File ► Manage MIDI Playlist. A long left-click on the MIDI score lets you zoom-in for a better precision.
2.10.1. Organteq MIDI file & built-in MIDI Mapping
Any MIDI stream recorded by Organteq standalone is recorded as a 6-track MIDI file. Track #0 contains the original input. Tracks #1 to #4 contain the notes played on the 4 keyboards from bottom to top (1=Pédale, ..., 4=Récit). Each track from 1 to 4 is recorded on the MIDI channels 1 to 4, respectively. Track #5 contains all other real-time events (stops switches, couplers switches, tremulants switches, expression pedal, crescendo pedal, tutti, ...) as SysEx messages, including clicks events on the GUI.
A MIDI file recorded through Organteq is recognizable by its 6 tracks structure (right-click on the white part of the MIDI Player):
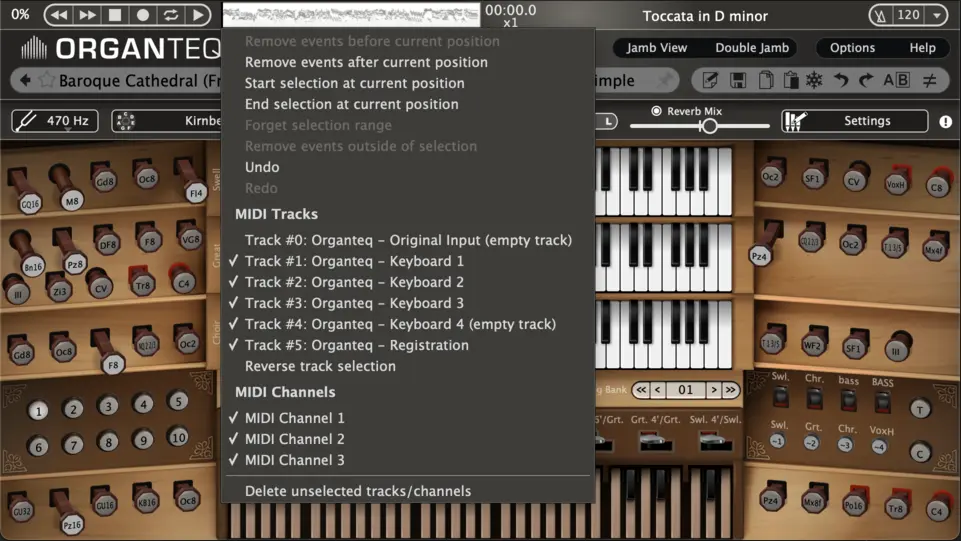
When loaded back in Organteq standalone, such a MIDI file is played by overriding the current MIDI mapping and uses an internal built-in MIDI mapping.
MIDI file recorded with Organteq must be read with the preset/setting (fxp file) with whom it has been recorded, otherwise the real-time events, such as stop switch events, might activate the wrong stop!
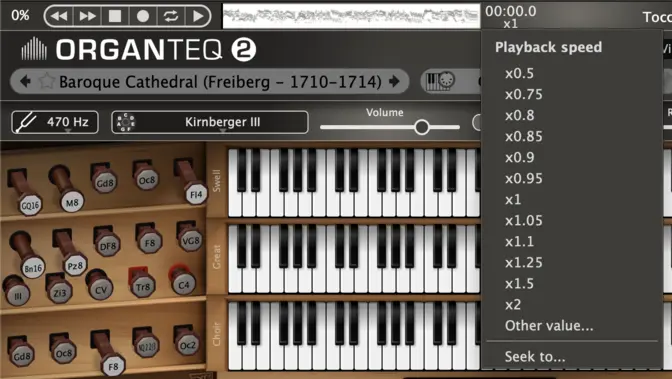
2.10.2. Playback speed
You can adjust the playback speed by clicking on x1 ("times 1"). A menu will appear where you can choose another value or enter any value between 0.1 and 10. Alternatively, click on x1 and drag the mouse to get the value you want.
2.10.3. Auto repeat and loop selection
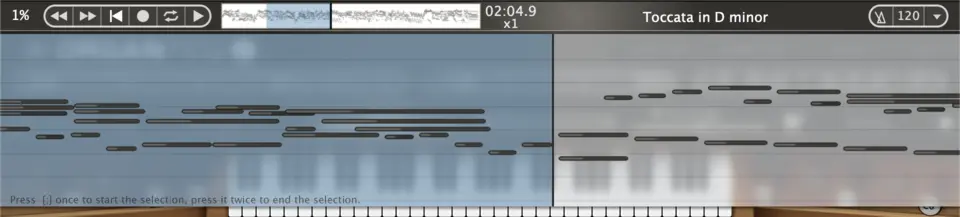
Click on the autorepeat button to toggle the Auto Repeat mode on the current MIDI file. You can select a sub-sequence of the MIDI file to loop on by dragging the transport bar of the MIDI player on one end of your sequence, then right-click to Start/End selection at current position. You can also select a sub-sequence by a long left-click on the midi player: drag the transport bar and press ; once to define the beginning of the selection, press ; twice to define its end.
2.10.4. Record and Save your performance
Click on the record button to start recording your performance live.
Save your MIDI file by opening the File menu. There you can also export your recording to a WAV, FLAC or MP3 audio file.
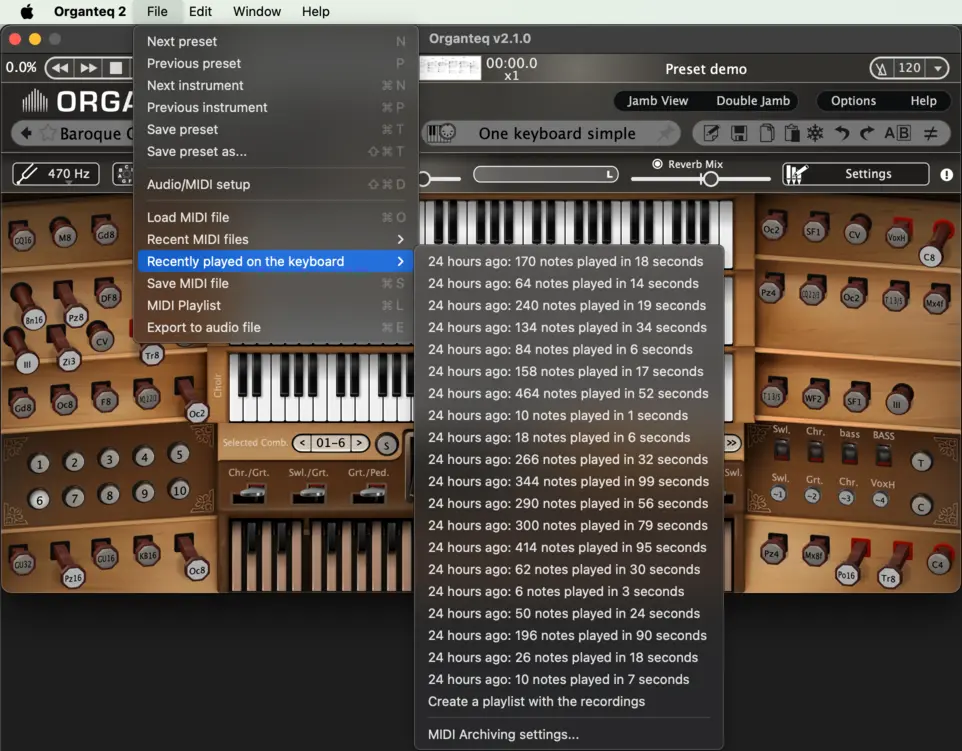
2.10.5. Brilliant performance lost?
At any time, you can retrieve your recent performances via File ► Recently played on the keyboard. Particularly useful when after a brilliant performance you think “too bad I didn’t record this”! Well, Organteq did it for you: just load the latest Recently played on the keyboard and save/export it to a regular MIDI/AUDIO file. It’s as simple as that!
For less recent performances, a MIDI Archiver is available, access the settings at the bottom of the Recently played on the keyboard menu.
Recently played menu by clicking on the actual MIDI file name in the upper bar.
2.10.6. Step by step in your MIDI file
In the standalone version, for exploring your MIDI file step by step, forwards or backwards, use the computer keyboard right or left arrows to play single notes or chords. Using right click in the MIDI player, you can remove events placed before or after the current position.
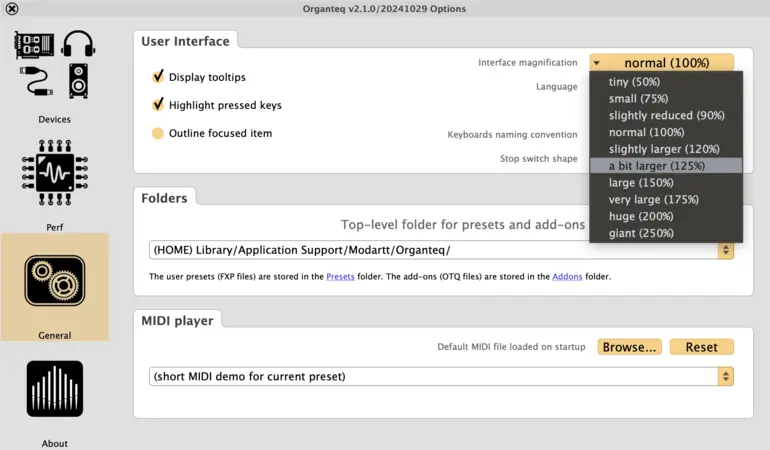
2.11. Interface magnification
The Organteq interface is resizable, making it comfortable to work with any display size. Click on Options ► General and select the size in the Interface magnification menu, or simply use the handy keyboard shortcuts +/-:
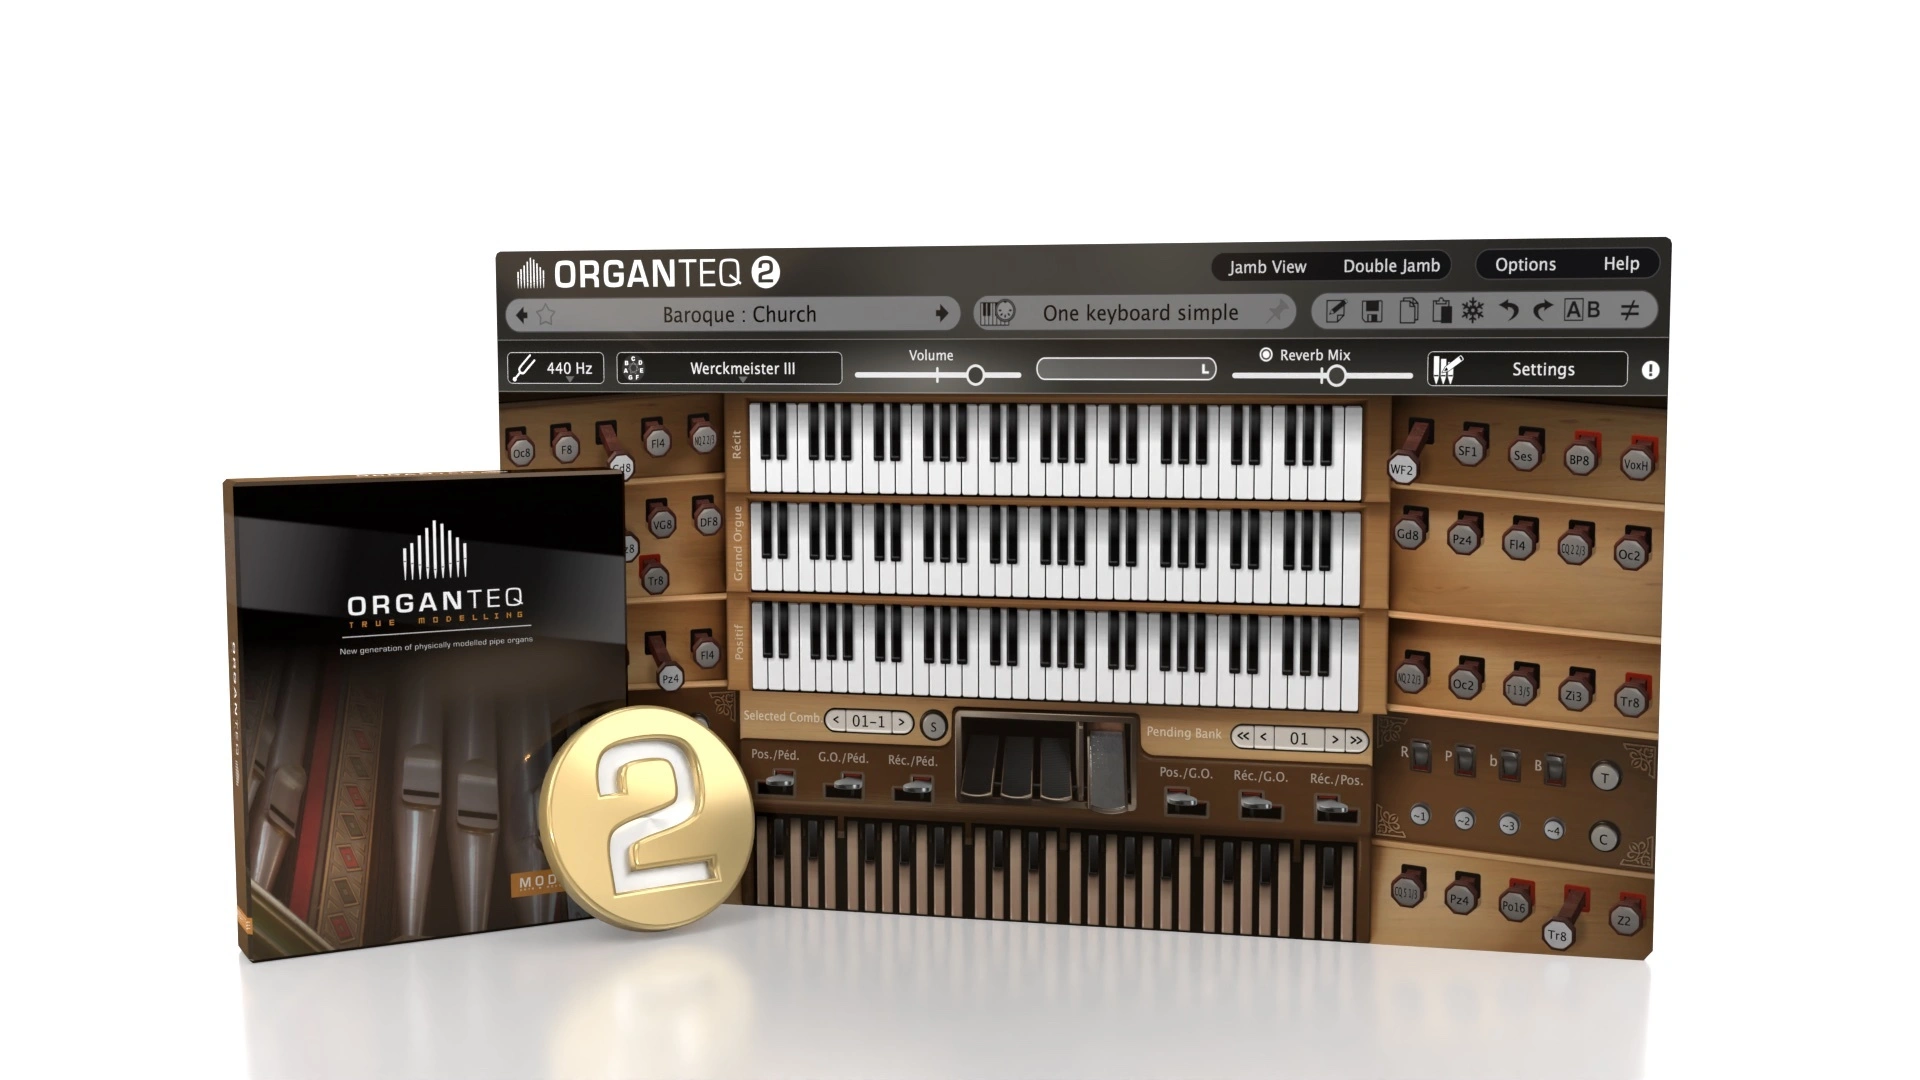
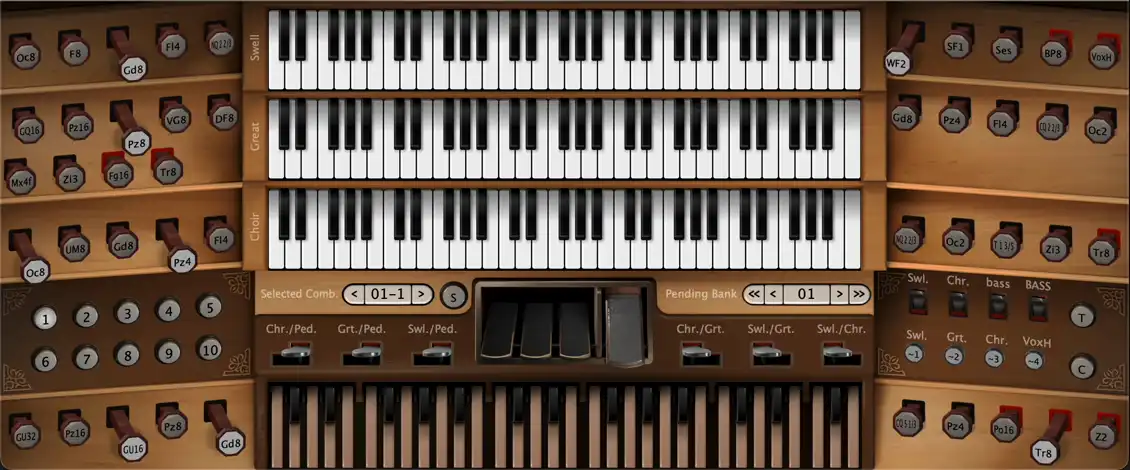
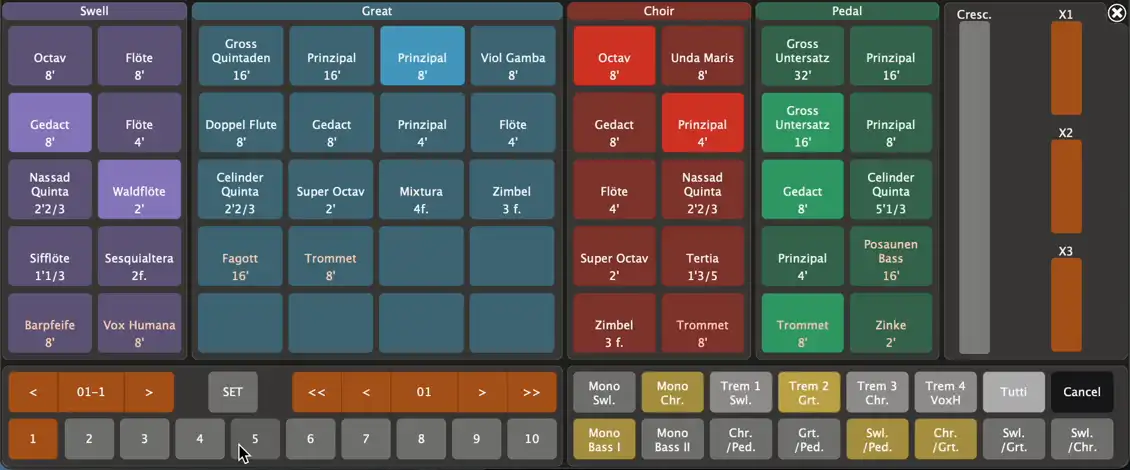
3. Console overview
This section gives a brief overview of the main Organteq window and its features. Please refer to section All settings for details on the features and how to customize/set them.
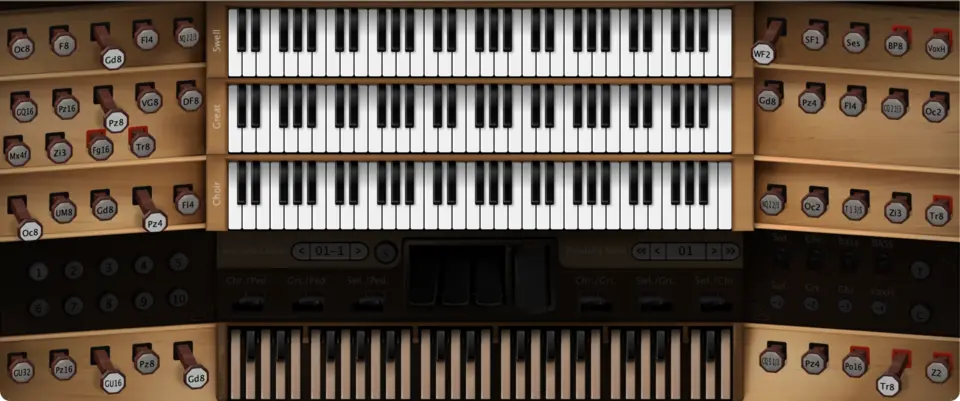
The main GUI view gathers in a condensed way the characteristics of your organ, ranging from the available stop switches to the different pedals, tremulants, and action buttons.
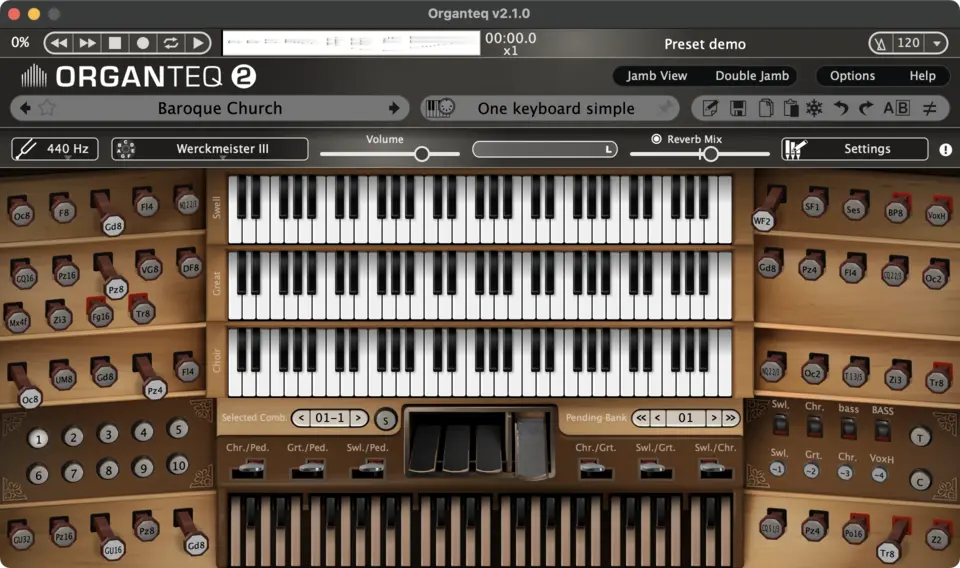
More precisely, the wooden panel indicates the state of these features:
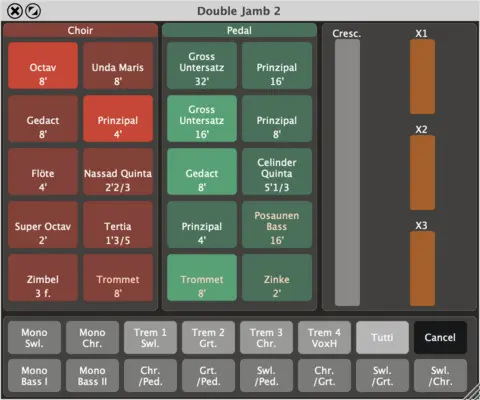
3.1. Jamb Views
Organteq comes with alternative views of the main console window. These Jamb Views, designed specifically for touch screen users, are strictly identical to the main console view in terms of available information (stops state, couplers state, etc.) and possible actions (switching states, setting combination, MIDI Assign, etc.).
You can open these views with the buttons Jamb View and Double Jamb in the upper bar of Organteq, and with the keyboard shortcuts J for the Jamb View and K for the Double Jamb view.
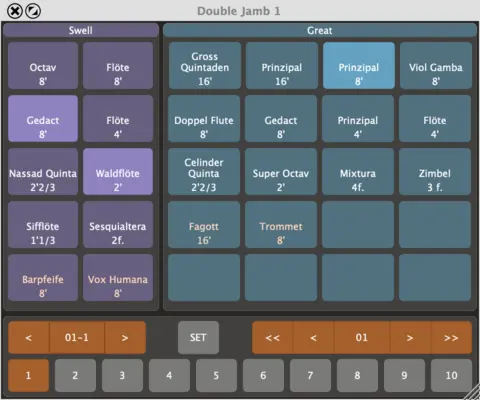
Single Jamb window can be detached from the main window by hovering the mouse at the top of the window, then clicking and dragging it.

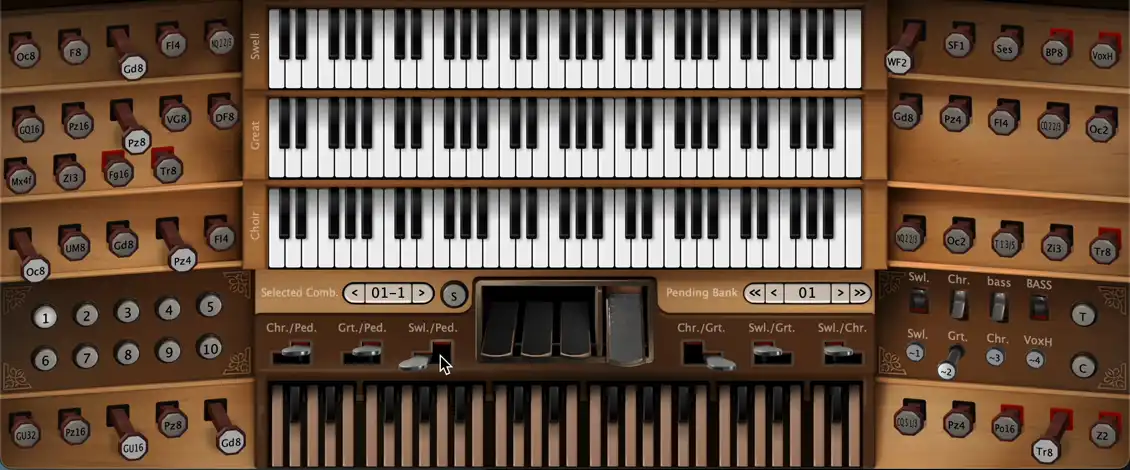
3.2. Restore windows position
You can save the on-screen position of the Jamb Views windows with the keyboard shortcuts ctrl + shift + x. To replace the windows in their saved positions, use ctrl + x.
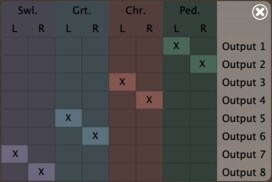
3.3. Stop
A stop is the basic unit of an organ. A stop is a set of pipes with timbral consistency along the tessitura. 74 unique stops are available in Organteq. Please refer to the List of stops section for more information.
3.4. Keyboards & stop divisions
Organteq comes with 4 keyboards, from bottom to top: Pédale, Positif, Grand Orgue and Récit. The Grand Orgue has a set of twenty stop slots, every other keyboard has a set of ten stops slots. All the stops of a keyboard are usually put in a box called division. The keyboard divisions are set at different location, offering different sound planes for each keyboard.
MIDI channel to a keyboard by right-clicking on the keyboard. Then press a key on the hardware keyboard. The channel of your hardware keyboard is then automatically attached to the virtual keyboard.
3.5. Stop drawknobs
When playing on a keyboard, a stop has to be activated to be heard. This is done with the stop drawknob, on the side of the keyboard. This can also be done in any Jamb View window or via the stop switch in the Stop Edit Panel.
Stops can also be activated not manually by using either:
- the Crescendo pedal, or
- the Tutti button.
Stops that are activated using these features are ghosted.
MIDI controller to each stop drawknob by clicking on the stop drawknob while holding the OS specific modifier key (Windows: ctrl + click, macOS: ⌘ + click).
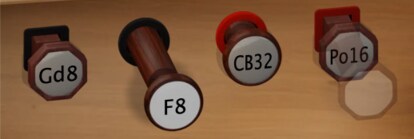
Stop drawknobs of the main console window have different appearances to distinguish:
- French Romantic stops (rounded switches) from German Baroque stops (octagonal switches).
- Flue pipes (black felt) from Reed pipes (red felt).
Options ► General ► User Interface ► Stop switch shape.
On the Jamb Views and the Stop Edit Panel, Reed pipes are written in red.
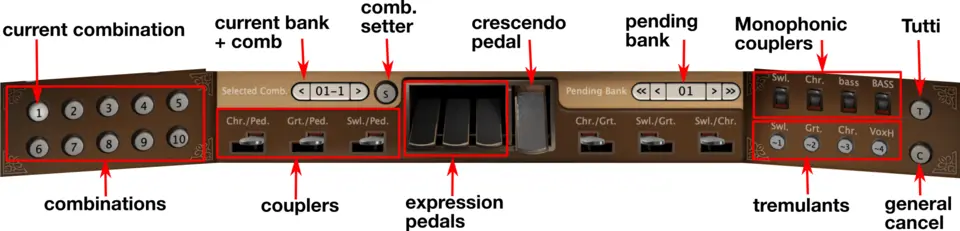
3.6. Couplers

Couplers allow one to add the registration of a keyboard to another keyboard. When Pos. / Péd. is activated, the sound of the Positif is added to the Pédale. Organteq offers 6 adjustable couplers, with octave transposition and forward/transitive options. Open the couplers settings window to custom your own couplers.
MIDI Keyboard mapping as simple as possible.
3.7. Monophonic couplers

Monophonic couplers are a particular sort of couplers. They allow you to send either the highest note (melody or treble) or the lowest note (bass) played on a keyboard to another keyboard. Organteq offers 4 different monophonic couplers:
Mono. Swell: sends the highest note played on the Grand Orgue to the Récit.Mono. Positive: sends the highest note played on the Grand Orgue to the Positive.Bass I: sends the lowest note played on the Grand Orgue to the Pédale.Bass II: sends the lowest note played on any manual keyboard to the Pédale.
3.8. Expression pedal
Pipes are enclosed in keyboard divisions. The expression pedals allow to open the wooden blinds of one or several divisions, yielding a much louder and richer sound.

Stops can be individually added to or removed from any expression pedal from the Expression pedal settings panel.
3.9. Crescendo pedal
The crescendo pedal gradually activates stops in addition to the manual registration.
The crescendo pedal is divided into 24 steps. For each step, a stop can be On or Off. Set the stop individually from the Crescendo settings panel.
In the same way as the stops, couplers and tremulants can also be switched on or off by the crescendo pedal.
3.10. Tremulant
The tremulant is a mechanical device that modulates the upstream air flow that feeds the pipes. When the tremulant is activated, the sound production is modulated according to the tremulant settings. Note that this is not a post-effect: the modulation generated by the tremulant is used as an input of the physical model, and is fully processed by the model itself yielding a modulation of the pitch, the intensity and the harmonic content.

Organteq comes with four assignable tremulants. The tremulant settings panel allows you to assign individual stops and/or entire divisions to any tremulant, and set the rate, the depth and the shape of each tremulant.
Jamb Views are also dynamic.
3.11. Tutti & General Cancel
Two additional buttons are available. Tutti activates all stops of all keyboards. General Cancel resets all stops, couplers and tremulants.
A double-click on General Cancel resets the pending bank to 01.

3.12. Combinations
The stop switches, couplers pedals and tremulant switches manipulation can be fastidious and break the live performance workflow. A combination allows one to perform several actions at the same time. It is a pre-recorded state of stop switches, coupler pedals and tremulant switches that you can trigger all together at any time. The combinations are stored into banks of 10 combinations each. There are up to 100 banks.

3.12.1. Combination snapshot
There are several ways to create combinations. The easiest way is to perform a snapshot.
To perform a snapshot: set the stop switches, couplers and tremulants as desired. Then:
- when
Setis on, triggering a combination stores the current state into the combination, instead of loading the previous recorded state. This performs a snapshot under the current bank and combination. - alternatively, snapshots can be achieved with a
right-click ► snapshotorshift+click ► snapshoton the combination buttons from 1 to 10.
In the Combination settings panel you can set the capture options so only a subset of items will actually be captured. The categories of capture are: the four divisions and the tremulants, couplers and monophonic couplers.
When the Set button is On, a visual feedback shows which item will be captured by highligthing it depending on the capture option settings (see this section):
On/Off: all the items are captured, regardless of their current state (OnorOff).On/none: only the items that are switchedOnare captured.none/none: no item is captured, regardless of the current state (OnorOff).
On the Jamb View, items that will be affected by the snapshot are marked with an orange 'S' symbol.
Set button and toggle the item between On and Off. If the item is always highlighted, the snapshot behaviour is On/Off. If the item is never highlighted, the snapshot behaviour is none/none. If the highlighted follow the toggle, then the snapshot behaviour is On/none.
Set button after use!
From the Combination settings panel you can also edit the combination by hand. From there you can also manage the banks and the combinations with various features: copy/paste, reorder banks and combinations, rename banks, ...
When playing, just click the combination button to quickly revert to the pre-recorded state.
3.12.2. Combination stepper
Stepper, Previous/Next and Previous Bank/Next Bank are used to navigate through combinations and combination banks. Thus, you can prepare your own sequence of combinations that suit your project, and easily navigate through it. Note that changing a combination bank will not trigger any combination: you need to further trigger a combination of that bank with the direct switch or with the combination stepper.

4. Preset
An Organteq preset gathers all your organ characteristics. In other words, it contains all the settings and parameters accessible through the different windows and settings panel. Hence, a preset gathers:
- the organ composition
- the tuning settings
- the pipe-per-pipe voicing
- the reverberation settings
- the MIDI Mappings settings
- the output settings
- the tremulant, expression pedals, and crescendo pedal settings
- the coupler settings
- the combination settings
- ...
An Organteq preset file is an fxp, and has the file extension .fxp.
4.1. Preset Banks
A bank is a set of presets that are located in a given folder, except the factory bank which contains all the built-in presets.
The Organteq preset bank folders
The easiest way to find the Organteq folders is to click on the small folder images to the right of All banks in the preset manager window. The Organteq folder contains one sub-folder Presets: this is where to store the user defined banks. Each bank is itself a folder that contains presets in the fxp file format.
Importing fxp files
There are two ways to import fxp files:
- Drag and drop the file onto the interface,
- Copy the file onto the appropriate folder.
4.2. Preset Tags
Besides being sorted in banks, each preset can also be associated to one tag. A tag is an optional text metadata embedded within a preset.
4.2.1. Built-in and custom tags
Organteq comes with five built-in tags: French Romantic, German Baroque, Historical, Modern and Experimental. The built-in presets are sorted according to these five built-in tags.
You can also create your own custom tags in the preset manager window.
4.3. General commands
In Organteq you can modify and create your own presets, save them and share them with other users. The following commands are located at the top of the interface.

- The
preset manager(pen) button toggle the preset manager window. - The
savebutton allow you to edit and save your new preset. - The
copyandpastebuttons allow you to select and copy/paste a subset of the current parameters from one preset to another. Right click on the copy button allows to copy without changing the previous selection. - The
freezecheckbox allows you to select the parameters that you want to keep unchanged when changing preset. This is a very convenient feature for “transporting” settings from one preset to another. - Using the
undo/redocommands, you can at any time undo and redo the changes you have made: up to 100 undos are possible. A right click on the button shows you the last modification. - The
ABbutton allows you to switch between two presets A and B, one being in the foreground while the other is in the background. The(un)equalbutton next to them appears asunequalas soon as A and B are different. Clicking the(un)equalbutton copies the foreground preset into the background preset. A right click on the AB button lists the differences between A and B. A and B presets have their own undo/redo stack.
Favorite presets
You can mark a preset as a favorite either by:
- clicking on the
Favicon (star) next to the preset name on the main window. - clicking on the
Favicon in the preset manager window.
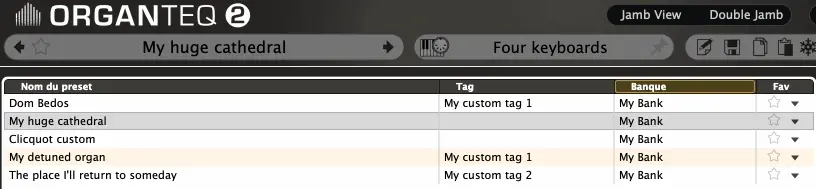
4.4. Preset manager
When you click on the preset manager button, the following preset manager appears:
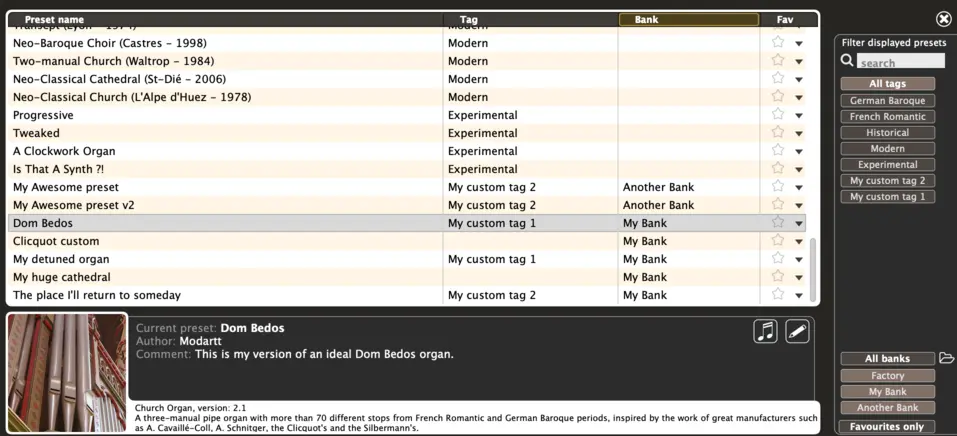
It lets you manage the presets. You can edit the preset information, sort or filter them (see some part of them), rename them, etc.
Edit
Information on each preset is displayed at the bottom of the presets manager, as well as a small demo excerpt (mini-player to the left of the edit button). There you can edit the information related to your own presets, including the tag, and record yourself your own demo excerpt (left and right clicks on the mini-player).
Sorting
The way presets are sorted can be chosen by clicking in the appropriate column: Preset name, Tag, Bank or Fav.
Filtering
You can select the presets that are visible in the menu through different filters located on the right side of managing window: search, All banks, All tags and Favourites only. You can also click on individual banks and/or individual tags.
ctrl on Windows, cmd on macOS, or shift while clicking on the filters (banks and tags).
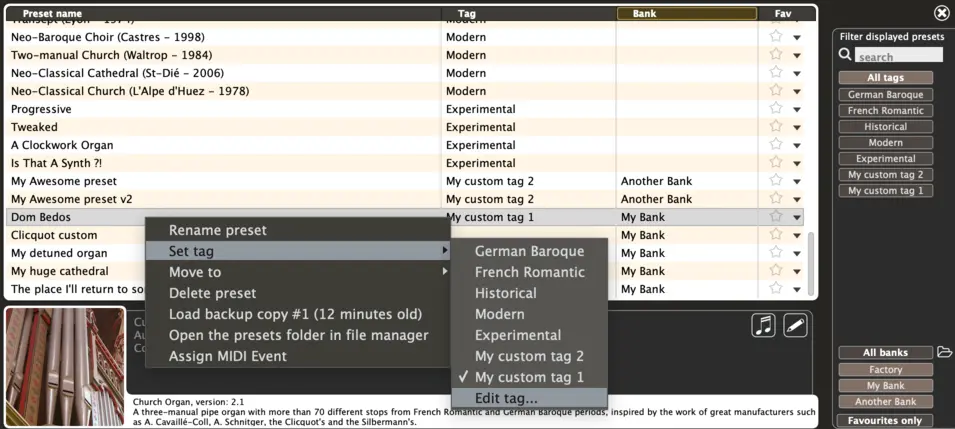
Renaming presets
A double-click on a user preset name allows you to rename it. You can also open the contextual menu by clicking on the small arrows in the Fav column.
Tag edition and creation
You can edit the tag of a preset either by:
- editing the preset using the
penbutton - right-click on the preset name, then Set Tag.
Typing a tag that does not exist yet automatically create a new user tag.
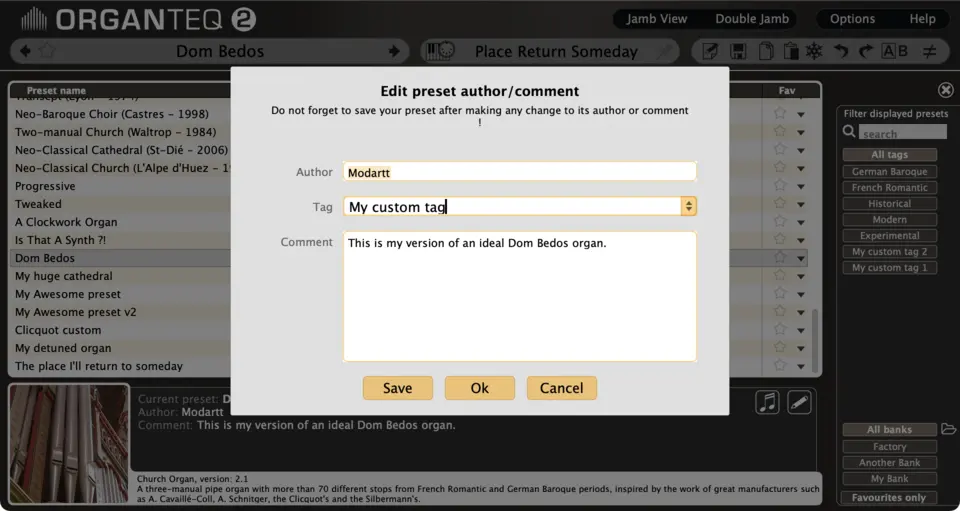
Saving presets
After you have created your new preset, you can save it by simply clicking on the save button; a pop-up window will ask you for a preset name and a bank name (default bank is My Presets). Each time you click again on the save button, you will save the new values with the same preset name. You can access backup copies with a right click on the preset name.
5. Parameters edition
The physical model contains a great number of parameters, but only a small proportion of them are available through the user interface : they are the user-editable parameters. Please refer to the All settings for details on these parameters.
5.1. Parameters sliders
You can change any parameter by moving the corresponding slider with the mouse.
Moving the mouse cursor perpendicularly to the slider will make the slider move slowly.
Each time you modify parameters in Organteq, a few computations are needed to update the physical model. It might take a few seconds.
5.1.1. Assigning a parameter to a MIDI controller
You can assign Organteq parameters to MIDI controllers such as those that may be on your keyboard. Select the parameter slider that you want to assign (right click on the slider and click on MIDI ► Assign MIDI Control) and move the knob of the MIDI controller that you have chosen for this parameter. Organteq will automatically assign the parameter to the controller. More sophisticated possibilities are provided in the MidiMapping section.
Any MIDI control may be assigned except the following ones: MIDI controls 6, 38, 96-101 which are used for RPN and NRPN MIDI parameters; controls 120 to 127 are reserved for various reset operations ("all notes off" etc.); controls 32 to 63 are reserved for 14-bit precision controllers.
6. All settings
Organteq offers hundreds of parameters to tweak your organ from the output settings to the pipe-per-pipe voicing, through tremulant adjustments, and many other features.
This section presents a window of eight settings panels that make it possible to create the organ of your dreams!!
6.1. General Panel
The general panel gathers the settings of the division acoustics, the output settings and the reverb.

6.1.1. Division settings
All the stops of a division are encased inside it. It is basically a big wooden box containing the pipes and all the mechanics and wind supply ducts. The division box has its own acoustics before the sound goes in the room through the front panel.
In Organteq you can adjust the acoustics of the division with:
- the
Box dimension: from a tiny little box to a huge volume - the
Box presence: how much of the box acoustics is heard in the final mix - the
Box gain: an additional gain control for the whole division - the
Box EQ: an additional equalizer (low-shelve, peak, high-shelve) for the whole division
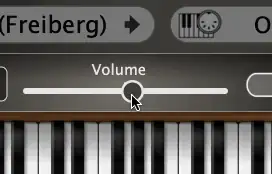
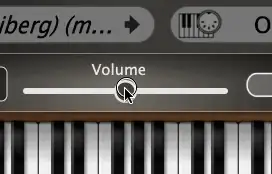
6.1.2. Output settings
The output settings allow you to control the global volume, the stereo image and the audio channel routing.
You can adjust the global volume of the whole organ with the Volume slider (this slider is also available from the main interface). The slider Noise Volume controls the volume of mechanical noises (keys action, coupler pedals, stop switches).
6.1.3. Stereo image
Each division provides two output channels: left and right. The stereo image of all the divisions is globally affected by the stereo image settings:
Stereo width: Narrow or broaden the stereo image of the organ. If you need to position microphones in front of the organ, the width would be the distance between those two microphones.C/C# separation: Within each division, the pipes are located according to their pitch: C whole tone scale on the left, C# whole tone scale on the right. This parameter gradually sends the C and C# sides of each division to the right and left channels, respectively.
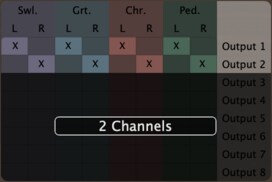
6.1.4. Multi-channels output
Two output configurations are available:
2 Channels: the sound of all the four divisions is mixed to the main stereo output,8 Channels: each division has its own stereo output. The audio routing matrix allows you to send any channel of each division to one, or more, of the available output channels (8 channels maximum). In standalone mode, you have to make sure that your audio device has enough enabled channels. When used as plug-in, make sure the track is set to receive eight channels.
6.1.5. Reverberation
A convolution reverberation unit simulates acoustic surroundings ranging from Studio up to very long reverbs like Cathedral or Taj Mahal. It includes other types of reverbs such as Plate, Spring, Speakers, Broceliande... You can even load your own reverb impulses via Load WAV impulse in the reverb menu.
The reverberation is controlled by the following parameters:
Mix: the relative level in dB between reverberant sound and direct soundDuration: the length of the reverberant soundRoom size: from 5m to 50mPre-delay: the time between the direct sound and the reverberant soundTone: a tilt equalizer that only affects the reflected sound, darker to the left, brighter to the rightTail / Early reflections: the relative level in dB between early reflections and reverberation tail.
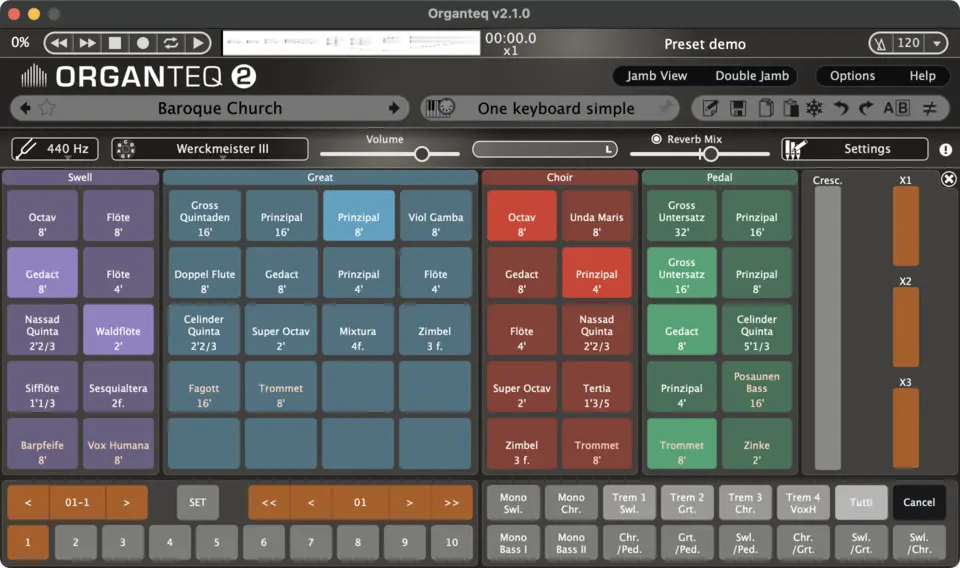
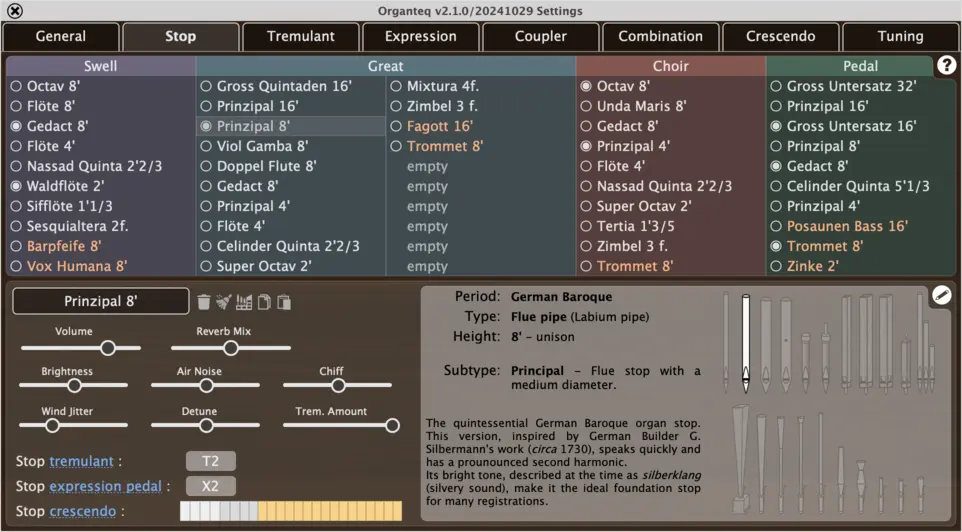
6.2. Stop Panel
In this panel, you can assign one of the 74 factory pre-built stops to a specific division stop-slot, and tune its voicing parameters.
6.2.1. Stop selection
In the upper panel, you can select a division slot by clicking on the corresponding line, or move a stop from a slot to another slot by clicking and dragging.
You can drag a stop from one slot to another. While doing so, three highlighted options will appear under the mouse to select the drag-and-drop behaviour:
Paste: Paste the selected stop into the highlighted slot.Move: Move the selected stop into the highlighted slotSwap: Swap the selected stop with the stop present in the highlighted slot. The latter can be empty or not.Insert: Insert the selected stop between two slots.
Once a stop slot is selected, its content appears in the lower panel.
MIDI Action mapping maps to a slot and not to the stop it contains.
6.2.2. Stop voicing
The lower panel shows the content of the selected slot. Whether empty or not, a new stop can be assign to the current slot: click on the Assign a stop button (empty slot) or on the stop name (non-emtpy slot). This opens a drop-down list of all available stops to choose from. You can type the name of the desired stop to shorten the drop-down list. See Organteq stop list for more detail about the built-in stops.
Once the new stop is assigned, general information on the stop is displayed on the right side. On the left side, you can modify its voicing parameter by using the dedicated sliders:
Volume: The loudness of the stopReverb Mix: The stop-per-stop reverb mix (the stop reverb mix is combined with the globalReverb Mix).Chiff: The strength of attack transients (for flue stops only).Air Noise: The amount of air noise. High values can be used to emulate very close distance to the pipes.Brightness: A timbral modifier. It is related to the diameter of the pipe and the height of the mouth for flue stops, and to the reed properties for the reed stops.Detune: in cents. Note that the stop detune will be added to theGlobal detuneof the organ. (see Tuning panel)Wind Jitter: the condition of the wind supply. A flat wind supply will provide a clean and stable sound, while a high value of jittering will bring harmonic noise (modulation of the pitch and the relative amplitude of each harmonic). The action of the wind jitter is combined with the one of tremulant before entering the pipes (see the Tremulant section).
Almost all the voicing parameters can be fine
-tuned on a pipe-per-pipe basis (see the Pipe Edit section).
A stop can be unassigned by clicking on the garbage button. All the voicing parameters of a stop can by copied and pasted to another slot, by clicking on the copy/paste buttons. The broom button resets the stop to the presets state (i.e. saved state). The factory button resets the stop to the default built-in state (that might differ from the saved state).

garbage, broom or factory button will unassign or reset all stops.
6.2.3. Stop expression, crescendo and tremulant
The expression pedals, crescendo pedal and tremulant are highly flexible. Their settings panel are presented below. However, the Stop Panel provides shortcut to show and edit these parameters. In the bottom left corner, some information related to the current selected slot is displayed (which tremulant, which expression pedal, what crescendo steps). You can change this setting from here, or from the dedicated settings panel.
tremulant, expression pedal and crescendo pedal settings.
Moving or copying a stop will keep the tremulant, expression pedal and crescendo pedal settings.
6.2.4. Pipe-per-pipe voicing
By default, the bottom right corner displays a small comment about the stop and additional informatios on its period (French Romantic or German Baroque), type, subtype and height.
Clicking on the Pipe edit/Stop info button will switch the view to the Pipe-per-pipe voicing subpanel. You can also open the Pipe edit panel for any parameter with a double-click on the corresponding slider.
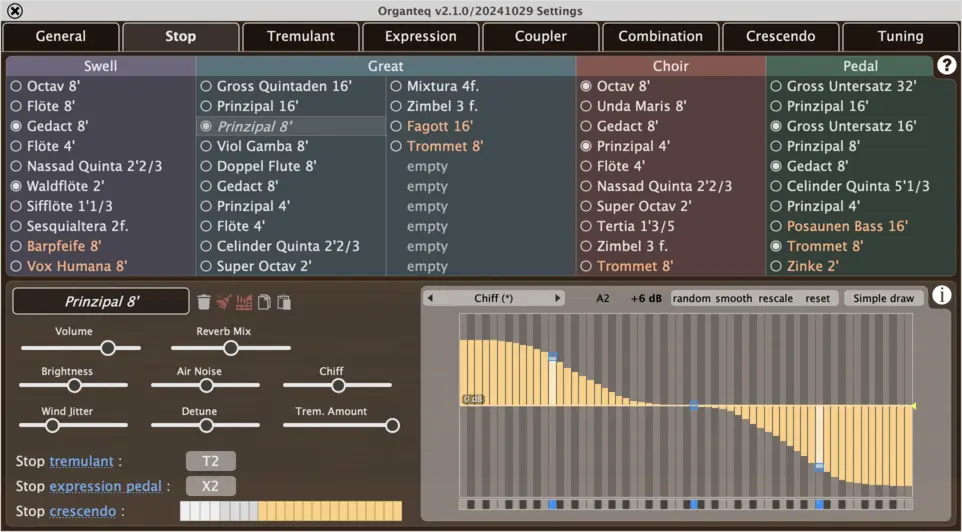
The Pipe-per-pipe voicing subpanel allows a finer pipe-per-pipe (or note-per-note) tuning of the different voicing parameters : Volume, Reverb Mix, Brightness, Air Noise, Wind Jitter, Detune, Tremulant Amount and Chiff (for flue pipes only).
6.3. Tremulant Panel
The tremulants are a mechanical device that modulate the upstream air flow that feeds the pipes. There are a wide variety of tremulants with different depth, rate and shape of the modulation waveform.
For each pipe, varying the upstream air flow results in a modulation of the pitch, the intensity and the harmonic content. Note that this is not a post-effect: the modulation generated by the tremulant is used as an input of the physical model.
The upper panel offers an overview of the stops and their associated tremulants. Change the tremulant of the selected stops by clicking on one of the tremulant buttons (T1, T2, T3, T4).
The lower panels allows one to modify the parameters of each tremulant: depth, rate and shape.
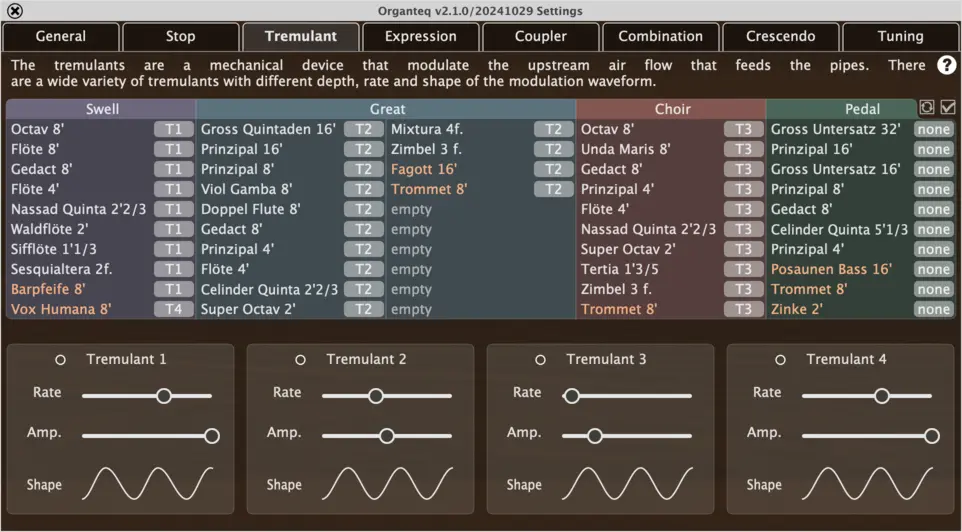
ctrl on Windows, cmd on macOS, and shift while clicking on the stops, or by using the buttons reverse selection and select all at the top-right corner of the panel.
The multiple stop selection is also available in the Expression panel, and the Combination panel.
6.4. Expression pedals panel
The expression pedal controls the opening of the wooden blinds of the box which contains the pipes. When the box is closed the sound is soft and muffled. When the box is opened the sound is loud and clear. There is usually at most one pedal per division box.
Organteq offers three different expression pedals that are extended to a more flexible behaviour. Any stop can be assigned to any pedal. Each pedal offers loudness (global gain) and brightness (high-shelve filter) settings.
The upper panel offers an overview of the stops and their associated expression pedals. Change the expression pedal of the selected stops by clicking on one of the expression pedal buttons (X1, X2, X3).
In the lower panels, for each expression pedal, you can edit the fully open (top equalizer) and fully closed (bottom equalizer) pedal position. Each EQ parameters, a global gain, the frequency, the Q-factor and the gain of a high-shelve filter, are controlled by clicking and dragging, or with a right-click. Changing the high-shelv Q-factor is done by holding shift while clicking and dragging. Horizontal moves are for large changes, while vertical moves are for smaller increments.
6.5. Coupler Panel
Six customizable couplers are available. A coupler allows the stops of one division to be played from the keyboard of another division, with or without transposition.
You can also create Octave couplers within a single keyboard by adding the octave above or below each note that is played.
The left part of the panel shows all the couplers, while the right part shows how the selected coupler affects the keyboards using an arrow. You can also drag both ends of the arrow to change your coupler characteristics.

6.6. Combination Panel
As described in the Combination overview, a combination is a pre-recorded state of stop switches, coupler pedals and tremulant switches that you can trigger all together at any time.
There are several ways to create combinations, such as the snapshot already described in the overview. This section will provide additional information on the different snapshot behaviour, as well as the manual way to create combinations and other features to manage the banks and combinations.

6.6.1. Managing bank and combinations
In the upper left panel the banks can be renamed (double click), reordered (drag and drop), copied/pasted (right-click). When selecting a bank, you have access to its ten combinations.
Select a combination by clicking on its number. The combinations can also be reordered by drag and drop.
You can edit the current selected combination by hand. To set the actions of a combination, select the stops, couplers and tremulants switches. Then set them to Off, On or none (leave items unchanged). Combination can also be duplicated using the copy/paste buttons (ctrl + C/V on Windows, cmd + C/V on macOS).
6.6.2. Combinations actions : On, Off and none
A combination basically turns all switches On or Off. A third action is available: none which lets the switch remained untouched. This allows you to modify only a subset of switches. Here is an example where the combination will affect all the keyboards but the Swell. This combination does not affect the monophonic couplers either, as well as some couplers:
6.6.3. Combinations capture options
In the bottom left panel, you can change the capture options so the combination will capture only a subset of all the switches. The categories of capture are:
- the four divisions Swell, Great, Choir and Pedal: concerns only the stop switches of the corresponding division.
- the tremulants: concerns only the tremulant switches.
- the couplers: concerns only the coupler switches.
- the monophonic couplers: concerns only the monophonic coupler switches.
For each category, there are three options of capture:
On/Off: captures all the switches of the category.On/none: captures only the items of the category that are switchedOn, the items that areOffare saved asnone(they won't be switched off when triggering the combination).none/none: captures nothing in the category. All the items of the category are saved asnone, regardless of their current state. Triggering a combination that was captured with this option won't affect the category. It can be useful for creating complex sequences of combinators, such as divisional combinations.
6.7. Crescendo Panel
The crescendo pedal triggers a pre-recorded sequence of stop switches, coupler pedals and tremulant switches. The crescendo pedal is divided into 24 steps. Note that the crescendo pedal takes only control on items that are not switched on by hand.
The Crescendo panel lists all the items that are affected by the crescendo pedal. The items are sorted by category: keyboard divisions, couplers and tremulants. The vertical black line represents the position of the crescendo pedal with respect to the steps.
To view items, click on the top right arrow of each category to partially expand (only active items are visible) or fully expand (all items are visible).
To edit an item :
right-clickto create a break point : clear all the left steps and fill all the right steps.left-clickto toggle the state of the current step (fill/clear).
Both clicks are draggable. In the case of the left-click, it extends the state to the dragged cells.
When the crescendo pedal matches a filled step, i.e. when the vertical black line enters a filled step, the item is switched on. This has no effect if the item is already switched on by hand.
When the crescendo pedal matches an cleared step, the item is switched off. This happens only if the item is not switched on by hand.
6.8. Tuning panel
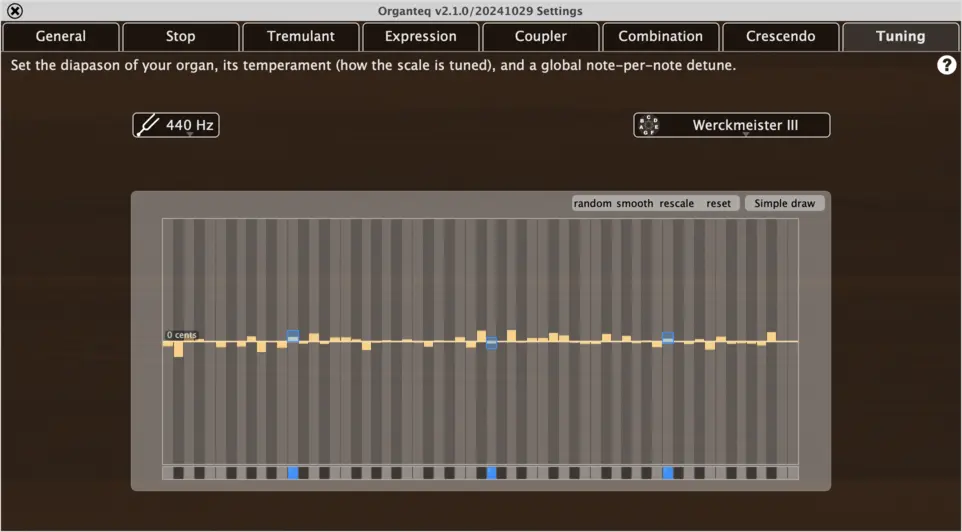
6.8.1. Diapason
The standard tuning (A above middle C) frequency1 is 440 Hz, but you can change it to other values by clicking in the Diapason menu.
6.8.2. Temperament
The temperament defines the way the scale is tuned. In the Temperament menu, you can choose from the following temperaments:
Equal: the standard tuningZarlino(circa 1558): sometimes called the “physicians scale”, based on harmonic thirds (ratio 5/4) and fifths (ratio 3/2)Pythagore(6th century BC): based on harmonic (pure) fifths except for one (the so-called “diabolus in musica”). Can you hear which one it is?Meantone (1/4 comma),Well-tempered,Werckmeister III(17th),Kirnberger III(18th) andValloti: unequal temperaments used in baroque musicSilbermann (1/6 comma)(early 18th): unequal temperament proposed by organ builder G. Silbermann.Rameau: unequal temperament proposed by J.P. Rameau, well-suited for French Baroque pieces.Rousseau/d'Alembert: unequal temperament proposed by J.P. Rousseau and J. d'Alembert for baroque and classical French music from that time.Flat: octaves ratio is strictly 2.Cavaille-Coll (1/9 comma)andCavaille-Coll (1/10 comma): Many historical sources attest that A. Cavaille-Coll did not tune its instruments with an Equal temperament. These two temperaments, where the four major thirds C-E, F-A, G-B and D-F# are prioritized, are an historically educated guess.
With the general fine tuning you can detune the whole organ note per note. Note that the global tuning is applied to all the pipes in addition to the detuning of each stop defined in the Pipe edit panel.
7. List of built-in presets
This section presents all the built-in presets. They are divided into five categories, corresponding to the five built-in Preset Tags of Organteq.
German Baroque: all the stops used for these presets are taken form the German Baroque stop list. They are virtual organs which have captured the quintessence of the Baroque organs of (mainly) central Germany. They are inspired by great works of T. Tröst, A. Schnitger et the Silbermann dynasty. They are well suited for Barorque pieces such as J.S. Bach compositions.French Romantic: all the stops used for these presets are taken form the French Romantic stop list. They are virtual organs inspired from the French Romantic period, in particular the works of A. Cavaillé-Coll. These organs are well-suited for pieces from that time (C. Franck, C.M. Widor, ...)?Historical: these presets aim at reproducing existing organs between France and Germany. The stops constituing these presets may come from both German Baroque and French Romantic stop banks.Modern: these presets are inspired by modern (late 20th) organ building habits in terms of stops compositions, while using both stop banks.Experimental: these presets explore new musical lands by creating organs that do not exist anywhere else. They use both stop bank too.
Each preset comes with pre-filled combinations which allows you to quickly have an idea on how the preset sounds. In some cases there are instructions on how to use the combinations. For instance in the Crescendo presets, the combinations gradually increase the number of stops and thus the global dynamics: in these presets it is adviced to play on the Great division only. On the other hand, the Solo presets are made to play accompaniment on one specific division while playing solo on the others ; the solo/accompaniment distribution may change while changing combination.
Each preset also proposes a variation in the number of stops. They vary from huge church organs up to 50 stops to intimate chapel organs with 2 manual only. The general settings are consistent with the acoustics of the organ size.
7.1. German Baroque
They are virtual organs which have captured the essence of the Baroque organs of central Germany.
| Baroque Cathedral I | An historical baroque organ from a cathedral, inspired by the building habits of A. Schnitger and T. Tröst. |
| Baroque Cathedral I - Console | Listen from the console this historical baroque organ from a cathedral, inspired by the building habits of A. Schnitger and T. Tröst. |
| Baroque Cathedral I - Solo | An historical baroque organ from a cathedral, inspired by the building habits of A. Schnitger and T. Tröst and designed for solo voices. Combinations #1 to #3: the Grand Orgue and Positif are meant to be used for solo voices while the Récit is used for accompaniment. Combinations #4 to #6: accompaniment for Positif. Combinations #7 to #9: accompaniment for Grand Orgue. Combination #10: solo on Pedal. |
| Baroque Cathedral I - Crescendo | An historical baroque organ from a cathedral, inspired by the building habits of A. Schnitger and T. Tröst. Pre-filled combinations with a ten-steps crescendo. As the manual couplers are engaged for all combination steps, it is meant to be played on the Grand Orgue manual and the Pédale only. |
| Baroque Cathedral II | An historical baroque organ from a cathedral, inspired by the building habits of A. Schnitger and T. Tröst. |
| Baroque Cathedral II - Console | Listen from the console this historical baroque organ from a cathedral, inspired by the building habits of A. Schnitger and T. Tröst. |
| Baroque Cathedral II - Out of Tune | Looks like this organ need some maintenance. |
| Baroque Cathedral II - Worn Out | It has been a very long time since this organ was maintened! |
| Baroque Church | An archetypal German baroque church organ, with ten pre-filled combinations. |
| Baroque Church - Solo | An archetypal German baroque church organ designed for solo voices. Combinations #1 to #3: the Grand Orgue and Positif are meant to be used for solo voices while the Récit is used for accompaniment. Combinations #4 to #6: accompaniment for Positif. Combinations #7 to #9: accompaniment for Grand Orgue. Combination #10: solo on Pedal. |
| Baroque Church - Crescendo | An archetypal German baroque church organ with pre-filled combinations of a ten-steps crescendo. As the manual couplers are engaged for all combination steps, it is meant to be played on the Grand Orgue manual and the Pédale only. |
| Baroque Choir - Solo | An archetypal German two-manual baroque choir organ, small and intimate. Combinations #1 to #4: Accompaniment on Positif. Combinations #5 to #8: Accompaniment on Grand Orgue. Combinations #9 to #10: Solo on Pedal. |
| Baroque Choir - Crescendo | An archetypal German two-manual baroque choir organ, small and intimate. Pre-filled combinations with a ten-steps crescendo. As the manual couplers are engaged for all combination steps, it is meant to be played on the Grand Orgue manual and the Pédale only. |
| Baroque Chapel | A two-manual organ of German Baroque facture, inspired by early works of A. Schnitger. Although it is quite small, one could play a considerable amount of music before exhausting its resources! |
7.2. French Romantic
They are virtual organs inspired from the French Romantic period.
| Romantic Cathedral | A majestic cathedral organ, inspired by the work of French manufacturer Cavaillé-Coll. Comes with 10 pre-filled combinations to explore various colours. |
| Romantic Cathedral - Solo | A majestic cathedral organ, inspired by the work of French manufacturer Cavaillé-Coll and designed for solo voices. Combinations #1 to #3: the Grand Orgue and Positif are meant to be used for solo voices while the Récit is used for accompaniment. Combinations #4 to #6: accompaniment for Positif. Combinations #7 to #9: accompaniment for Grand Orgue. Combination #10: solo on Pedal. |
| Romantic Cathedral - Crescendo | A majestic cathedral organ, inspired by the work of French manufacturer Cavaillé-Coll. Pre-filled combinations with a ten-steps crescendo. As the manual couplers are engaged for all combination steps, it is meant to be played on the Grand Orgue manual and the Pédale only. |
| Romantic Cathedral - Expressive mutations | A cathedral organ, inspired by the work of French manufacturer Cavaillé-Coll, that put an emphasis of the expressive capabilities of the mutations stops such as the Tierce, Larigot and Septieme. |
| Romantic Church | Your daily church organ, inspired by the work of French manufacturer Cavaillé-Coll! Comes with ten pre-filled combinations to explore various colours. |
| Romantic Church - Solo | Your daily church organ, inspired by the work of French manufacturer Cavaillé-Coll and designed for solo voices. Combinations #1 to #3: the Grand Orgue and Positif are meant to be used for solo voices while the Récit is used for accompaniment. Combinations #4 to #6: accompaniment for Positif. Combinations #7 to #9: accompaniment for Grand Orgue. Combination #10: solo on Pedal. |
| Romantic Church - Crescendo | Your daily church organ, inspired by the work of French manufacturer Cavaillé-Coll. Pre-filled combinations with a ten-steps crescendo. As the manual couplers are engaged for all combination steps, it is meant to be played on the Grand Orgue manual and the Pédale only. |
| Romantic Abbey | An impressive abbey organ, inspired by the work of French manufacturer Cavaillé-Coll. Fuller than its Church counterpart, it still does not have the full power of the Cathedral organ. |
| Romantic Abbey - Console | Listen from the console this impressive abbey organ, inspired by the work of French manufacturer Cavaillé-Coll. Fuller than its Church counterpart, it still does not have the full power of the Cathedral organ. |
| Romantic Abbey - Out of Tune | Looks like this organ needs some maintenance ... |
| Romantic Abbey - Worn out | It has been a very long time since this organ was maintained!... |
| Romantic Choir - Solo | A more intimate two-manual organ, inspired by the work of French manufacturer Cavaillé-Coll, designed for solo voices. Combinations #1 to #4: Accompaniment on Récit. Combinations #5 to #8: Accompaniment on Grand Orgue. Combinations #9 to #10: Solo on Pedal. |
| Romantic Choir - Crescendo | A more intimate two-manual organ, inspired by the work of French manufacturer Cavaillé-Coll and pre-filled combinations with a ten-steps crescendo. As the manual couplers are engaged for all combination steps, it is meant to be played on the Grand Orgue manual and the Pédale only. This small organ is surprisingly powerful!" |
| Romantic Chapel | A two-manual organ of French Romantic inspiration. Quite minimal, but also powerful. |
7.3. Historical
These presets aim at reproducing historical organs from various periods between France and Germany.
| Alsacian Organ I (Strasbourg, St-Thomas - 1741) | Inspired by the works of Strasbourg builder J.A. Silbermann, this versatile organ stands at the crossroads of late German Baroque and early French Classic periods. |
| Alsacian Organ II (Marmoutier - 1746) | Inspired by the works of Alsacian builders A. & J.A. Silbermann (father & son), this organ is closed to the 'Parisian aesthetics' around 1700 and suits very well pieces from Couperin, de Grigny, Marchand and others. |
| Baroque Cathedral (Freiberg 1710-1714) | Inspired by a masterpiece of G. Silbermann, built in the Frieberg Cathedral between 1710 and 1714. |
| Baroque Two-Manual I (Steinkirchen - 1687) | Inspired by an early work of A. Schnitger in Steinkirchen (1687). Although it is quite small, one could play a considerable amount of music before exhausting its resources! |
| Baroque Two-Manual II (Arnstadt - 1703) | Inspired by an early work of Wender in Arnstadt (1703), a contemporary of J.S. Bach, this organ has been built and rebuilt over the last centuries ... Who knows if the successive reconstructions remains faithful to the original ? |
| Baroque Two-Manual III (Rötha - 1721) | Inspired by a G. Silbermann instrument in Rötha (1721), this peculiar work does not have any reed stops on the two-manuals but still possesses the 'Silberklang' (silvery sound), characteristic of G. Silbermann instruments. |
| Classical French Organ I (Souvigny - 1783) | Inspired by the works of famous French builder F.H Cliquot, this organ was virtually untouched since its establishment in 1783 and is an archetypal example of the French art from the second half of the 18th century. It comes with 10 pre-filled combinations. |
| Classical French Organ II (Poitiers - 1791) | Inspired by the works of famous French builder F.H Cliquot, this organ was virtually untouched since its establishment in 1783 and is an archetypal example of the French art from the second half of the 18th century. It comes with 10 pre-filled combinations. |
| Royal Chapel (Versailles - 1711) | This striking and powerful organ has a very peculiar character, ideal for playing French Baroque pieces by Couperin, Lully, Rameau and others. It comes with 10 pre-filled combinations. |
| French Puget I - Taur (Toulouse - 1880) | An archetypal representant of the organs built by the Puget family, made in 1880. This one belongs to the Taur Church in Toulouse. |
| French Puget II - St Exupere (Toulouse - 1842-1903) | Three generations of Puget's have worked on this peculiar organ from 1842 to 1903. The Positif is always coupled to the Grand Orgue. |
| French Baroque Cathedral (Auch - 1694) | Built by J. de Joyeuse in 1694, with some adjunctions by M. Puget in 1939. It is the greatest organ from Louis XIV that is still standing. |
| French Hybrid - (Montpellier - 1754-1934) | Originally built by French legend Dom Bedos in 1754, many famous builders modified this organ through centuries, from J.P. Cavaillé in 1782 from the Puget's in 1884 and 1934. |
| French Romantic Church (Menilmontant - 1872) | Built by A. Cavaille-Coll in 1872, this two-manual organ was originally planned with four divisions. It is still unclear why the building was stopped. It is still a magnificent instrument! |
| Baroque Schnitger I (St Johannis - Hamburg - 1680) | A two-manuel organ built in 1680 by the great A. Schnitger in Hamburg, St Johannis. |
| Baroque Schnitger II (St Gertrud - Hamburg - 1699) | A two-manuel organ built by A. Schnitger in Hamburg, St Gertrud. We can only have guesses on how it sounded: the church and organ were burned in a town-fire in 1842... |
| German Classical Abbey (Neresheim - 1798) | This large organ by J.N. Holzhey (1798) belongs to the late transitional German style. A powerful instrument with a majestic reverberation. Beware of the out-of-tune reeds, though! |
| Baroque Peculiar (Dorstadt) | Build by an unknown builder, this organ has a very unusual composition. Its specifications can be found in Organographia Hildesiensis Specialis (1738), by J.H. Bierman. |
7.4. Modern
These presets aim at reproducing modern and contemporary organs for exploring a broad varity of styles and sounds.
| Neo-Baroque | A powerful organ that belongs to the late 20th century 'Neo-Baroque' movement. Its composition and temperament may however suit a much larger repertoire. It comes with 17 pre-filled combinations. |
| Transept (Lyon - 1974) | A medium-sized organ of French Baroque inspiration, but built in the late 20th century. The four tonal plans are largely inspired by instruments built by Silbermann and by Clicquot. It comes with 10 pre-filled combinations. |
| Neo-Baroque Choir (Castres - 1998) | A modern two-manuel choir organ, of baroque inspiration but voiced accordingly to modern standards. |
| Two-manual Church (Waltrop - 1984) | A modern two-manuel choir organ of great versatility and a roaring 32' reed at the pedal - surprising for such a small instrument! |
| Neo-Classical Cathedral (St-Dié - 2006) | A contemporary cathedral organ, of classical inspiration but voiced accordingly to modern standards. |
| Neo-Classical Church (L'Alpe d'Huez - 1978) | A contemporary church organ, of classical inspiration but voiced accordingly to modern standards. |
7.5. Experimental
These presets explore new musical lands by creating organs that do not exist anywhere else.
| Progressive | An organ with unorthodox registration and unusual composition choices! Combinations #1 to #6 follow a slow and progressive built-in. Suggestion : play it on the Grand Orgue keyboard and use monophonic couplers to create nice soundscapes! |
| Tweaked | This organ was tweaked a lot! It sounds ... interesting. |
| A Clockwork Organ | 'There was me, that is Alex, and my three droogs, that is Pete, Georgie, and Dim ...' Explore the 10 pre-filled combinations on every manual to be immersed in a Kubrick movie! |
| Is That A Synth ?! | Who knew that stacking slightly detuned replica of the same stop again and again will do 'that'?! Explore the 10 pre-filled combinations. |
8. List of stops
This section presents general information about what is a stop and how they are categorized, and then presents the list of stops included in Organteq.
A stop is the basic unit of an organ. A stop is a set of pipes with timbral consistency along the tessitura. Adding or removing stops while playing comes down to change the timbre of the instrument. This is why the organ is often seen as the acoustic ancestor of the synthesizer of which the stops would be the basic audio bricks.
8.1. General information about stops
8.1.1. Stop type
Stops are categorized into two main families, depending on the exciter, i.e. how the acoustic vibration is produced:
- flue stop: the acoustic vibration is created by the interaction of an air jet with the pipe labium
- reed stop: the acoustic vibration is creating by the beating reed
In both families, the acoustic vibration is filtered by the pipe resonances. A wide variety of exciter shapes and pipe shapes yields a wide variety of timbres.
8.1.2. Flue stops
Flue stops are mainly made of cylindrical resonator:
- flute or wide diameter: these pipes produce a soft sound with a pronounced fundamental and less harmonics
- principal or medium diameter: the sound is balanced
- string or narrow diameter: these pipes tend to reproduce the sound of bowed string instrument, with a much richer timbre
- bourdon or closed-end pipe: half the length of open-end pipes, they produce a soft sound with a strong odd timbre (odd harmonics)
8.1.3. Reed stops
There is no such a clear classification for reed stops since the variabitity of pipe shapes is more important. Lets mention some important pipe shape:
- trumpet or conical: strong and powerful sound reminding the trumpet
- clarinet or cylindrical: softer sound reminding the instrument of the same name
- voix humaine: reed stop with a very short pipe length, not matching its nominal frequency
8.1.4. Stop height (pitch) & mutations
In addition to the timbral variation offered by the pipe shape, the stops are also available at different pitches. It is the custom in the organ world to refer to a stop pitch using the height of the lowest C of the stop, which is approximatively 8 feet (noted 8'). Even bourdon whose length is halved is referred as a 8' stop since it sounds as a 8' open-end pipe. A stop sounding an octave lower is twice longer: 16'. A stop sounding an octave above is twice shorter: 4'. And so on.
Other pitches than octaves are available. These stops are called mutations and sound at higher pitch at specific musical interval. Here is a the most common heights including mutations:
| Height | Musical interval | |
|---|---|---|
| 32' | = 8' x 4 | double lower octave |
| 16' | = 8' x 2 | lower octave |
| 8' | = 8' / 1 | unison (reference pitch) |
| 5' 1/3 | = 8' / 1.5 | fifth |
| 4' | = 8' / 2 | octave |
| 2' 2/3 | = 8' / 3 | twelfth (octave + fifth) |
| 2' | = 8' / 4 | double octave |
| 1' 3/5 | = 8' / 5 | seventeenth (double octave + third) |
| 1' | = 8' / 8 | triple octave (sometimes seen as a mutation) |
8.1.5. Mixture stops
All the stops mentioned so far are single rank stops: there are as many pipes as the number of keys, one pipe per key. Mixture stops combine several flue ranks: one key activates several pipes at different heights. These pipes cannot sound separately.
The ranks of Mixture stops might also have breaks along the tessitura. A break is a change in the pipe height that occures between two keys. The following table shows the actual height of an octave rank (4') with a break at B2/C3:
| C1 - B1 | C2 - B2 | C3 - B3 | C4 - B4 | C5 - B5 | |
|---|---|---|---|---|---|
| 8' rank (reference) | 8' | 4' | 2' | 1' | 1/2' |
| 4' rank with one break | 4' | 2' | 2' (break) | 1' | 1/2' |
| Musical interval | octave | octave | unison (break) | unison | unison |
8.2. Organteq French Romantic stops
The French Romantic stop collection of Organteq is inspired by the work of Cavaillé-Coll.
8.2.1. French Romantic flue stops
| Stop name | Short name | Type | Subtype | Height | Comment |
|---|---|---|---|---|---|
| Principal 32' | P32 | Flue | Principal - Flue stop with a medium diameter. | 32' | The typical organ stop. This 32' version offers a strong, almost subsonic bass. |
| Bourdon 32' | B32 | Flue | Bourdon - Closed-open end flue stop. | 32' | Similar to the Bourdon 8'. This 32' version offers a very soft and almost subsonic bass. |
| Montre 16' | M16 | Flue | Principal - Flue stop with a medium diameter. | 16' | A principal whose pipes are out of the division boxes and placed in front of the audience. Its timbre is sharper than a typical principal. This 16' version offers strong bass. |
| Principal 16' | P16 | Flue | Principal - Flue stop with a medium diameter. | 16' | The typical organ stop. This 16' version has a round bass. When played with the Principal 8' and 4', it forms a mellow Romantic Plenum. |
| Bourdon 16' | Bn16 | Flue | Bourdon - Closed-open end flue stop. | 16' | Similar to the Bourdon 8'. This 16' version offers a very soft bass used to fill the lower part of the sound in order to achieve more depth. |
| Quintaton 16' | Q16 | Flue | Chimney - Closed-open end flue stop with an open chimney. | 16' | Closed pipe ending with an open chimney. Same characteristics as the Bourdon but with a strong 3rd harmonic (twelfth = octave + fifth). This 16' version offers a very soft bass. |
| Montre 8' | M8 | Flue | Principal - Flue stop with a medium diameter. | 8' | A principal whose pipes are out of the division boxes and placed in front of the audience. Its timbre is sharper than a typical principal. It constitutes the so-called Jeux de Fond, together with Bourdon 8', Gambe 8' and Flute 8'. They are the basis for other registrations. |
| Principal 8' | P8 | Flue | Principal - Flue stop with a medium diameter. | 8' | The typical organ stop. It constitutes the so-called Jeux de Fond, together with Bourdon 8', Gambe 8' and Flute 8'. They are the basis for other registrations. |
| Gambe 8' | G8 | Flue | String - Flue stop with a narrow diameter. | 8' | It is inspired from bowed-string instruments, with a brilliant sound and chiff attack. It constitutes the so-called Jeux de Fond, together with Bourdon 8', Principal 8' and Flute 8'. They are the basis for other registrations. |
| Voix Celeste 8' | VxC | Flue | String - Flue stop with a narrow diameter. | 8' | Very similar to the Gambe 8', but craftily detuned sharp. Pulled together with a well-tuned Gambe 8', it produces a very floating beating sound. |
| Salicional 8' | S8 | Flue | String - Flue stop with a narrow diameter. | 8' | A 8' stop whose timbre has varied considerably through times. This romantic version offers a soft stringy tone, between a Principal and a Gambe. It blends well with most of the flue stops. |
| Flute 8' | F8 | Flue | Flute - Flue stop with a wide diameter. | 8' | Its soft sound with a strong fundamental is inspired from flute-like woodwind instruments. It constitutes the so-called Jeux de Fond, together with Bourdon 8', Principal 8' and Gambe 8'. They are the basis for other registrations. |
| Flute Traversiere 8' | FT8 | Flue | Flute - Flue stop with a wide diameter. | 8' | Its soft sound with a strong fundamental and lighter upper harmonics is inspired from the transverse flute. |
| Flute Harmonique 8' | F8FH | Flue | Flute - Flue stop with a wide diameter and pierced at mid-length. | 8' | This jeu octaviant has double-lengthed pipes with a pierced hole in the middle. This peculiar technique gives a powerful sound while keeping the mellowness of a flute. Although this technique is known since the 18th century for wooden pipes, it is A. Cavaillé-Coll who spread its use for metal pipes and brought it to prominence. |
| Bourdon 8' | B8 | Flue | Bourdon - Closed-open end flue stop. | 8' | The Bourdon 8' offers the typical timbre of soft sound and strong odd harmonics. It is a closed version of the flute. The stop is referred to as a 8', although its length is half that of a flute of the same pitch. |
| Prestant 4' | Pt4 | Flue | Principal - Flue stop with a medium diameter. | 4' | A principal whose pipes are out of the division boxes and placed in front of the audience. Its timbre is much sharper than a typical principal. This 4' version makes the registration richer. |
| Principal 4' | P4 | Flue | Principal - Flue stop with a medium diameter. | 4' | The typical organ stop. When played with the Principal 16' and 8', it forms a mellow Romantic Plenum |
| Flute 4' | F4 | Flue | Flute - Flue stop with a wide diameter. | 4' | Its soft sound with a strong fundamental and lighter upper harmonics is inspired from flute-like woodwind instruments. This is an octave version of the Flute 8'. |
| Grande Tierce 3'1/5 | T 3 1/5 | Flue | Principal - Flue stop with a medium diameter. | 3'1/5 | Mutation that supports the 16' harmonic serie. This one is voiced quite sharply, according to the neo-classical French school of the 19th century (Puget). A mutation is a stop sounding at a musical interval which is not the octave. |
| Quinte 2'2/3 | Q 2 2/3 | Flue | Flute - Flue stop with a wide diameter. | 2'2/3 | Mutation of the Flute 8': sounds at a twelfth (octave + fifth). A mutation is a stop sounding at a musical interval which is not the octave. |
| Nasard 2'2/3 | N 2 2/3 | Flue | Bourdon - Closed-open end flue stop. | 2'2/3 | Mutation of the Bourdon 8': sounds at a twelfth (octave + fifth). It is common to pull it together with Bourdon 8'. A mutation is a stop sounding at a musical interval which is not the octave. |
| Doublette 2' | D2 | Flue | Principal - Flue stop with a medium diameter. | 2' | A double octave version of the Principal 8'. |
| Tierce 1'3/5 | T 1 3/5 | Flue | Flute - Flue stop with a wide diameter. | 1'3/5 | Mutation of the Flute 8' that supports the fifth harmonic (double octave + major third). A mutation is a stop sounding at a musical interval which is not the octave. |
| Larigot 1'1/3 | Lg1 | Flue | Flute - Flue stop with a wide diameter. | 1'1/3 | Mutation of a Flute 8' that supports the sixth harmonic (double octave + fifth) of a 8' pipe, and brought to prominence in France by Dom Bedos. A mutation is a stop sounding at a musical interval which is not the octave. According to Dom Bedos, this stop should be in the Positif manual. |
| Septieme 1'1/7 | 1'1/7 | Flue | Principal - Flue stop with a medium diameter. | 1'1/7 | Mutation of a Principal 8' qui supporte le septième harmonique (double octave + septième mineure), popularisé en France par A. Cavaillé-Coll. Une mutation est un jeu sonnant à un intervalle musical autre que l'octave. |
| Piccolo 1' | P1 | Flue | Principal - Flue stop with a medium diameter. | 1' | A triple-octave version of the Principal 8'. This one is sometimes considered as a mutation because of its very high pitch. Try to use it with a holed registration: B8 + P1! |
8.2.2. French Romantic mixture stops
| Stop name | Short name | Type | Subtype | Height | Comment |
|---|---|---|---|---|---|
| Cornet V | CV | Flue | Mixture - Several flue ranks. | V | A five flue ranks mixture that includes a major-third. It aims to replace the reed stops that are less powerful in the upper register. Usually defined above C3, this one has been extended to lower octaves with a less brilliant Mixture. |
| Plein Jeu III | III | Flue | Mixture - Several flue ranks with breaks (i.e. change in the pitch). | III | It is one of the main signatures of the organ. It is meant to be used with other flue stops, for instance P8 + P4 + III. This Mixture is made of three flue ranks with breaks, combining octaves and fifths. |
| Plein Jeu V | V | Flue | Mixture - Several flue ranks with breaks (i.e. change in the pitch). | V | It is one of the main signatures of the organ. It is meant to be used with other flue stops, for instance P8 + P4 + V. This Mixture is made of five flue ranks with breaks, combining octaves and fifths. |
8.2.3. French Romantic reed stops
| Stop name | Short name | Type | Subtype | Height | Comment |
|---|---|---|---|---|---|
| Contre Bombarde 32' | CB32 | Reed | Reed stop with a conical resonator. | 32' | This 32' reed stop offers rich and strong bass. Assign it to the Pédale to add depth to your foot bass line. |
| Bombarde 16' | B16 | Reed | Reed stop with a conical resonator. | 16' | This 16' reed stop offers rich and strong bass. Assign it to the Pédale to add depth to your foot bass line. |
| Basson 16' | Ba16 | Reed | Reed stop with slightly diverging conical resonator, occasionaly flared and/or capped. | 16' | A slightly nasal but striking 16' reed, moderately imitative of the orchestral instrument. It produces reed tones of singular fullness when combined with medium-voiced labial stops, such as a 8' Hautbois or 8' Clarinette. |
| Trompette 8' | T8 | Reed | Reed stop with a conical resonator. | 8' | Inspired by the brilliant and powerful sound of the trumpet. Often used for solo voices. |
| Clarinette 8' | C8 | Reed | Reed stop with a cylindrical resonator. | 8' | Inspired by the sound of the clarinet. Alternative solo stop to Trompette. |
| Hautbois 8' | HB8 | Reed | Reed stop with slightly diverging conical resonator, occasionaly flared and/or capped. | 8' | Supposedly imitative of the eponyme instrument, it offers a quiet and soft capped sound. It blends well with flutes or closed pipes. |
| Musette 8' | M8 | Reed | Reed stop with a converging conical resonator. | 8' | It offers a much softer sound than other reed stops. |
| Regale 8' | R8 | Reed | Reed stop with a very short cylindrical resonator. | 8' | This ancestral stop offers a medieval sound that suits old pieces, as well as more recent compositions. |
| Voix Humaine 8' | VxH | Reed | Reed stop with a very short and half closed cylindrical resonator. | 8' | Also called Vox Humana. The combination of the high pipe resonances (short length) with the low-tuned reed makes this stop the closest to human voice. |
| Clairon 4' | C4 | Reed | Reed stop with a conical resonator. | 4' | This 4' version of the Trompette is usually used for octave solo voice. |
8.3. Organteq German Baroque stops
The German Baroque stop collection of Organteq is inspired by the work of many great German builders, such as the Silbermann dynasty, T. Tröst and A. Schnitger.
8.3.1. German Baroque flue stops
| Stop name | Short name | Type | Subtype | Height | Comment |
|---|---|---|---|---|---|
| Prinzipal 32' | Pz32 | Flue | Principal - Wooden flue stop of medium section. | 32' | The typical German Baroque organ stop. This 32' version offers very strong and low, almost subsonic bass. |
| Gross Untersatz 32' | GU32 | Flue | Gedact - Covered wooden flue stop. | 32' | A wide-scale Gedact. This 32' version is placed behind the main organ chest, and offers a very soft and almost subsonic bass used to fill the lower part of the sound in order to achieve more depth. |
| Prinzipal 16' | Pz16 | Flue | Principal - Wooden flue stop of medium section. | 16' | The typical German Baroque organ stop. This 16' version offers strong bass to establish the firm grounded tone (Gravität) praised by J.S. Bach. |
| Kontra Bass 16' | KB16 | Flue | String - Flue stop with a narrow diameter. | 16' | An imitative string stop of 16' pitch. It helps to establish the firm grounded tone (Gravität) demanded by J.S. Bach in the low part of the sound. |
| Gross Untersatz 16' | GU16 | Flue | Gedact - Covered wooden flue stop. | 16' | A wide-scale Gedact. This 16' version offers a very soft bass used to fill the lower part of the sound in order to achieve more depth. |
| Gross Quintaden 16' | GQ16 | Flue | Chimney - Closed-open end flue stop with an open chimney. | 16' | A 16' closed flue pipe that offers a peculiar gritty bass sound with a strong 3rd harmonic (twelfth = octave + fifth) and a pronounced chiff. |
| Prinzipal 8' | Pz8 | Flue | Principal - Flue stop with a medium diameter. | 8' | The quintessential German Baroque organ stop. This version, inspired by German Builder G. Silbermann's work (circa 1730), speaks quickly and has a prounounced second harmonic. Its bright tone, described at the time as silberklang (silvery sound), make it the ideal foundation stop for many registrations. |
| Octav 8' | Oc8 | Flue | Principal - Wooden flue stop of medium section. | 8' | An early principal from German Builder A. Schnitger (circa 1680). Its clear, transparent tone and precise attack make it the ideal foundation stop for a principal chorus built-up. |
| Viol Gamba 8' | VG8 | Flue | String - Flue stop with a narrow diameter. | 8' | An imitative string stop voiced to resemble the eponyme bowed-string instrument. Its brillant and incisive tone suits well solo voices. |
| Unda Maris 8' | UM8 | Flue | Principal - Wooden flue stop of medium section. | 8' | A flat-detuned soft celeste stop of hybrid scale between flute and principal. Used with a 8' (Prinzipal or Flöte) it produces an undulating and floating effect with relatively slow beats. |
| Flöte 8' | F8 | Flue | Flute - Flue stop with a wide diameter. | 8' | A stop intended to represent the orchestral flute player. It is a good blender, in particular with strong reeds, but is also used as a soft solo voice. |
| Doppel Flute 8' | DF8 | Flue | Double Mouth - Flue stop with a wide diameter and two mouths. | 8' | An unconventional two-mouthed flue pipe of wide scale. Its name can indistinctly denote opened or closed pipes. This opened version, designed by German organ builder T. Tröst, has a bright and powerful liquid tone. It is particularly effective in combination with soft-tone reed stops. |
| Gedact 8' | Gd8 | Flue | Gedact - Covered wooden flue stop. | 8' | Due to a leather-covered stopper that plug its top, the Gedact 8' offers a soft smothered sound with strong odd harmonics. Its pronounced chiff and fast attack are a signature of many German builders. |
| Nachthorn 8' | Nh8 | Flue | Gedact - Covered wooden flue stop. | 8' | A very large scale stopped flute that produces a round and delicate combination of flute and horn tones, making it quite singular. Its low mouth is responsible for the pronounced chiffs. |
| Celinder Quinta 5'1/3 | CQ 5 1/3 | Flue | Principal - Flue stop with a medium diameter. | 5'1/3 | A principal-scaled Mutation that sounds at the fifth of a 8' pipe. Originally intended to support the 16' harmonic series, its use with 8' and 4' pipes confers an unusual tonal color. |
| Prinzipal 4' | Pz4 | Flue | Principal - Wooden flue stop of medium section. | 4' | The quintessential German Baroque organ stop. This 4' version is voiced a bit more sharply that its 8' counterpart. Its pronounced 2nd harmonic is characteristic of German builder G. Silbermann's work. |
| Flöte 4' | Fl4 | Flue | Principal - Wooden flue stop of large section. | 4' | Its soft sound with a strong fundamental and lighter upper harmonics is inspired from flute-like woodwind instruments. It is a good blender, in particular with strong reeds, but is also used as a soft solo voice. |
| Celinder Quinta 2'2/3 | CQ 2 2/3 | Flue | Principal - Flue stop with a medium diameter. | 2'2/3 | Mutation of a Prinzipal 8': sounds at a twelfth (octave + fifth). It supports the 8' harmonic series. |
| Nassad Quinta 2'2/3 | NQ 2 2/3 | Flue | Gedact - Covered wooden flue stop. | 2'2/3 | Mutation of a Gedact 8': sounds at a twelfth (octave + fifth). It supports the 8' harmonic series. It is a very versatile stop of great use for building solo voices: try it with a robust 4' Flute or a Zimbel, for example! |
| Super Octav 2' | Oc2 | Flue | Principal - Flue stop with a medium diameter. | 2' | A double octave version of the Prinzipal 8'. |
| Waldflöte 2' | WF2 | Flue | Principal - Wooden flue stop of large section. | 2' | A wide wooden flute that offers a sweet and mellow sound, even in the high octaves. Try it with a 4' Flute and a 1'1/3 mutation in the Récit! |
| Tertia 1'3/5 | T 1 3/5 | Flue | Principal - Wooden flue stop of medium section. | 1'3/5 | A principal-like third-sounding Mutation that supports the fifth harmonic (double octave + major third) of a 8' pipe. To be pulled with caution, especially in minor mode pieces!... |
| Sifflöte 1'1/3 | SF1 | Flue | Principal - Wooden flue stop of medium section. | 1'1/3 | A principal-like fifth-sounding Mutation that supports the sixth harmonic (double octave + fifth) of a 8' pipe. In a notebook from 1741, G. Silbermann proposed the hole combination Gedact 8' + Flöte 4'+ 1 1/3' Sifflöte. The omission of a 2' pipe caused the Sifflöte to be heard with great distinctiveness. |
8.3.2. German Baroque mixture stops
| Stop name | Short name | Type | Subtype | Height | Comment |
|---|---|---|---|---|---|
| Sesquialtera 2f. | Ses | Flue | Mixture - Several flue ranks. | 2f. | A major-third Mixture of two unbroken diapason ranks, speaking the 12th and 17th (i.e. octave + fifth and double-octave + major third). Intended to support the 8' harmonic series. |
| Zimbel 3 f. | Zi3 | Flue | Mixture - Several flue ranks with breaks (i.e. change in the pitch). | 3 f. | A Mixture made of three flue ranks with discrete breaks, combining octaves and fifths. Intended to be used with 8' and 4' pipes for high chorus. According to a notebook of G. Silbermann, a Zimbel should be placed in the upper manual. |
| Mixtura 4f. | Mx4f | Flue | Mixture - Several flue ranks with breaks (i.e. change in the pitch). | 4f. | A mixture with 4 sounding pipes per note, combining octaves and fifths. This version has smooth breaks. According to J.F. Agricola, mixtures "cannot be used alone, but only for reinforcement of principals and octaves". |
| Mixtura 8f. | Mx8f | Flue | Mixture - Several flue ranks with breaks (i.e. change in the pitch). | 8f. | A huge major-third Mixture with 6 to 8 sounding pipes per note, combining octaves, major thirds an fifths. This version has very pronounced breaks. J.S. Bach was supposedly very found of major-third sounding mixture due to their very peculiar color, even in minor mode pieces ... |
8.3.3. German Baroque reed stops
| Stop name | Short name | Type | Subtype | Height | Comment |
|---|---|---|---|---|---|
| Posaunen Bass 32' | PB32 | Reed | Wooden reed stop with square conical resonator. | 32' | A smooth but powerful trombone, usually made of wood. This 32' version offers a very deep bass and a small rattle. |
| Posaunen Bass 16' | Po16 | Reed | Wooden reed stop with square conical resonator. | 16' | A smooth but powerful trombone, usually made of wood. |
| Fagott 16' | Fg16 | Reed | Reed stop with a half-closed conical resonator. | 16' | A non-imitative soft reed of subdued tone, it is often found in the Schwellwerk (i.e. Récit manual) due to its slightly nasal and hollow character. It combines well with solo flutes stops. |
| Trommet 8' | Tr8 | Reed | Reed stop with a conical resonator. | 8' | A reed with brilliant and powerful sound, mainly used for solo voices. Some German builders call it Cläron. |
| Krumhorn 8' | K8 | Reed | Reed stop with a conical resonator. | 8' | This reed, one of the oldest organ stops, has varied in construction and timbre over the centuries. With its clear but still mellow timbre, this version is quite versatile and could easily be used in many repertoires. |
| Barpfeife 8' | BP8 | Reed | Reed stop with a three joined truncated cones resonator. | 8' | A reed of the Regal class with an intense tone, originally intended to imitate a growling bear. It is one of the oldest organ stop. Adjust its brightness to your taste, and try it with a 8' Gedact or 8' Octav as a solo voice! |
| Vox Humana 8' | VoxH | Reed | Reed stop with a very short and half-closed cylindrical resonator. | 8' | A reed with hollow timbre. It is supposedly imitative of the human voice, although according to J.S. Bach's student J.F. Agricola, "most of them have the misfortune of sounding exactly the way a human being must not sing if he wants to sing well." It is often played with a fast tremulant to emulate the human vibrato. |
| Schalmei 4' | Sc4 | Reed | Reed stop with a very short resonator. | 4' | A reed of the Regal class that yields a smothered and plaintive tone, almost acidic. This stop tone and resonators shape have varied considerably through time and organ builders ... It is well-suited for countermelodies played in the Récit, but is also often found in the Pedal division supporting the 2' Zinke. |
| Zinke 2' | Z2 | Reed | Reed stop with a large and very short conical resonator. | 2' | A very soft reed, originally intended to imitate the eponyme Renaissance instrument. Its peculiar resonator confers an unusual flue character. Most often found in pedal divisions, but can also be used as a solo stop for medieval Cantus Firmus melodies. |
9. Special acknowledgements
9.1. Instrument providers
We are grateful to Toulouse les Orgues and Bernard Thourel for their valuable contributions.
9.2. Company
MODARTT is a company that develops and provides software, hardware and consulting services for artistic and technological applications.
10. Intellectual property
- Organteq is a trademark of MODARTT S.A.S., 9, avenue de l’Europe, 31520 Ramonville Saint Agne, France.
- Cubase, ASIO, and VST are trademark of Steinberg Media Technologies GmbH
- The Audio Units logo is a trademark of Apple Computer, Inc.
- FFTPACK v4. Copyright (c) 2004 the University Corporation for Atmospheric Research ("UCAR"). All rights reserved. Developed by NCAR's Computational and Information Systems Laboratory, UCAR, www.cisl.ucar.edu.
- Redistribution and use of the Software in source and binary forms, with or without modification, is permitted provided that the following conditions are met:
- Neither the names of NCAR's Computational and Information Systems Laboratory, the University Corporation for Atmospheric Research, nor the names of its sponsors or contributors may be used to endorse or promote products derived from this Software without specific prior written permission.
- Redistributions of source code must retain the above copyright notices, this list of conditions, and the disclaimer below.
- Redistributions in binary form must reproduce the above copyright notice, this list of conditions, and the disclaimer below in the documentation and/or other materials provided with the distribution.
- THIS SOFTWARE IS PROVIDED "AS IS", WITHOUT WARRANTY OF ANY KIND, EXPRESS OR IMPLIED, INCLUDING, BUT NOT LIMITED TO THE WARRANTIES OF MERCHANTABILITY, FITNESS FOR A PARTICULAR PURPOSE AND NONINFRINGEMENT. IN NO EVENT SHALL THE CONTRIBUTORS OR COPYRIGHT HOLDERS BE LIABLE FOR ANY CLAIM, INDIRECT, INCIDENTAL, SPECIAL, EXEMPLARY, OR CONSEQUENTIAL DAMAGES OR OTHER LIABILITY, WHETHER IN AN ACTION OF CONTRACT, TORT OR OTHERWISE, ARISING FROM, OUT OF OR IN CONNECTION WITH THE SOFTWARE OR THE USE OR OTHER DEALINGS WITH THE SOFTWARE.
- WEBP. Copyright (c) 2010, Google Inc. All rights reserved.
- Redistribution and use in source and binary forms, with or without modification, are permitted provided that the following conditions are met:
- Redistributions of source code must retain the above copyright notice, this list of conditions and the following disclaimer.
- Redistributions in binary form must reproduce the above copyright notice, this list of conditions and the following disclaimer in the documentation and/or other materials provided with the distribution.
- Neither the name of Google nor the names of its contributors may be used to endorse or promote products derived from this software without specific prior written permission.
- THIS SOFTWARE IS PROVIDED BY THE COPYRIGHT HOLDERS AND CONTRIBUTORS "AS IS" AND ANY EXPRESS OR IMPLIED WARRANTIES, INCLUDING, BUT NOT LIMITED TO, THE IMPLIED WARRANTIES OF MERCHANTABILITY AND FITNESS FOR A PARTICULAR PURPOSE ARE DISCLAIMED. IN NO EVENT SHALL THE COPYRIGHT HOLDER OR CONTRIBUTORS BE LIABLE FOR ANY DIRECT, INDIRECT, INCIDENTAL, SPECIAL, EXEMPLARY, OR CONSEQUENTIAL DAMAGES (INCLUDING, BUT NOT LIMITED TO, PROCUREMENT OF SUBSTITUTE GOODS OR SERVICES; LOSS OF USE, DATA, OR PROFITS; OR BUSINESS INTERRUPTION) HOWEVER CAUSED AND ON ANY THEORY OF LIABILITY, WHETHER IN CONTRACT, STRICT LIABILITY, OR TORT (INCLUDING NEGLIGENCE OR OTHERWISE) ARISING IN ANY WAY OUT OF THE USE OF THIS SOFTWARE, EVEN IF ADVISED OF THE POSSIBILITY OF SUCH DAMAGE.
- LIBJPEG. This software is based in part on the work of the Independent JPEG Group.
- LAME 32bits version 3.99.5
- Copyright (c) 1999-2011 by The LAME Project
- Copyright (c) 1999, 2000, 2001 by Mark Taylor
- Copyright (c) 1998 by Michael Cheng
- Copyright (c) 1995, 1996, 1997 by Michael Hipp: mpglib
All products names and any trademarks mentioned are used for identification purposes only and are copyrighted by their respective holders.